


The original paint that is commonly called “Organisol” is no longer available. The paint code in the system at a PPG dealer will be listed as DDL 9355. Even if your dealer can still mix the lacquer formula he will not have the original texture additive. He will be able to add texture but the original additive’s particles were larger.
You can also buy DCC 9355. It is a urethane base paint and does not have any texture additive. It also has more sheen than the lacquer paint. Unless you are trying to duplicate the exact original appearance you can use the urethane. The stripes or hood will be smoother and much easier to maintain.
There are some specific differences in how you apply these two very different types of paint that are used to produce similar results. Here are some suggestions based on several years of experience using both paints on actual cars.


Top left: This stripe area has been scuffed and masked off then painted with the urethane Organisol. Top right: The stripe location for a 1969 Road Runner or GTX. Bottom left: Unmask the stripe area carefully. Pull the tape towards the painted area to insure a clean line. Bottom right: A thing of beauty and notice the level of sheen created by using the guidelines for shooting the urethane Organisol.
Two Different Types of Organisol
Your PPG dealer may not be able to mix this formula. It is available from Frank Badalson as well as other aftermarket suppliers. It is difficult to make this paint come out well and not be too rough. Too rough means you cannot run a rag over the surface without it dragging because of the texture.
The first step is to lay out the stripes using 3M fine line tape. This will ensure a crisp line without any bleed over. The tape goes on the outside of the stripe area that will be painted. Next you take a red scuff pad and carefully sand the paint until the shine is gone. Then you must mask off the entire car so that no overspray will get on the surfaces that do not get the Organisol treatment. It is not necessary to tape off the gap between the hood and the fender. The factory didn’t and neither should you. Whatever over spray happens happens.
After masking, sanding and wiping the area to be painted wiped down with a tack cloth. Since DDL9355 is lacquer and can react with your fresh paint it is a good idea to shoot a coat of black epoxy primer DP90 as your first coat. You must lay the paint down wet or the texture will stand up instead of lay down and you will have an extremely rough finish that attracts everything.

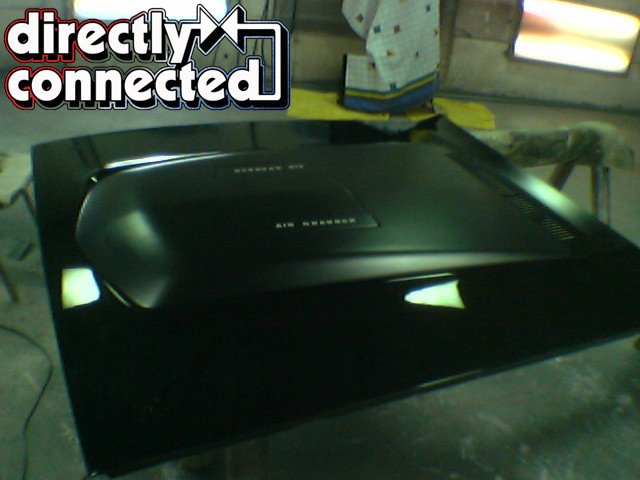
Above left: Here is an example of a 1970 Plymouth hood stripe. This stripe was shot with the Lacquer Organisol. Nothing is more menacing than the 1970 vacuum-operated Air Grabber hood in its upright and fully exposed position. Above right: Up close on the lacquer Organisol. Notice the sheen.
Paint surfaces horizontal if possible. Use the slowest thinner and add some retarder as well if it is above 80 degrees.
You can put two light but wet cover coats of semi gloss black lacquer over the DP 90 epoxy primer. Allow to dry at least 24 hours or more before applying Organisol, and use a gun with a big tip 1.6mm or larger.
Cross coat the large area surfaces in three directions – this eliminates streaking of texture. Shoot diagonally first, in short length/long length with large overlapping passes. Be sure to shoot with lower than normal pressure at the gun like 45-50 psi instead of 55-60 psi. Make it go on wet!
Test spray before committing to car. Practice a little. Use slow thinner! And lay it on wet! Start with thinner at 125-percent, and up to 150-percent last two coats.

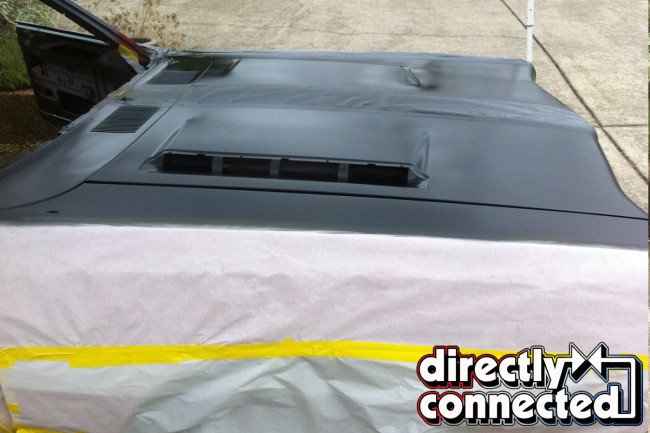
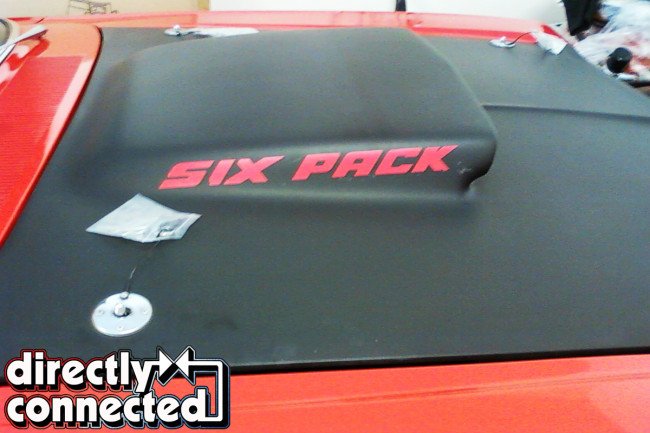
Above left: An example of a 1971 GTX Air Grabber hood painted with the urethane Organosol. Notice the sheen. Above right: Way cool hood with the military style lettering. The contrast between the gloss body color and the flat Organisol hood treatment is awesome.
After getting full coverage of texture typically four coats thin each progressive coat to 150-percent. Use your judgment; think about 6-to-8 coats. Allow each coat to dry for at least 30 min.
The texture must cover the surface completely; there should be no gaps in the texture. The purpose of laying it on cross coating and wet is to get the texture to lay down flat.
Across the tops of the fender and across the front header panel you can add 1-2 extra coats of Organisol to resist wear of the paint from stones, fender covers etc.
The stripe starts at the corner of the A-post, even with the edge of the cowl. It runs perfectly straight the entire length of the fender, and curls over the edge. The most important part is getting the center gap correct. It measures 11 ½-inches, spaced evenly from the center, or 5 ½-inches on each side of the centerline of the hood. The air scoops are also painted to match. If car is equipped with the Air Grabber option, the grille mesh material within the scoops is to he painted Rallye Red.

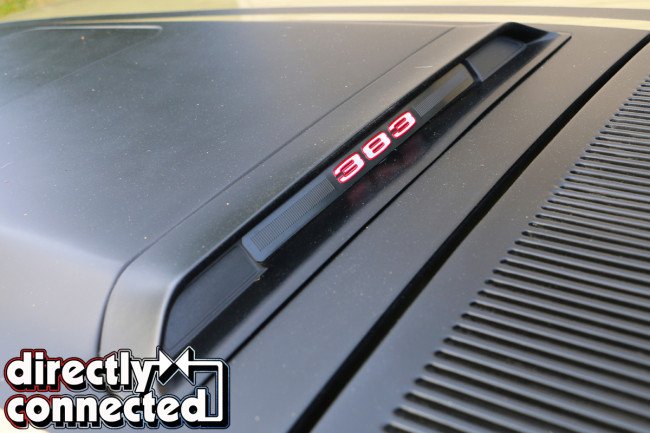
Above left: For reference and to prove that the texture on an original hood was minimal, here is an untouched 5000 mile close up of an A12 hood. Above right: There is a BIG controversy over which way the “Six Pack“ faced on these original cars. This is an untouched original so there’s no arguing over this one’s location.
DCC9355 urethane
Using a gun with a tip of 1.6mm or larger, shoot four wet coats of Organisol thinned with the slowest reducer you can find. Allow each coat to dry for about 30 minutes. Check for good coverage and if needed apply additional coats. Always use alternate patterns of spray, first lengthwise, next crossways, so the coats will come out even without any tiger striping.
 DCC9355 urethane
If using the single stage urethane, use the following formula to mix the paint:
– 4 parts DCC9355
– 3 Parts DT reducer
– 1 part DCX61 hardener
– 1 part DX685 flattening additive
– ¼ oz (per pint of mixed paint) of DX1999 texture additive
Shoot one good coat of DP90 epoxy primer. Then shoot two medium wet coats of the urethane. By using this formula you can clean the stripe with a mild cleaner and a rag without any problems. On both paints you should never get wax or polish on these stripes. If you do it will not come off.
There are many stripes on these cars that are not painted on but are decals. These are always applied after paint and are never cleared over. Follow the supplier’s instructions for applying these stripes. Always wait at least two weeks after painting before applying these stripes. Since you need to sand and buff before painting stripes you will have some time for the car to fully cure.
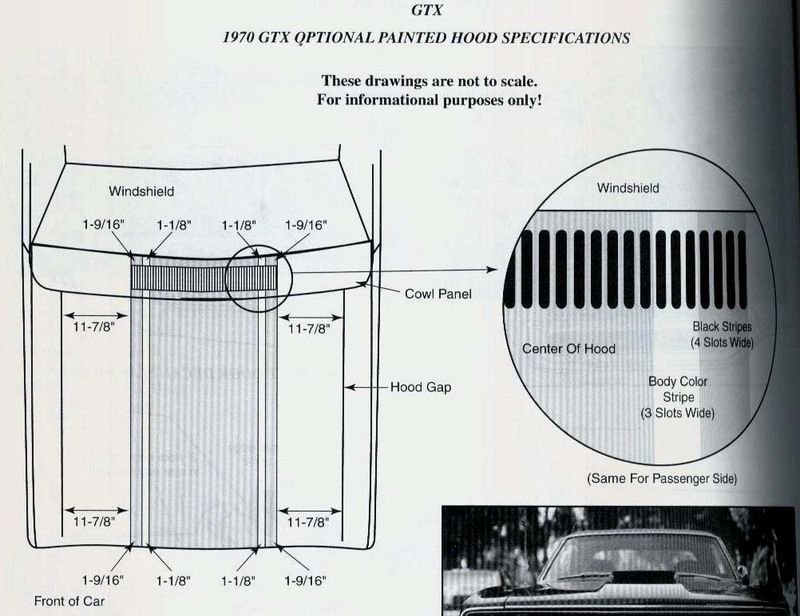
A really nice detailed drawing of where the 1970 Plymouth hood stripes were laid out.
Truth or Fiction
Fiction: These stripes were shot first masked off and then the body color was applied.
Truth: Never! The stripes were shot after the body color was applied. Original cars show the soft lines of overspray in between the hood and fenders.
Fiction: These stripes were glossy and sometimes have clear coat sprayed over them.
Truth: Never! The stripes were always flat with some texture.
Fiction: The hood to fender gaps were masked off so you have a clean tape line keeping all over spray from inside the engine area.
Truth: The factory did not take the time to mask off inside the hood to fender and cowl area. What ever happened when the stripe was painted happened. It was left that way.
Fiction: These stripes can be polished and car wax or polish will not affect their appearance.
Truth: You cannot use polish or wax on these stripes. Stay completely away from them with these products. They will ruin the stripe. Clean with Windex and to help with a nice final appearance use a rag with Lemon Pledge on it. Wipe uniformly so you will not have any streaks.

This is an up close shot of an original 1970 car showing where the stripe over spray went between the hood and the cowl. NO WAY was this are masked off and NO WAY was the stripe painted before the body color. ‘Nuff said!


 Mopar Connection Magazine – The ONLY Daily Mopar Magazine © 2022. All Rights Reserved. Mopar Connection Magazine is the ONLY daily Mopar Magazine bringing you the latest Mopar news, technology, breaking news, and Mopar related events and articles. Find out the latest information about Mopar, Mopar products and services, stay up to date on Mopar enthusiast news, dealership information and the latest Mopar social media buzz! Sign up for the Mopar Connection Magazine newsletter for the latest information about new products, services and industry chatter. Mopar Connection Magazine is the best and only source you need to be a Mopar industry insider!
 by
by