


By far, most 1966-through-1970 Plymouth and Dodge B-bodies left the factory with manual drum brakes. That in itself could be one of the main factors that contributed to the rarity of these cars. They were really fast but many times if you had to shut-er-down in a hurry, the roadside ditch was a quick option when the drums just couldn’t stop the beast. Under hard braking drum brakes would heat up rather quickly and would experience major brake fade. If you didn’t get brake fade you could lock them up. If you were in gravel or on a wet – or even worse – or icy road, locked up brakes quickly caused many hard impacts. However, if they are in good working order, and you leave a little more room than you leave with your modern, anti-lock, power disc brakes, they will perform as needed.
One of the first things a guy learns growing up working on cars is how to do a drum brake job. Manual drum brakes are very simple and their repair is basic and relatively inexpensive. But if your car has been sitting a very long time in an uncovered state, it is going to take more than about 30 minutes and a set of new brake shoes to get your brakes in perfect operating condition again (and show quality appearance).
You also need to examine your front and rear brakes to see if they are original in appearance and what needs to be replaced or rebuilt. As important as these parts are to you and your car’s safety, it is recommended that the entire brake system be replaced or rebuilt. That includes the master cylinder, brake lines and hoses, distribution block, wheel cylinders, bearings, brake drums, and shoes. If you plan to show the car, new brake lines are a must.
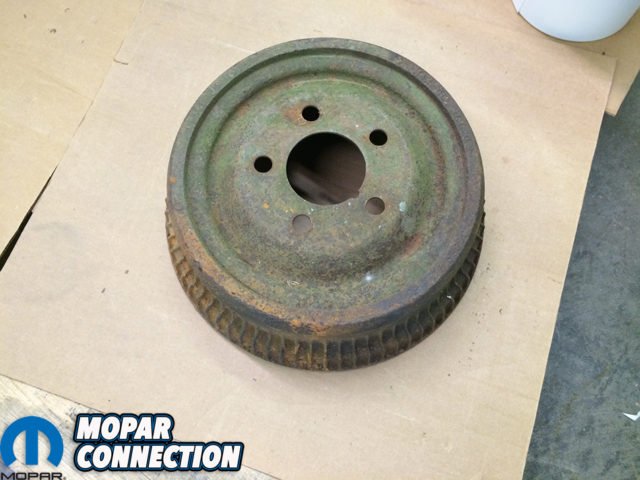
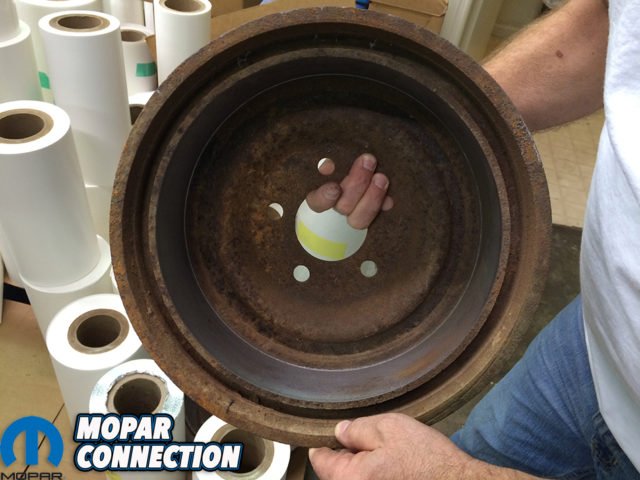
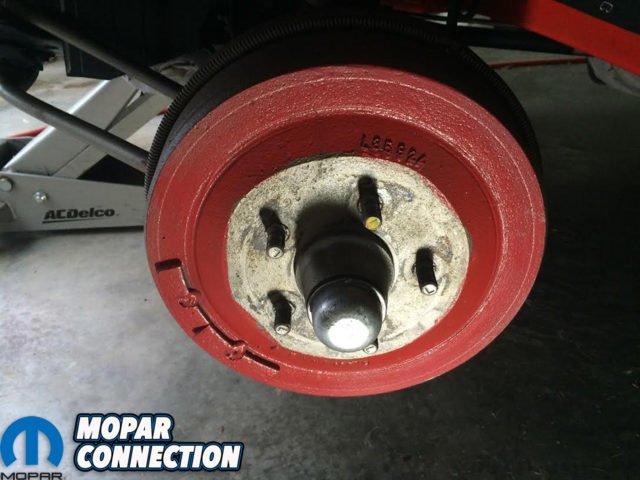
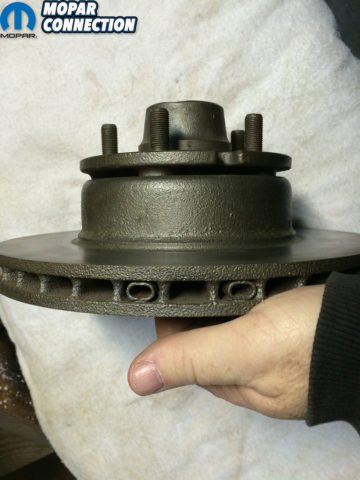
Above left: This is the heavy duty 11inch rear drum. If your drum does not have the extra reinforced fins you probably have the smaller low performance brakes. To upgrade to the 11 inch brakes requires replacement not only of the drum but the entire brake assembly including the backing plate. It is worth the effort and expense to upgrade. Above center: Be sure that your rear drums have the minimum amount of metal left so you can turn them before spending the time it takes to blast, and paint them. Do not blast the drum surface where the brake shoes contact the drum. The best order for restoring these is to mic the drum and confirm it can be turned, blast them, have them turned and then paint with a darker cast metal paint. Above right: If your car has any wheel except a solid steel wheel, it received a brushed on coating of Rallye red paint. It was applied without any care given to how much paint was used and how messy the results.
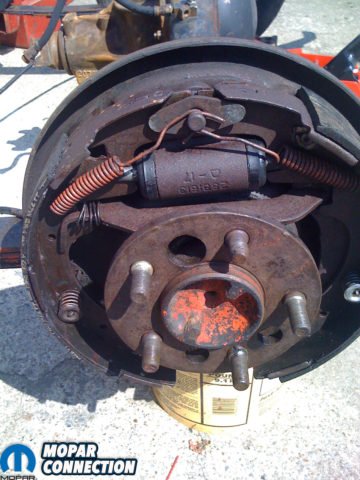

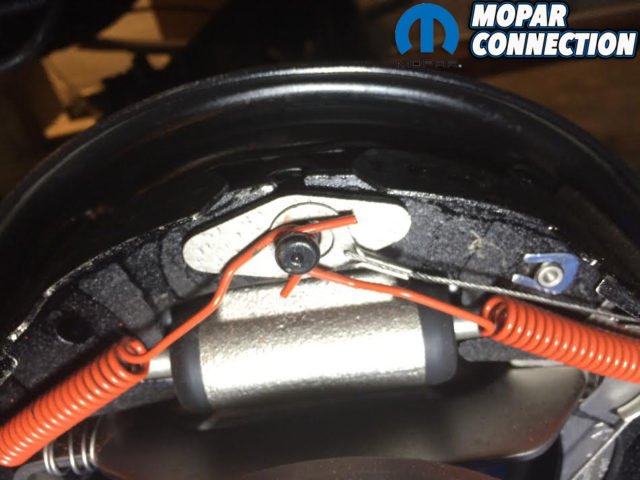
Above left: Here is what you can find when you open up the brake drum. Most of the natural metal will be rusty and there can be paint that never came originally on the car. But there will also be correct finishes like the orange upper springs. Above center: The internal components of this unit are in really good shape and can be blasted and refinished correctly. Even though there is a lot of pad left on these shoes they should be replaced with new. Do it once and do it right! Above right: Wheel cylinder, cross piece, spring, and wheel studs are all in good restorable condition.
The actual components inside the brake drum are unique in color and appearance. As you disassemble your originals they have probably been replaced. Refer to these reference pictures of how these components were finished and what colors were used from the factory. As always, different models, years, and factories used different part suppliers, so restore yours the way you find them or use a documented example of your cars specific application:
Master Cylinder, Engine Compartment Lines, And Distribution Block
The master cylinder is cast in appearance and does have part numbers and date codes. Make sure you have the correct-style master cylinder for your year and model of car. Early master cylinders can be a single reservoir and all later ones were dual reservoir. Once you have the master out of the car, the pedal actuator rod may seem like it will not come out. It will and it is just held in the cylinder with an “O” ring. One of the fastest ways to get a stubborn rod out is to put the master cylinder in a bench vise;
Simply run a steel rod through the hole in the end of the brake rod. Angle the bottom of the steel rod against the bench and take a hand sledge and hit the top of the steel rod away from the cylinder. It will pop right out. You can get a rebuild kit at most parts stores. Remove all the internal cup seals, plungers and springs, making sure to pay attention to the order and orientation of the parts as they come out. Check the bore for pitting and ridges. If the master is your original you want to save it even if you have to send it away and have it sleeved. If the bore is in good shape using a hone smooth the bore so you have a surface that will seal when you reassemble the unit.
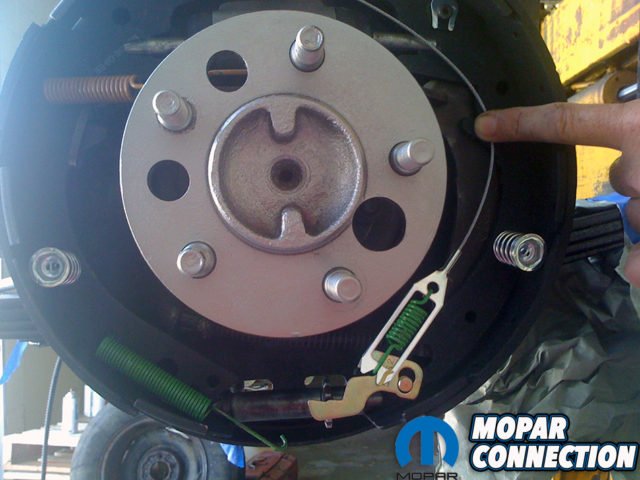
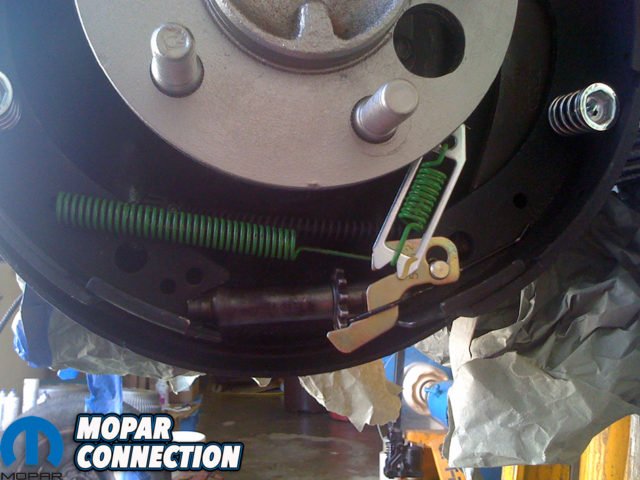

Above left: Axles were pulled where the rear end was rebuilt. They were painted with Symoure’s Stainless Steel paint. The backing plate was painted semi- gloss black. All of the components were replaced with new except the brake adjuster with the star wheel. Above center: The spring in the adjuster cable and the lower brake shoe spring is green, and the brake shoe hold down spring, rod and caps are clear zinc or cadmium plated. Notice the large tooth adjuster which is original. Above right: The adjusters are unique to each side of the car. Make sure you have the right one by testing the direction they move when the adjuster cable is engaged. Notice the adjuster has small teeth since the original one was not usable it had to be replaced with a new one.
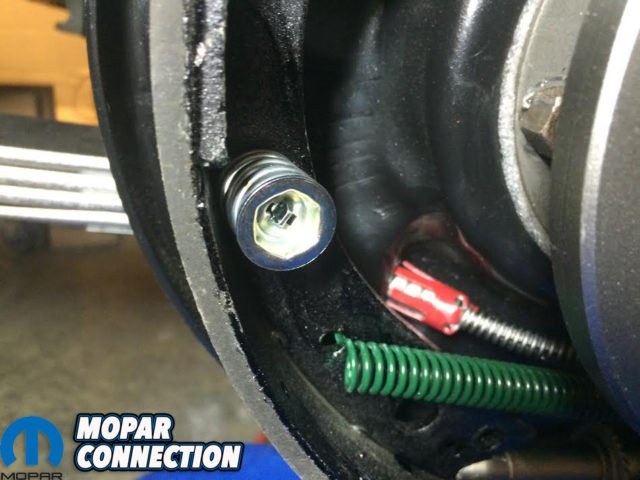
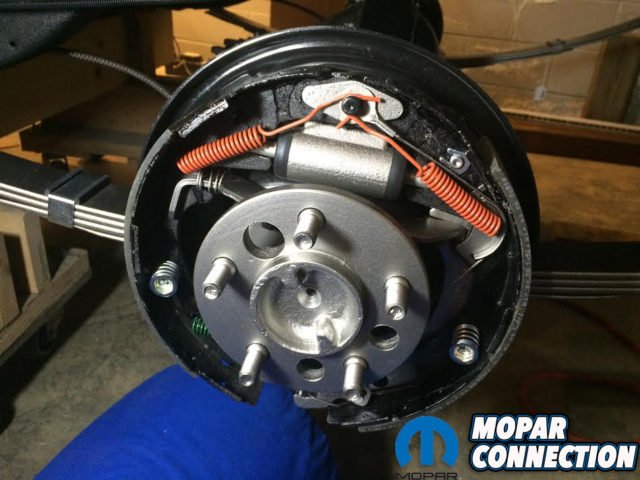
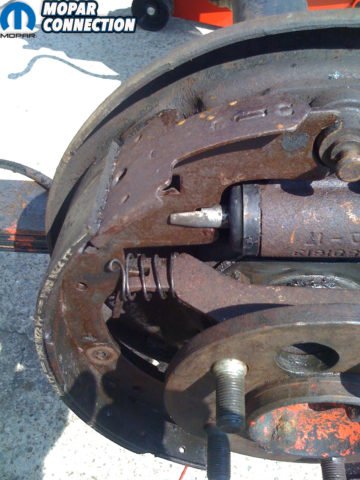
Above left: The wheel cylinder had to be replaced because the original had too many rust pits in it’s bore. Notice no original part numbers in the cylinder. Orange springs and all new hardware complete the assembly. Above center: Notice the attention to detail on this assembly. The emergency brake retainer was red on this low mile 70 road runner, so it was painted the same way it was found. When removing the cable be careful to not damage the retainer. It must have its teeth compressed so the cable can be removed from the backing plate. Above right: Completed drum brake assembly that is finished the way it came from the factory. It will now function better than new. Even though it will soon be covered by the brake drum and wheel you will have the pictures to prove you didn’t cut any corners in “Restoring” your car. Remember to “Restore” means to totally return to the way the car left the factory.
The wheel cylinders also need to be rebuilt or replaced. The process is the same with these individual units. The bleeder valve is usually stuck or rusted and should be replaced with a new one. Save your originals if you can but it is not the end of the world if you have to replace them since they are not seen. Their correct function is way more important than their appearance. They are also cast in appearance with black phosphate holds keeping them in place. A white foam gasket seal the unit to the backing plate.
The distribution block is usually usable and can be brought back to original appearance with a wire wheel since it is brass. It too is date-coded and attached with a black phosphate bolt. There are differences in this block depending on whether you have manual drums, power-assisted drums, or front disc brakes. They cannot be interchanged between brake systems.
Again all the brake lines need to be replaced. If you are going for totally correct appearance the originals are not stainless. They can flash rust so unless you are going to show in a high-level Original Equipment (OE) class, the stainless replacements look good and keep a nice appearance and last much longer. There is one drawback to using stainless: since the tube is made out of much harder metal they can have problems with sealing.
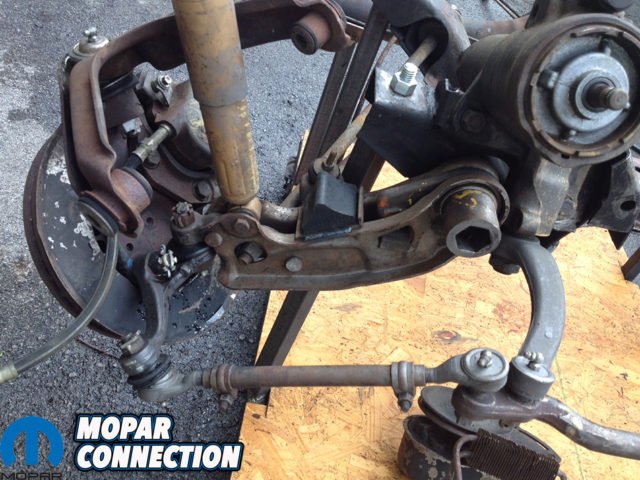

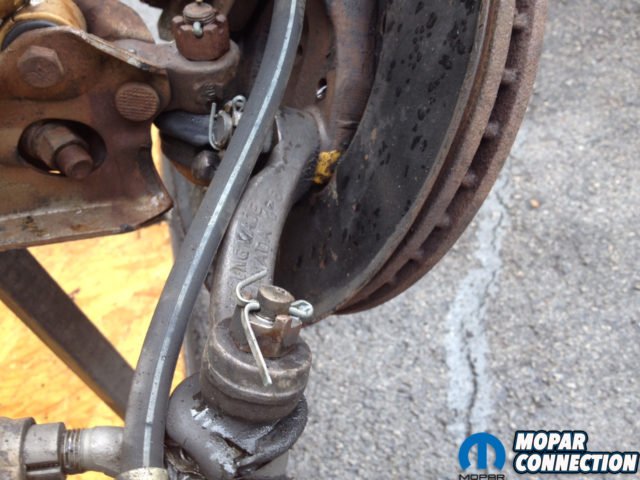
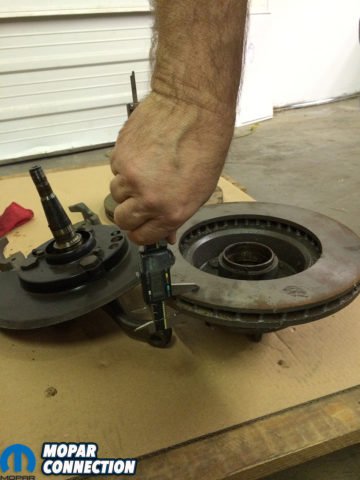
Above left: Here is an untouched original front disc brake assembly from a 1970 Plymouth. It has been steam pressure washed and care was taken to not remove the original inspection marks. Notice “orange” “blue” and “yellow” inspection marks. Don’t let the new nut and bolt that is from the stand fool you. Above center: Galvanized dust shield that has been painted black along with an original brake hose. Also notice the way the factory bent the cotter pins and the blue inspection mark. This is the left side assembly. Above right: This is the right side and the inspection mark is yellow compared to the blue one on the left side. Notice the three castle nut on the tie rod end and the cotter pin has at some time been replaced and is not original. It is way too long and not bent the way the originals were.
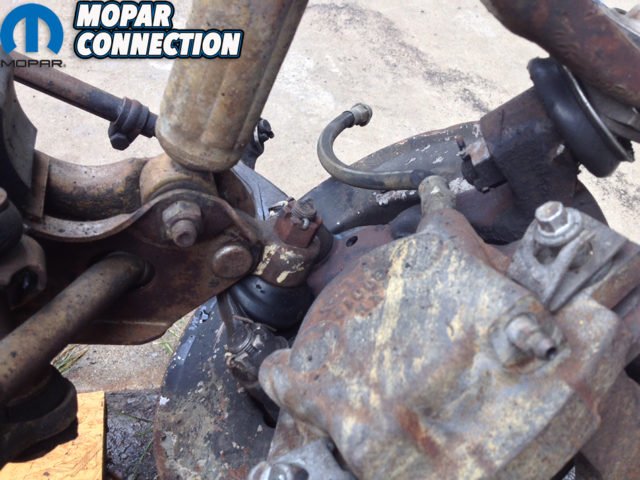
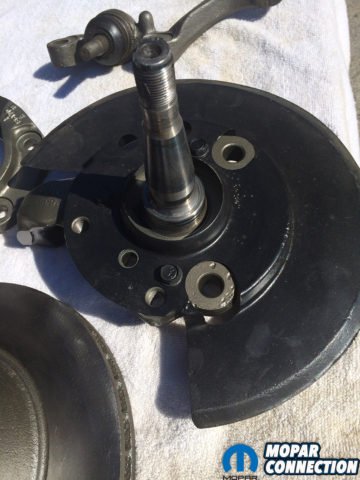
Above left: Up close shot shows additional inspection marks. It also documents the clips on the caliper bolts that are almost always missing. Also notice that the lower ball joint is held on by a six castle nut while the upper is a three castle nut. Above center: Notice the back side of the poor condition assembly that looks like it is beyond saving. It isn’t and since it has all original parts it should be saved. Above right: Someone has done some previous incorrect work on this unit. At least it is clean and complete. Obviously the bearings and seals need to be replaced. Inspect the spindle and make sure it is smooth and in usable condition.
Power Drum Brakes
Everything that needs to be done to a manual brake car’s system must also be done to a power brake car with the addition of a power booster. These boosters can be model and year specific so make sure you have the correct one for your car. The master cylinder is also different and so is the distribution block. Most power brake booster and master cylinders are painted black and completely assembled. If you have a Hemi car you must have a Hemi assembly for it to fit.
Front Disc And Rear Drum Brakes
If your car was ordered with front disc brakes it will appear on your broadcast sheet. This option can also be coded on your fender tag. A different master cylinder and distribution block will be needed. These front disc brake units in complete original condition are hard to find and expensive to rebuild. The rotors and calipers are not reproduced in correct appearance. So if you have your originals they need to be saved. Turning the rotors is a must and hopefully you have enough metal left to use your originals.
Rubber Hoses And Body Length Brake Lines, Distribution/Axle Vent Block
All rubber hoses should be replaced. These are available new from a local parts store but will not have the finish or markings of originals. They are reproduced with a close appearance to originals but New Original Stock (NOS) are the only way to replace these if you are going to be as close to original as possible. You can get a complete set of new brake lines from Fine Lines or The Right Stuff companies. They come package in a large box with a slight bend in the middle for shipping. This bend can easily be straightened for installation. They fit very well and are a must if you plan on showing your car. There is a combination distribution block and axle vent that is threaded into the rear axle. It is also brass and has a spring loaded cap that vents the axle. Most of the time these are reusable.
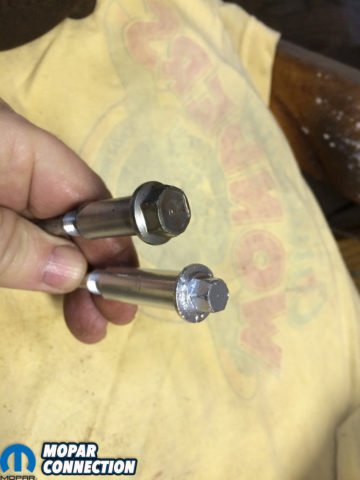
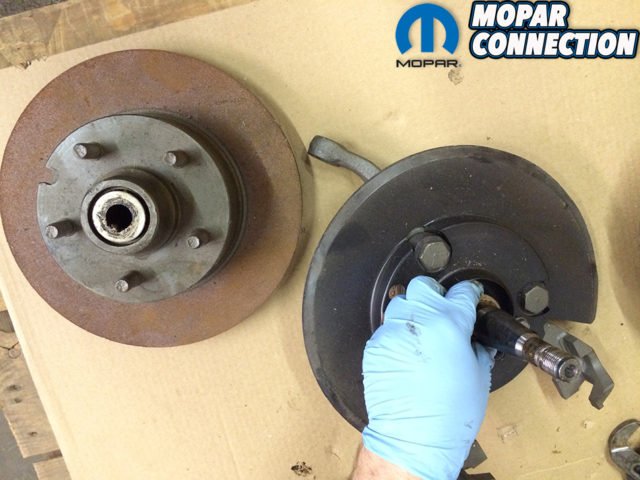
Above left: Before spending any time on the original rotor you need to measure it to make sure it has more than the minimum thickness and has enough metal left so it can be turned. Also do not overlook the condition of the wheel studs. Above center: On this pair or disc brake assemblies there is one good dust shield and one that is completely unusable. Now ones are available but are not the original finish. That is not a problem since they are painted black from the factory. Above right: Here is a side by side comparison of an original caliper bolt and a replacement caliper bolt. Notice the difference in size and design of the head of the bolt. The original has been re plated. You also can paint these with chrome paint but the finish will not last like plating will.
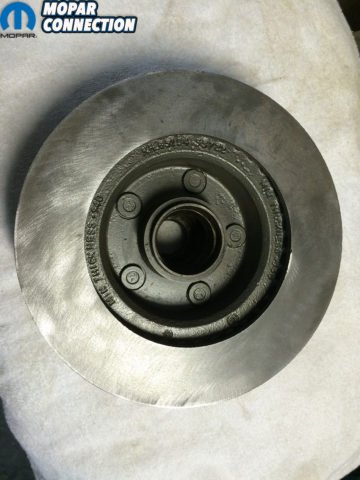
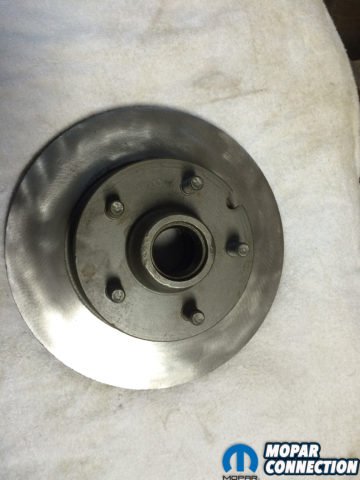
Above left: After carefully blasting the rotor without blasting the surface where the pads contact the rotor you can paint it with a dark cast color. Then take the rotor to have it turned. Then take some fine Emory cloth and sand them with a circular motion. This make a really good surface for seating the pads during the early miles of operation. Above center: Even though there is a slight chip in the surface of the center of the hub this original rotor is worth using. Replacements are not identical to the original but can be used if yours are too far gone to save. Above right: This shows all of the original details of the brake rotor. The notch, the two piece wheel stud plate, and the balancing weights. By painting this rotor before it was turned it is ready to re-assemble.
Emergency Brake Assembly And Cables
The routing of the cables can be very different depending on the year and model of your vehicle. There is a single cable that attaches to the emergency brake assembly. It will have a grommet seal where it comes out of the interior to the underside of the car. On most B-bodies this cable will go through the frame and there is a special clip that holds the cable in place and does not allow it to move forward or backward during operation.
This clip is hard to see but it is there. After going through the frame there will be a guide attached/welded to the floor pan that directs the cable to the inside of the rear frame rail. There the single cable goes into a double clip where the right and left emergency cables attach and then go back to the brake assemblies. There will be a threaded rod with a lock nut that allows you to adjust the emergency brake so it will properly engage. There are two more “U” clips that hold the right and left cable to the frame bracket.
These cables need to be functional and they are natural in appearance. The rear two brake cables slide in a heavy duty, spiral reinforced case. These can be blasted and painted with Symoure’s Stainless Steel paint for correct appearance. They are also reproduced and will have a great original appearance.
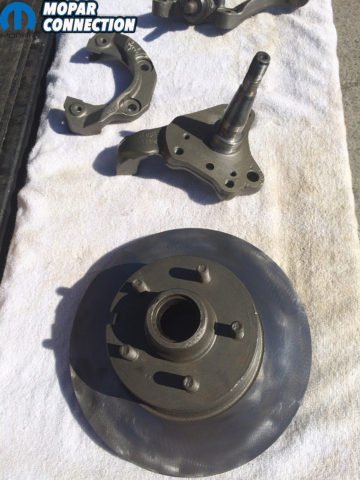
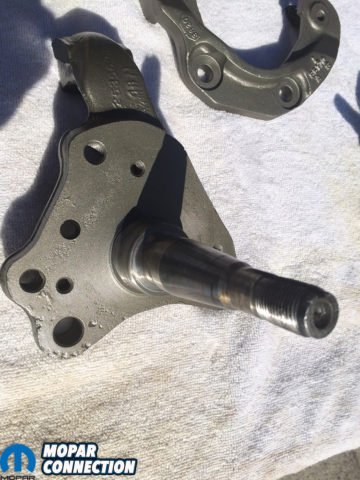
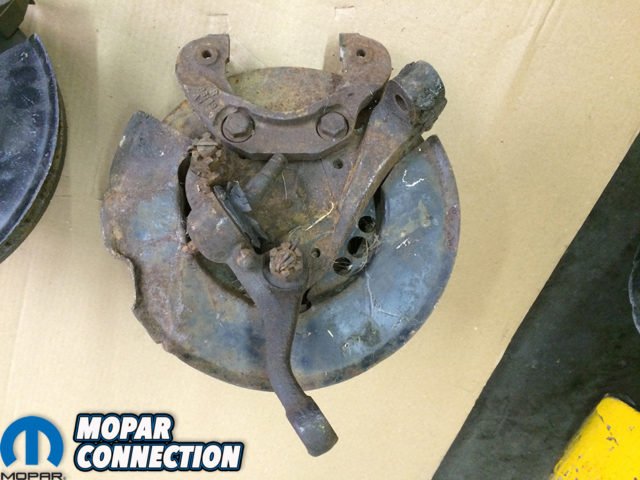
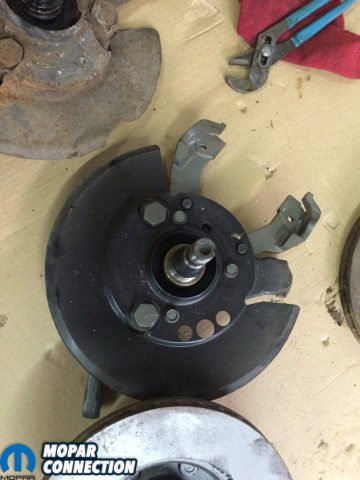
Above left: All pieces have been blasted, turned, and new lower ball joint will replace the worn out original. Moog parts are as close as you can get to original unless you find NOS ones. Above center: The original spindles were in good enough condition to save. Do not blast or paint the surface of the spindle where the bearings and rotor ride. Notice the original part numbers on the spindle and the date codes on both the spindle and the caliper mounting bracket. Above right: First step in re assembly is the dust shield. It has been painted semi- gloss black and the attaching bolts are black phosphate.

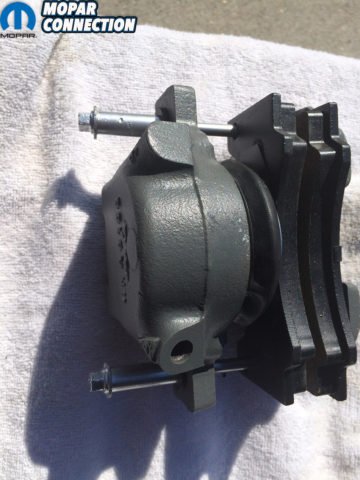
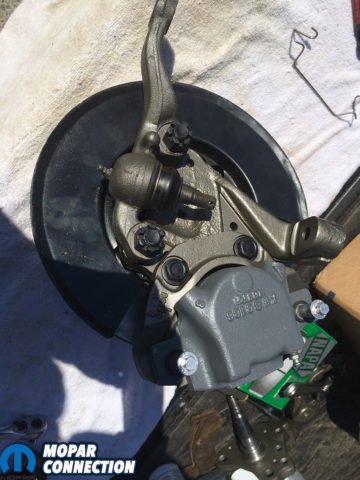
Above left: Always use new parts when possible if they are close to the appearance of the originals. Here are reproduction splash shields and even though they are not galvanized like the originals they will be painted black and will look original when mounted on the car. Above center: After having the original calipers rebuilt, the bolts re plated, cleaning and re installing the rubber bushings the caliper bolts go through, and buying new brake pads the assembly is ready to assembly. Above right: Almost completely assembled. The only thing missing are the cotter pins, caliper bolt clips. The calipers were rebuilt and the paint the vendor used is different than the paint on the other parts. The owner liked the contrast so there were not re painted. Originally they were not painted but in reality it is nearly impossible to keep the natural metal from flash rusting. So unless you are going to compete in a high level, Original Equipment class, just paint them. When you paint them be sure and fog the last coat. That cuts the shine and make the part almost impossible to tell if it is painted or not.

Above: Here is a close up of the anti-rattle spring. These are almost never still on the assembly and are not reproduced. If yours are missing be prepared to search long and hard to find them.
That’s A Lot Of Info
Refer to the detailed pictures showing all of these applications with step by step documentation on the restoration of these units. The basic function and design of the brake system are very similar over the years, but the differences in appearance and different years and models, through 1966-through-1970, can be substantial. Your Factory Service Manual is a must and it will show detailed diagrams of your original equipment.


I have 11 inch rear drum brakes on my ’67 plymouth belvedere. I go to tighten the lug nuts and the wheels will not turn. The e brake equalizer was backed off, and the shoes are adjusted in. I bought this 11 inch brake assembly as a kit. I cannot understand how this happens. When i tighten the lugs it feels as if the drum is pushed against the shoes.
From MCM Technical Editor Mike Wilkins, “The drum has to be making contact with something; the backing plate, brake shoes, axle flange, etc. You just have to slowly tighten the lugs and find the spot where they no longer turn and examine from there.”
I figured the problem out. The backing plate, then the retainer. I actually reversed that not paying attention. So that’s a big “Duh” on me.
Hi , I live in New Zealand and need a set of 11″ front drums for my 1970 dodge d100 stepside 318 v8, am bloody desperate can you put me on to a lead or supplier please, any help would be appreciated, thanks in advance..can send photos and measurements if needed, Steve
You’re going to have to hit up the forums and Facebook groups. There are plenty.
Howdy Folks, Can anyone provide me with the correct part number and purchase location for a set of 10 inch Rear Brake Drums for my 1972 Plymouth Scamp that has an 8 3/4 rear end and small bolt pattern axles? The Drums fit over the backing plates. Thanks, Dennis e-mail: mdriel@eastlink.ca
You’re gonna want to hit the For A-Bodies Only forum for that one, Dennis.
Is there a place that carries a rebuild kit for the 1969 4 piston bendix caliper used on mopars Tks Steven
Kevin: What is the proper location for the FRONT brake line on the passenger side of a 1969 Plymouth Road Runner? I have been checking on a number of sights and there seems to be examples of brake line tubing the goes over the frame rails and under the frame rails. Was there a difference between 1968 and 1969? My car was built September 30 which confirms it is a 1969 RR but i’m also aware that parts from 1968 would be used until all 1968 stock was used. I would welcome your comments.
Thank you. John
Disc or drums? What was the powertrain option? These mattered depending on the engine, transmission and brake options.
I have a 72 challenger with manual front disc brakes. Today when i took it out for a drive the brake pedal felt like it was going down farther than normal and not as stiff. Plus the passenger side front wheel is locking up when i apply the brakes fairly hard. Kinda scary coming to a screeching stop at every stoplight! What the heck is going on?
I have 67 GTX . I change to disc brakes replace new portion valve .the problem is the brakes will not pump up after several bleeding