


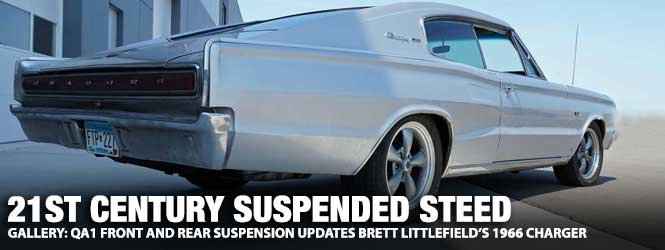
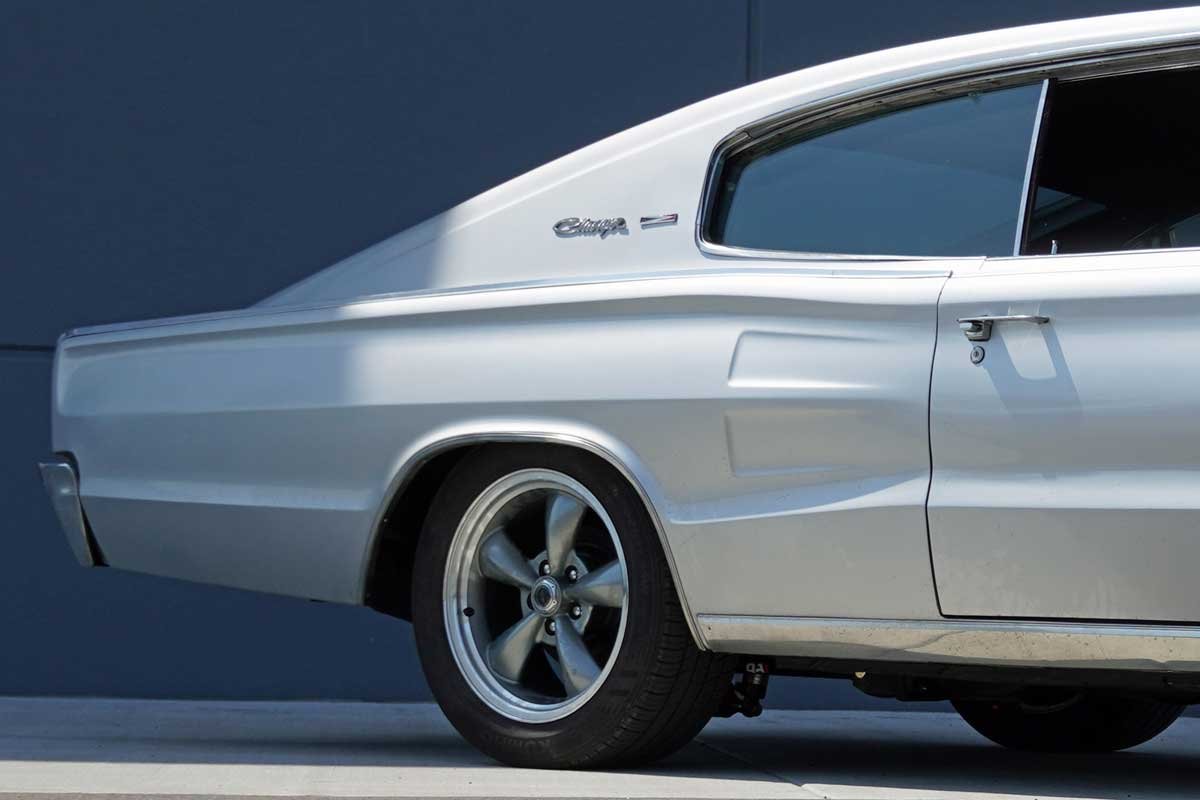
Brett Littlefield’s beautiful ’66 Charger is nearly his dream car. After owning it for about four years, he has put his tasteful touches throughout the vehicle. However, when it came to the suspension, other than freshening the factory parts, the suspension remained stock. The Charger still had torsion bars on the front and leaf springs at the rear. So, the Charger was dropped off at the QA1 headquarters for a complete makeover to update the suspension.
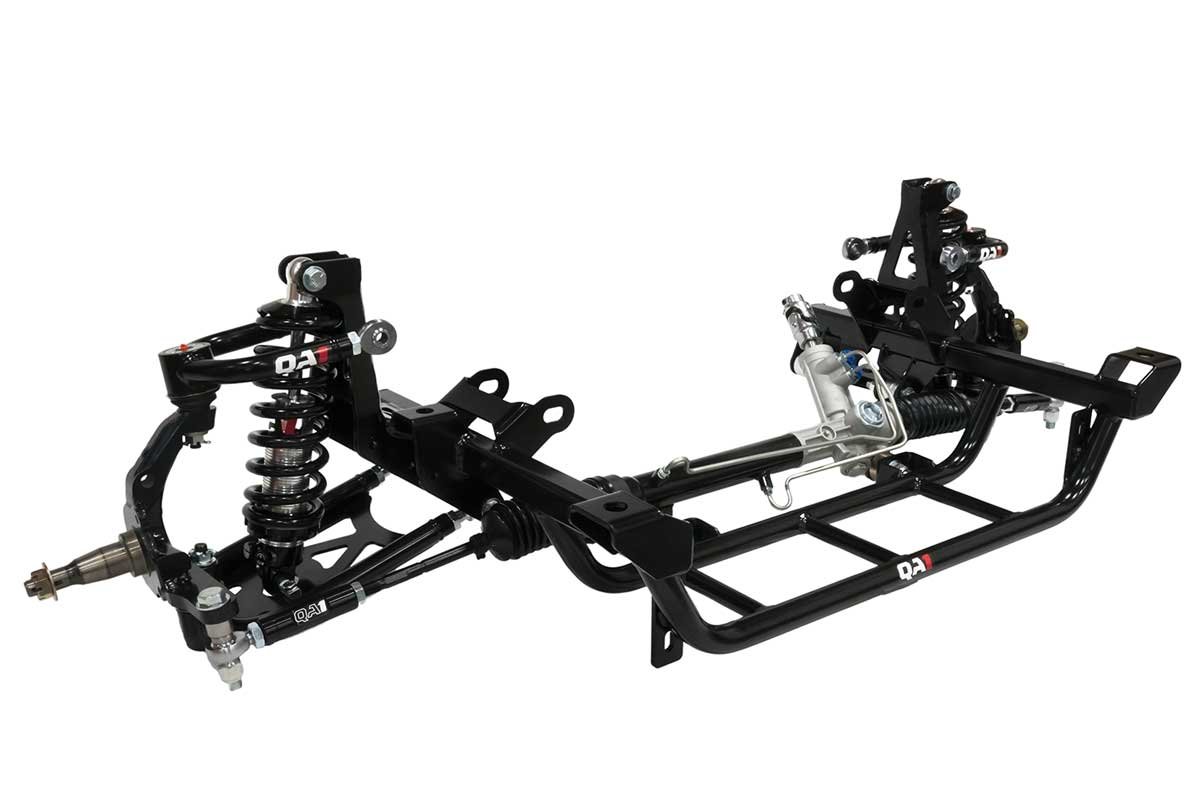
The plan was to disassemble and remove the front factory pieces and install a QA1 coil-over front suspension. QA1 has a coil-over kit for the Charger and other Mopar B-bodies. Also, there are coil-over suspension designs for A- and E-bodies and a coil-over design for Dodge Trucks.


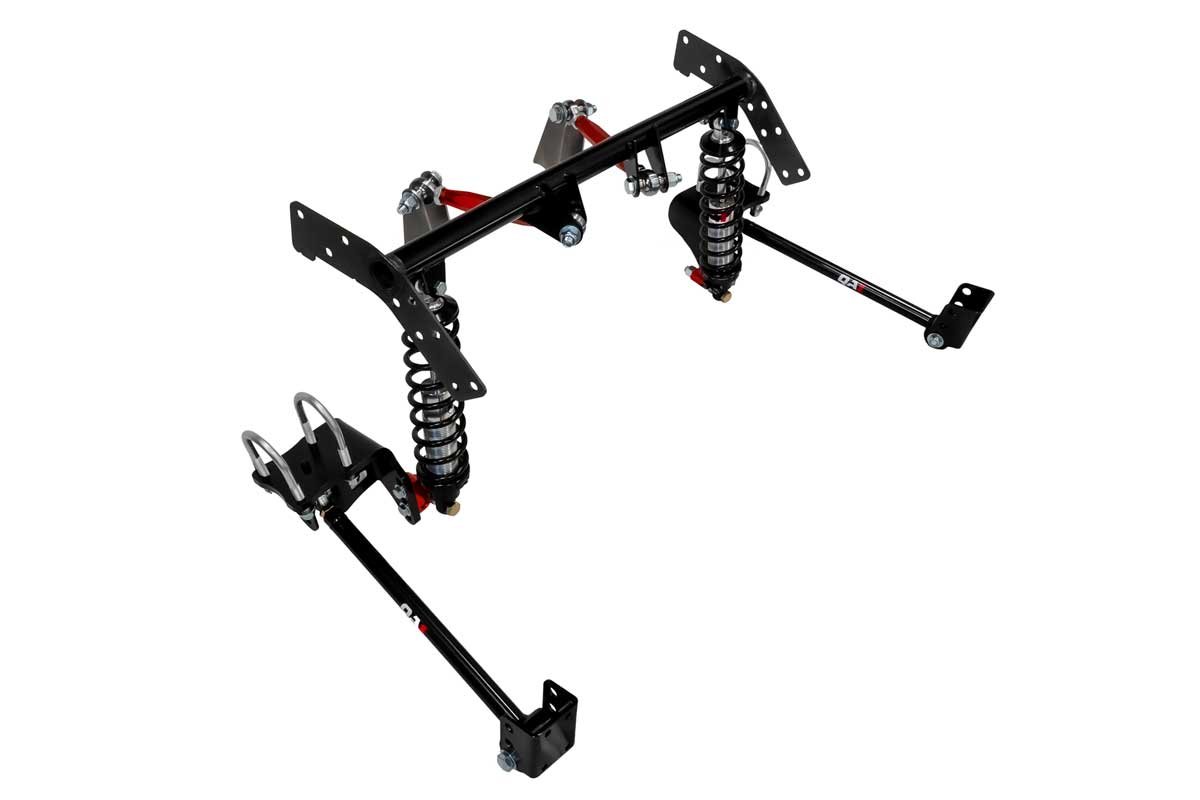
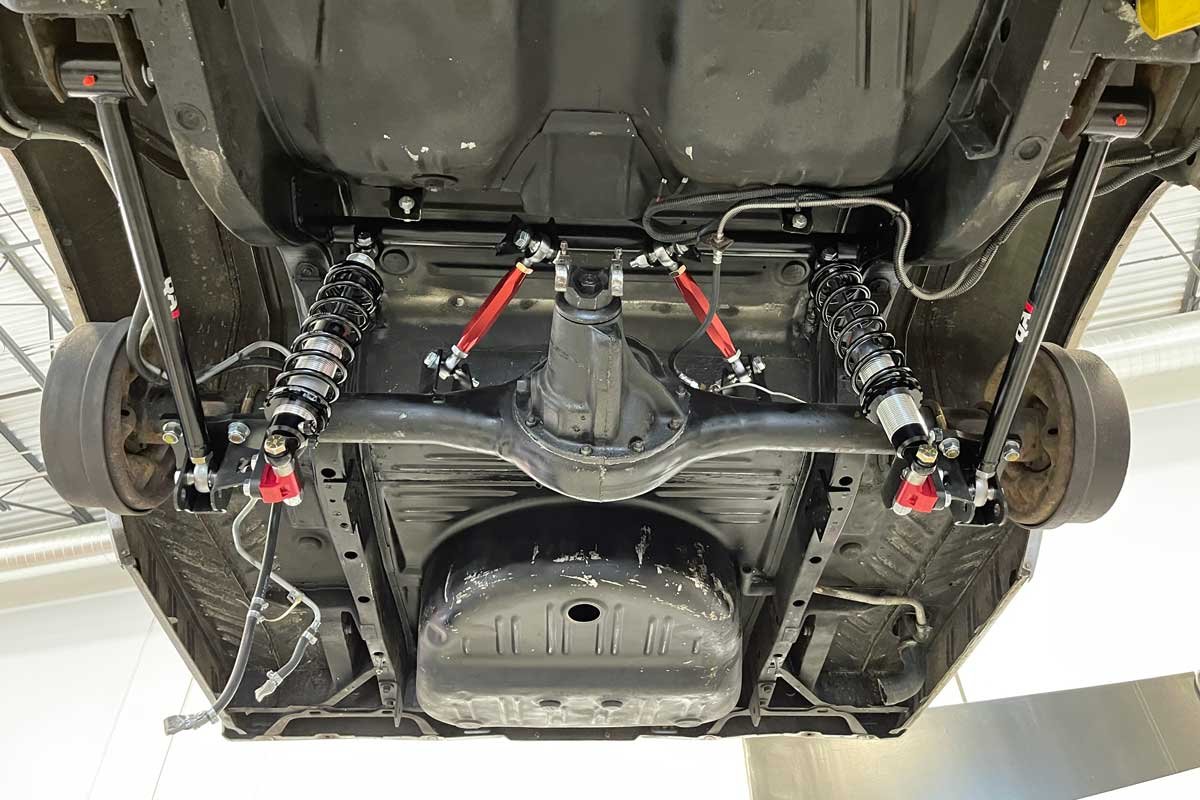
Above: The QA1 rear coil-over conversion kit will upgrade a classic Mopar A-, B- or E-body to a triangulated four-link design. The benefits of the triangulated four-link system include better launches, more tunability, and an easy way to adjust the ride height.
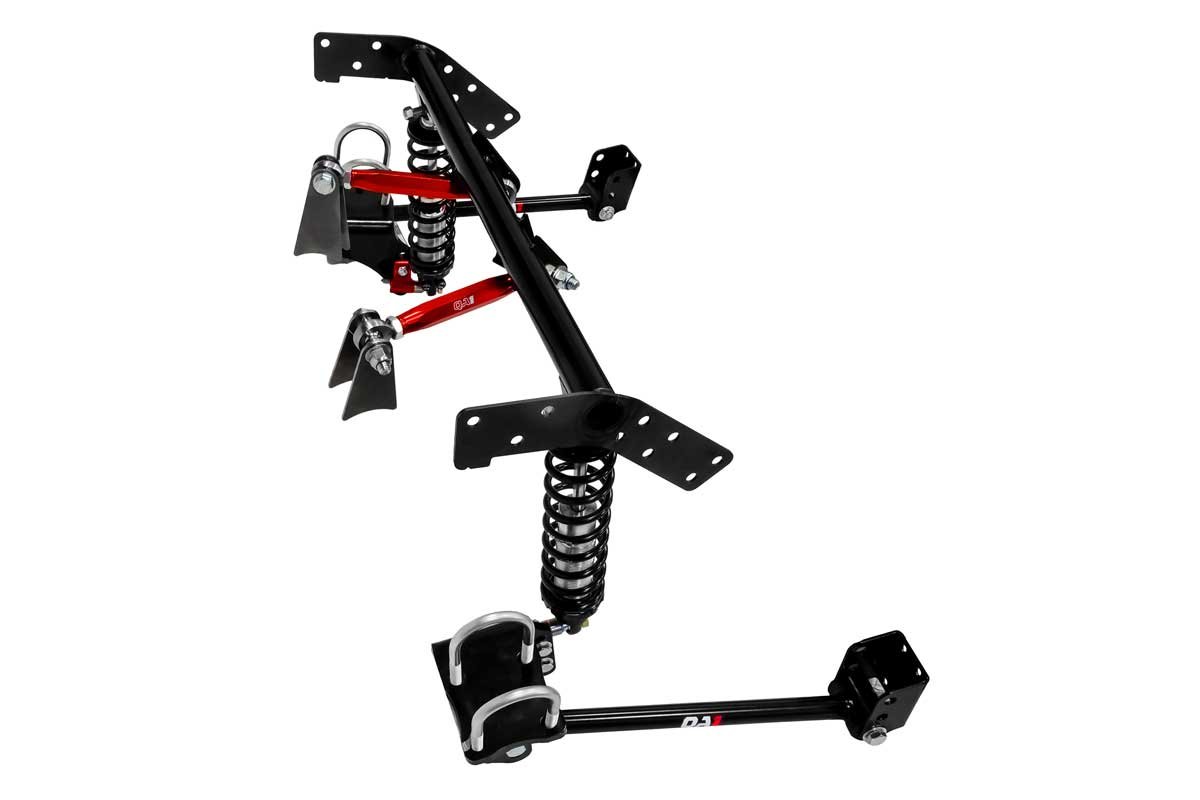
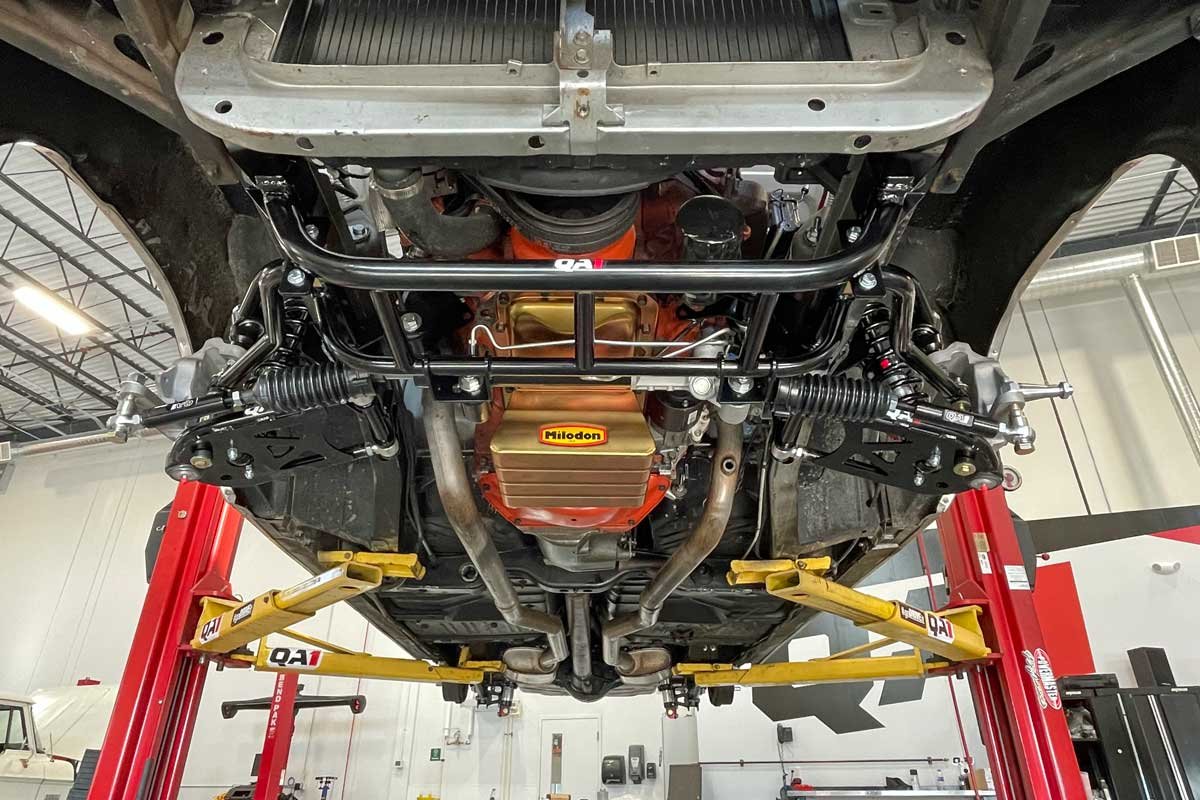
The QA1 engineers have improved the front suspension geometry, increasing corning abilities and enhancing the driving experience. In addition, the tubular design reduces exhaust clearance concerns and significantly reduces the suspension’s weight.
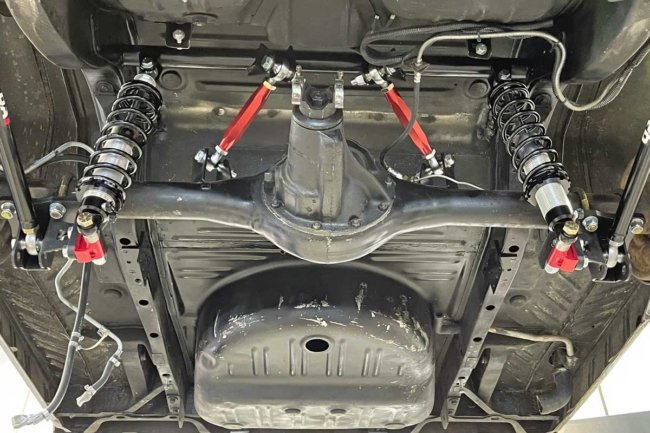
At the rear of the Charger, a QA1 triangulated 4-link design with coil-overs improves traction during launches while increasing the rear anti-squat and allowing for improved pinion angle adjustability. Additionally, the suspension design provides wheelbase correction to allow a more expansive wheel/tire combination. Also, the suspension will clear over the axle exhaust system piping up to 3-inches in diameter. There is a rear coil-over kit for A-, B-, and E-bodies.

Above Left: Once the Charger’s leaf springs, hangers, shackles, and 8 ¾-inch rear end were removed, the unibody frame rails were sanded so the QA1 cross member could be welded in place. Above Right: The QA1 assembly required welding on upper link brackets to the 8 ¾-inch housing.
After securing the Charger onto a vehicle lift and reviewing what they had, the QA1 technicians started the upgrades by disassembling the suspension at the rear of the Charger. The first component to be removed was the driveshaft. Subsequently, the pair of double-adjustable QA1 shocks were pulled from the chassis. Unfortunately, the shocks would not be reused as the new suspension would employ coil-over shocks.
The technicians removed the brake line from the chassis to the axle housing. After disconnecting the brake line, the techs loosened the hanger bracket fasteners and the shackle nuts. The Charger was lowered to the point the tires contacted the shop floor to control the leaf spring energy. The hangers and the shackles were freed from the chassis. The Charger was lifted back into the air sans the rear end, which remained on the floor.
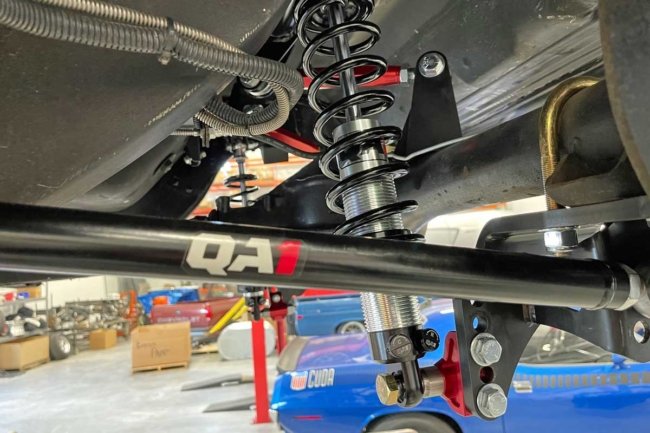

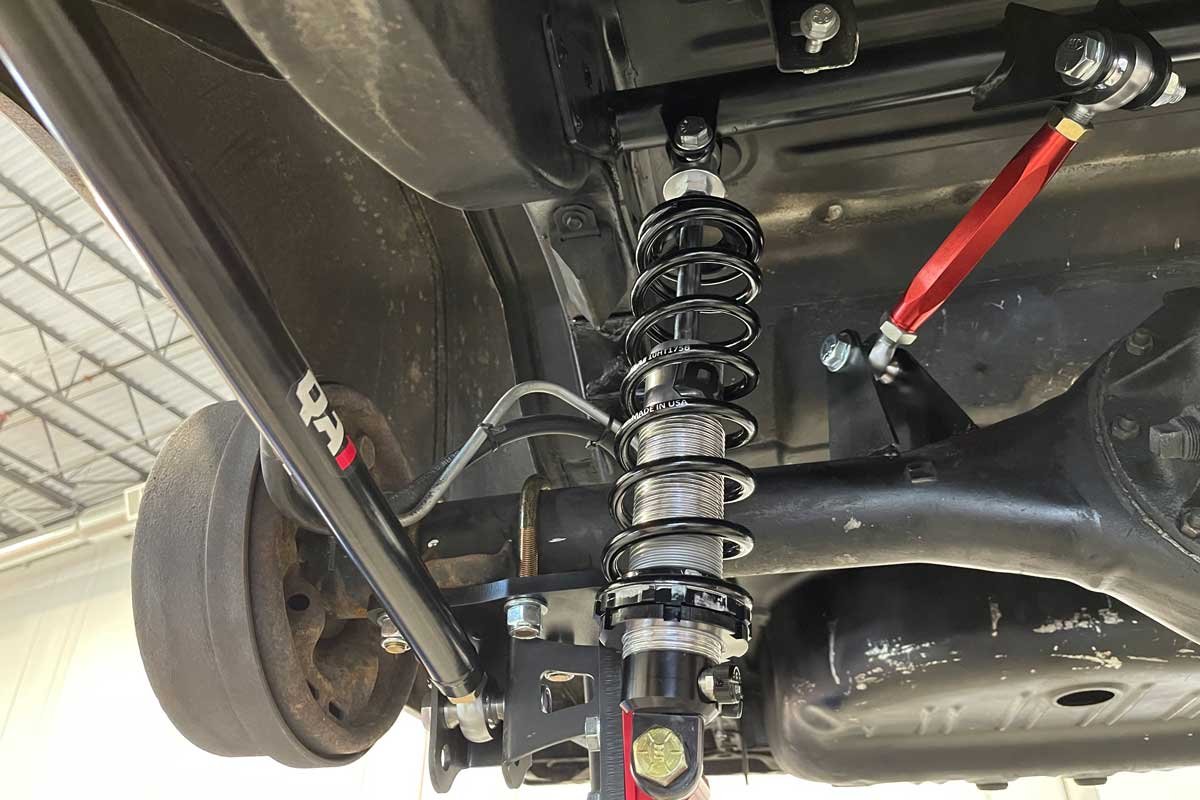
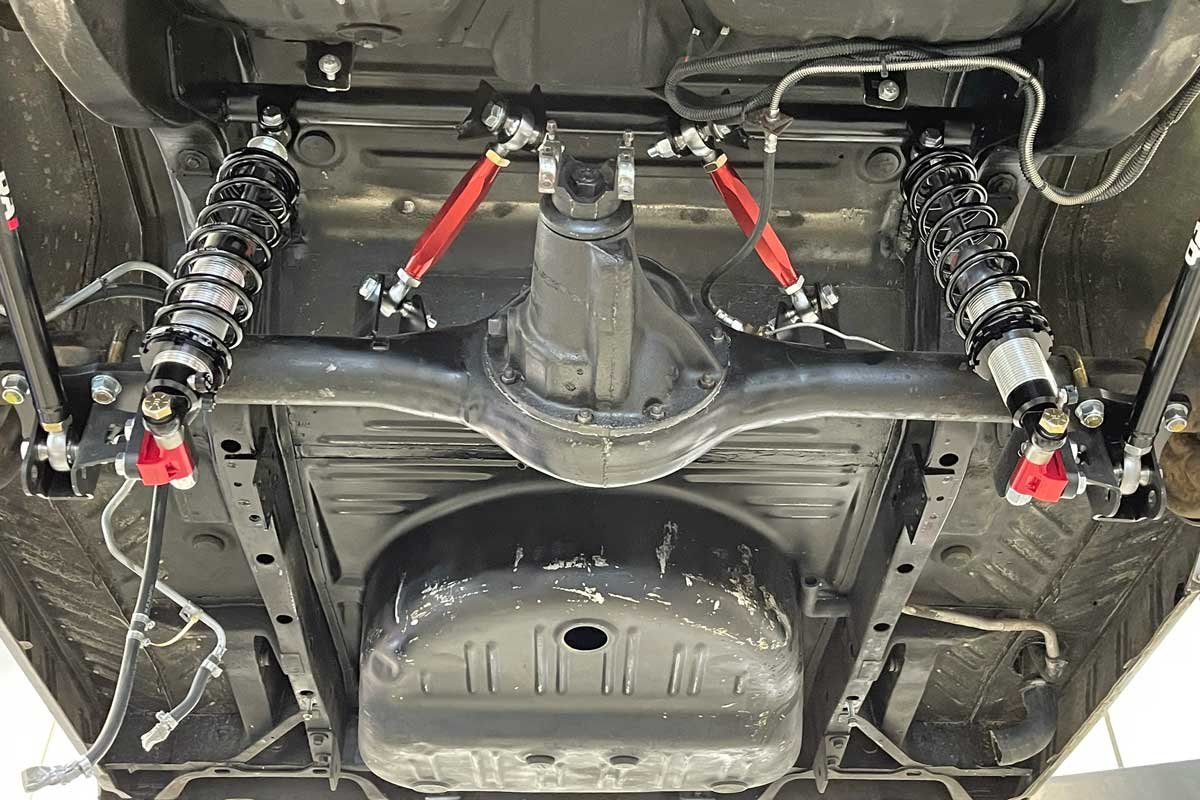
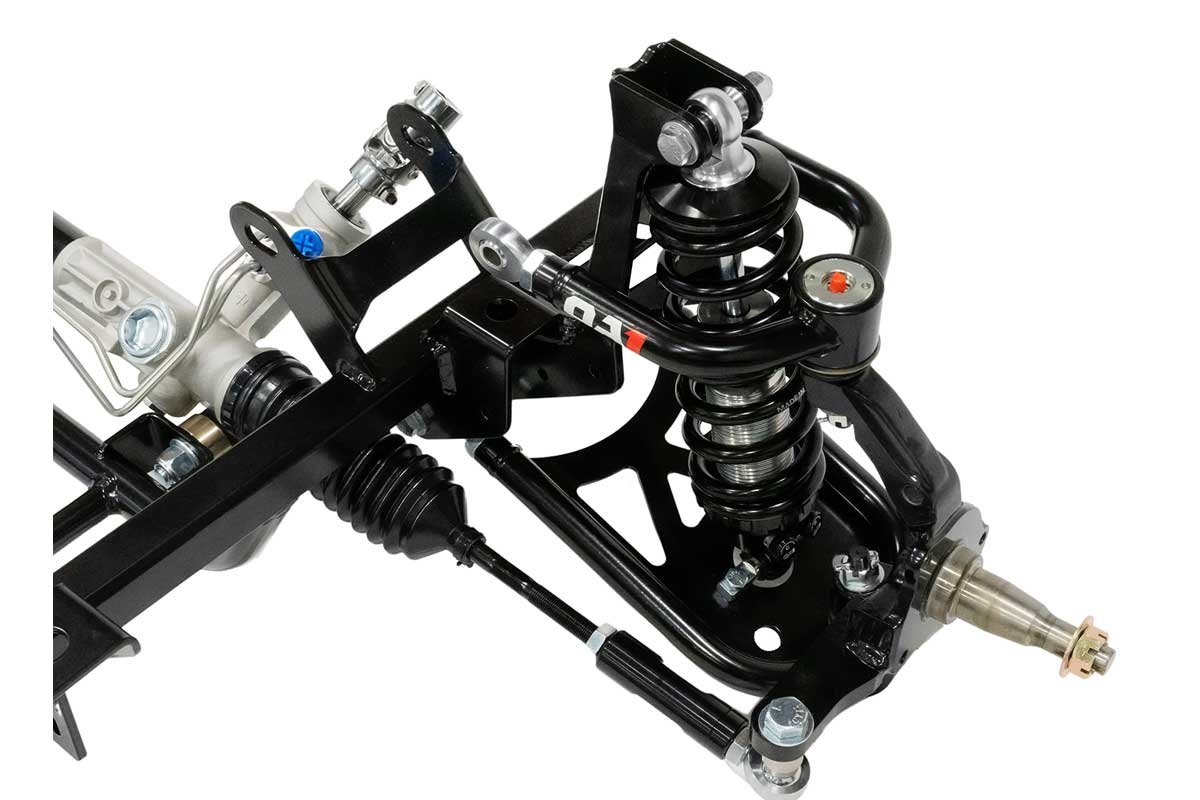
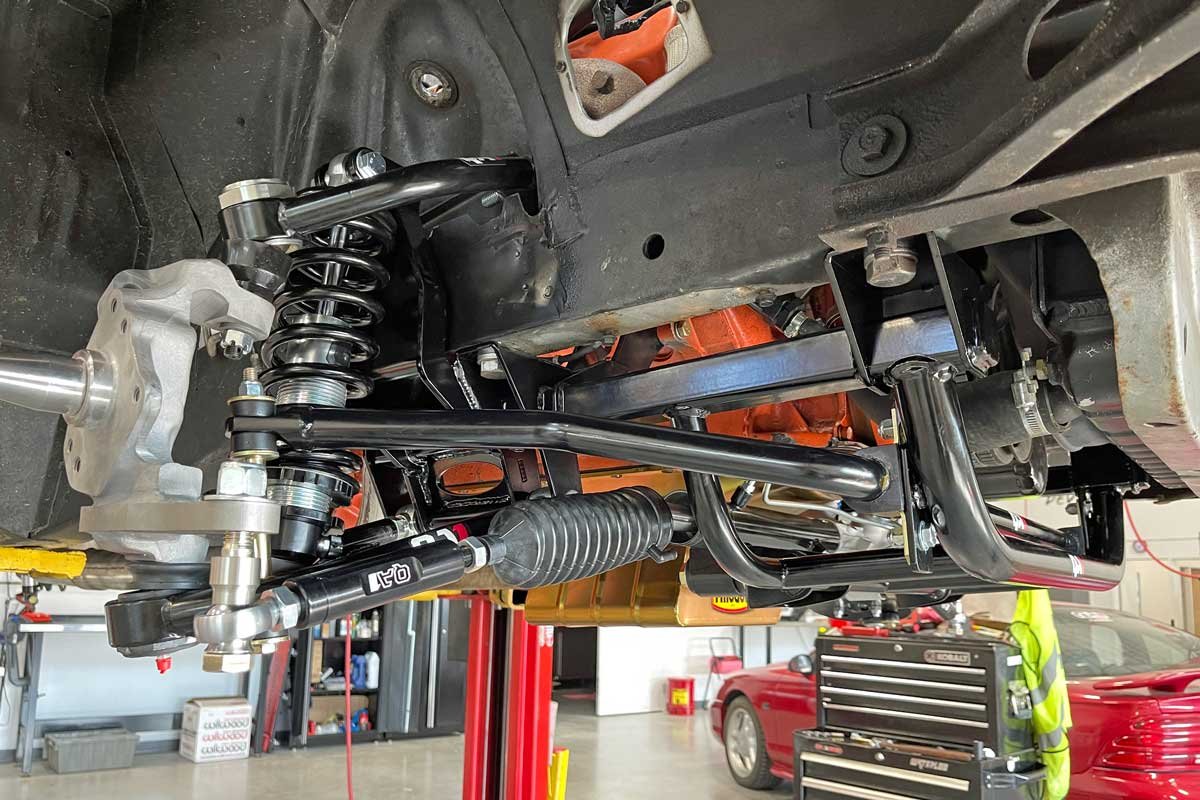
Above Left: Every component on the QA1 rear suspension is adjustable. This adjustability provides the ultimate fine-tuning for maximum performance and ride compliance. Above Center: The lower links allow the wheelbase to be optimized. The upper links establish the pinion angle. Above Right: The QA1 kit can be ordered for an 8 ¾-inch, 9-inch, or a Dana 60. This Charger uses the 8 ¾-inch rear end.
Because the dual exhaust piping was one piece from the exhaust manifolds to the tailpipe tips, each exhaust bank was dropped from the chassis. The exhaust needed to be detached so the techs could get the gasoline tank out of the chassis. The rear of the Charger was now entirely stripped, and after a good cleaning of the chassis, it was time to assemble the QA1 products.

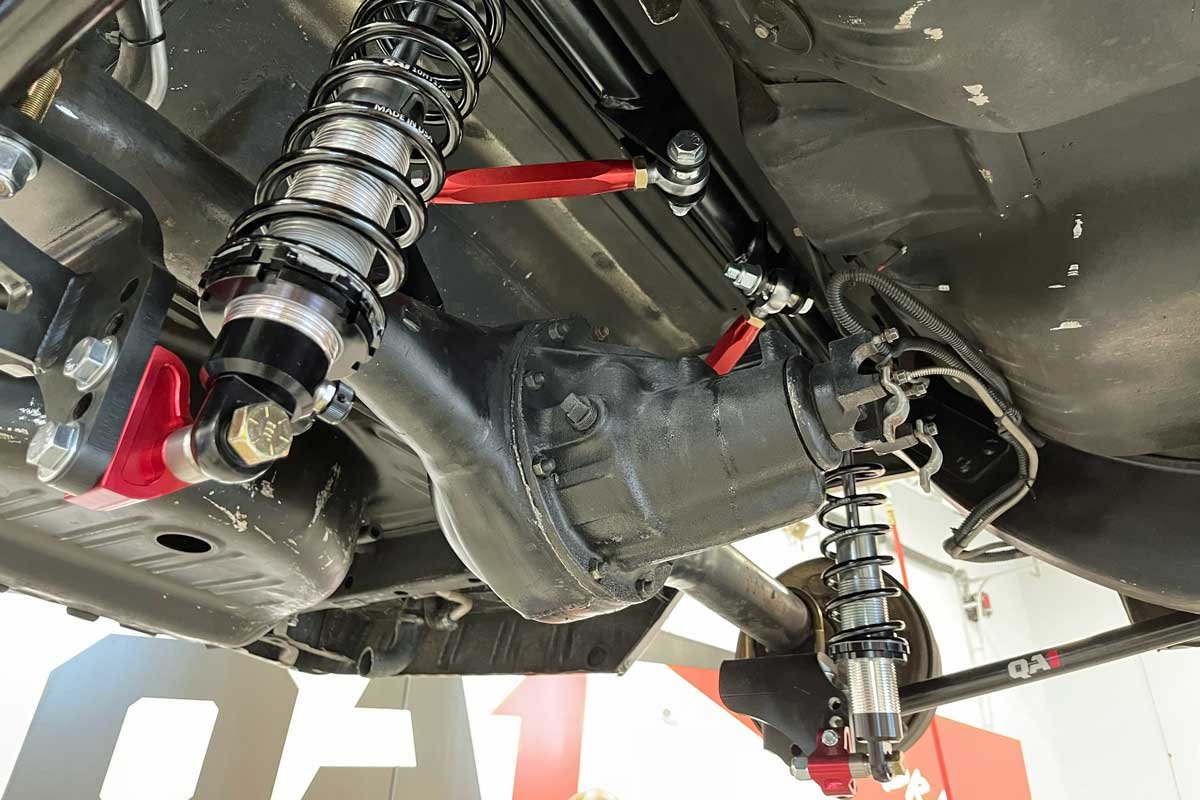
Above Left: The rear end is located correctly under the Charger. The lower link brackets attach where the leaf spring hangers were once housed. The gasoline tank has not been installed, but once installed, it will fit without modifications. Above Right: A closer look shows how the brake line is run from the chassis to the rear end. Although the driveshaft is not installed, the factory unit will work because the rear end has not been significantly moved forward or rearward. However, QA1 does have custom driveshafts, if one is necessary.
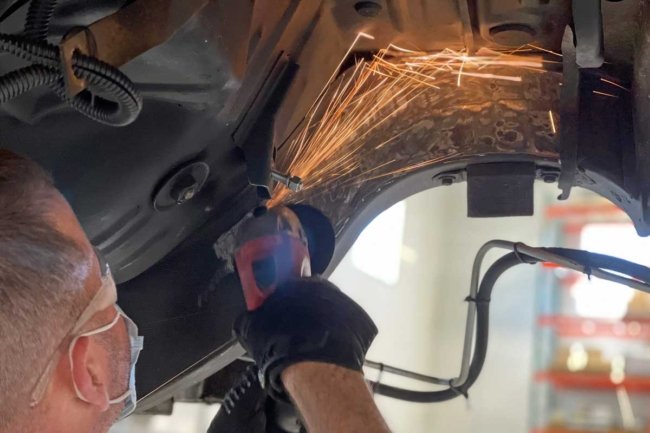
The foundation of the rear suspension is the cross member, which extends from one unibody subframe rail to the other. The cross member must be welded to the frame rails, so the rails had to be sanded to bare metal to allow optimum weld penetration. Once the frame rails were prepared, the cross member was located correctly with the aid of index marks and the use of an angle finder. Then, the cross member was clamped to the unibody and welded to the chassis.
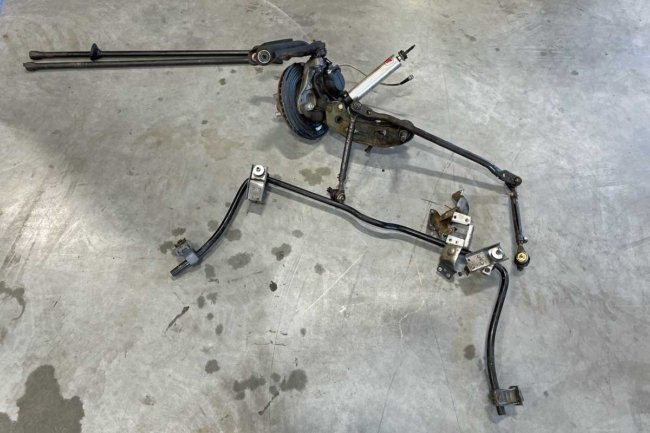

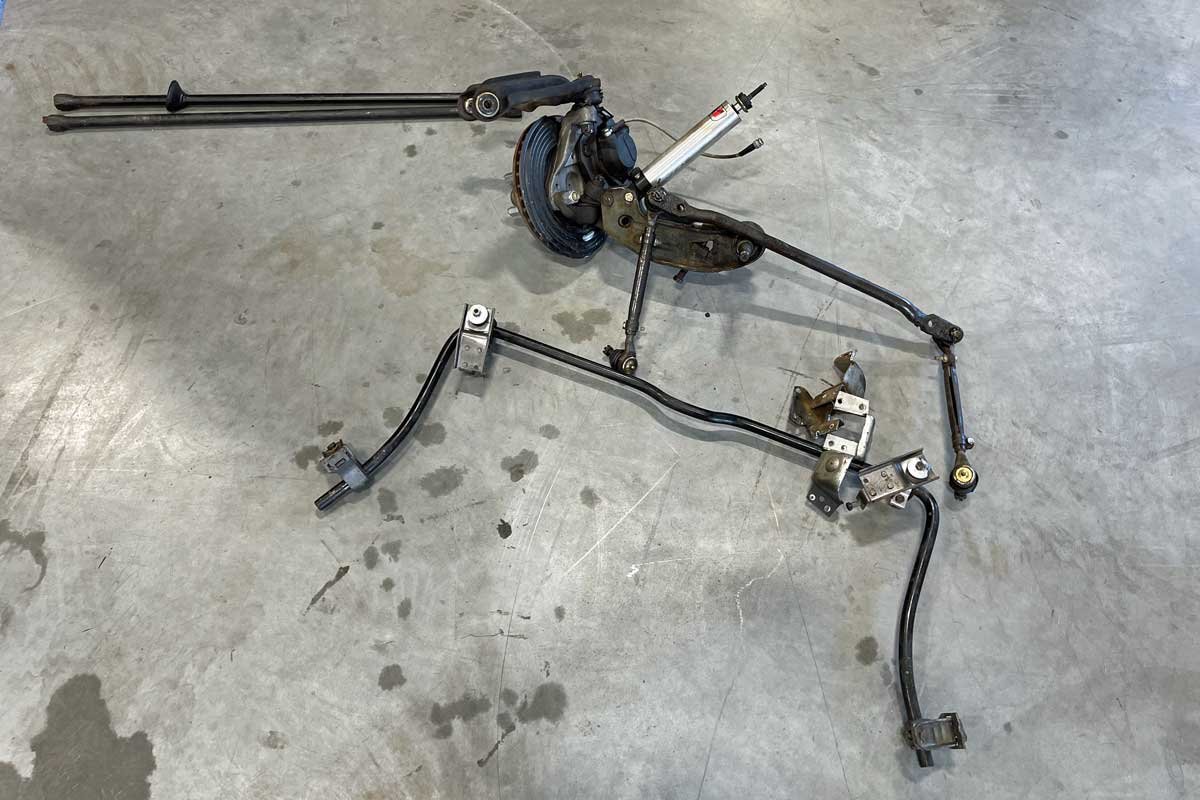
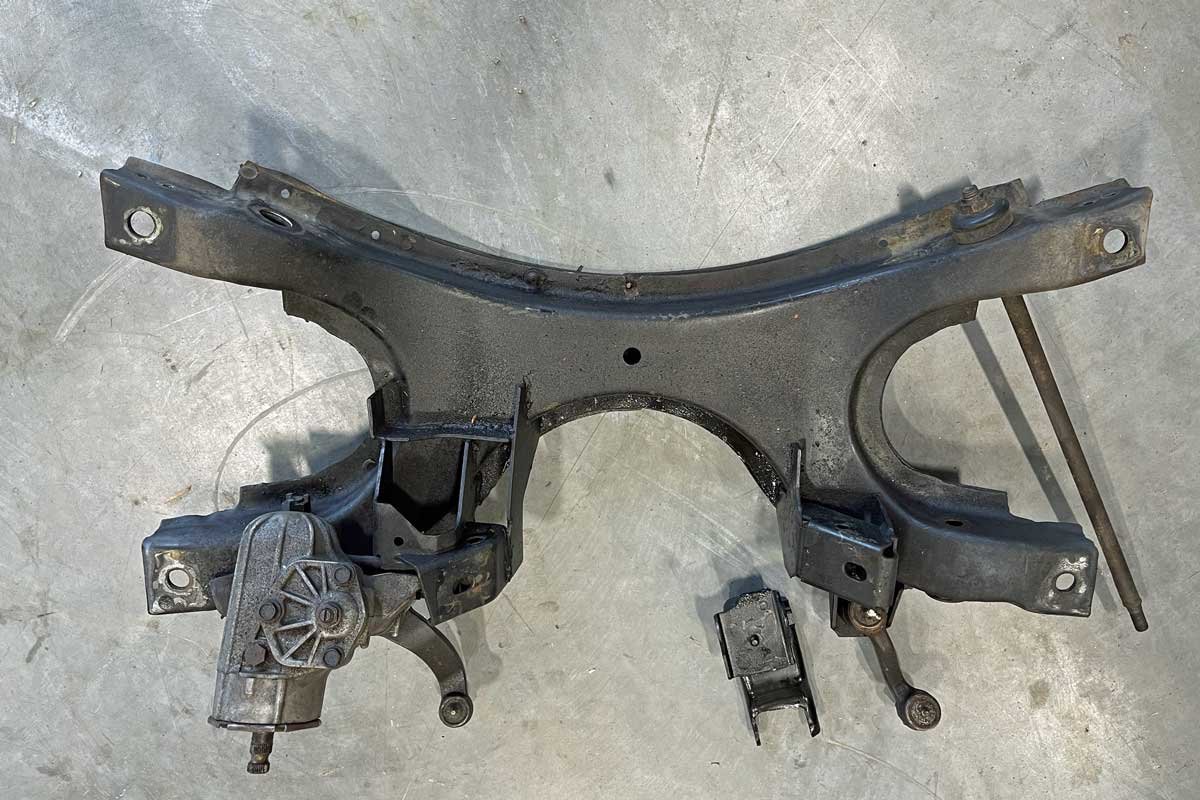
Above Left: The factory steering linkage, spindles, shocks, and the unique sway bar were discarded. Above Right: The OEM k-member, steering box, strut rods, and torsion bars (not in photo) were also pitched in favor of the QA1 coil-over front suspension.
While the fresh paint dried on the cross member, the QA1 techs removed the leaf spring U-bolts from the 8 ¾-inch axle housing. The techs discarded the U-bolts, the shock mounts, and the leaf springs. New axle mounts with locating tabs were secured to the axle housing at the leaf spring perches with the included U-bolts and hardware. The axle mounts provide a securing point for the trailing arms and shock absorbers.
A pair of trailing arm brackets were attached with new hardware in the leaf spring hangers’ existing chassis bolt hole locations. A previously adjusted (to the same length) trailing arm was attached to each bracket, and both arms were allowed to hang. Afterward, the upper trailing arm links and the shocks (without the coil springs installed) were connected to the cross member. Lastly, the Charger was lowered over the 8 ¾-inch rear end.


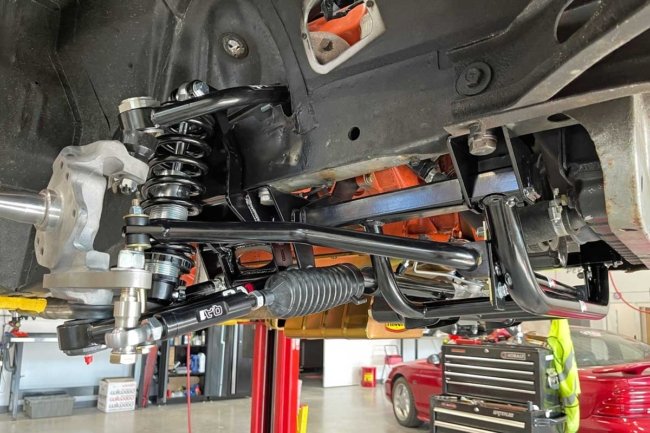
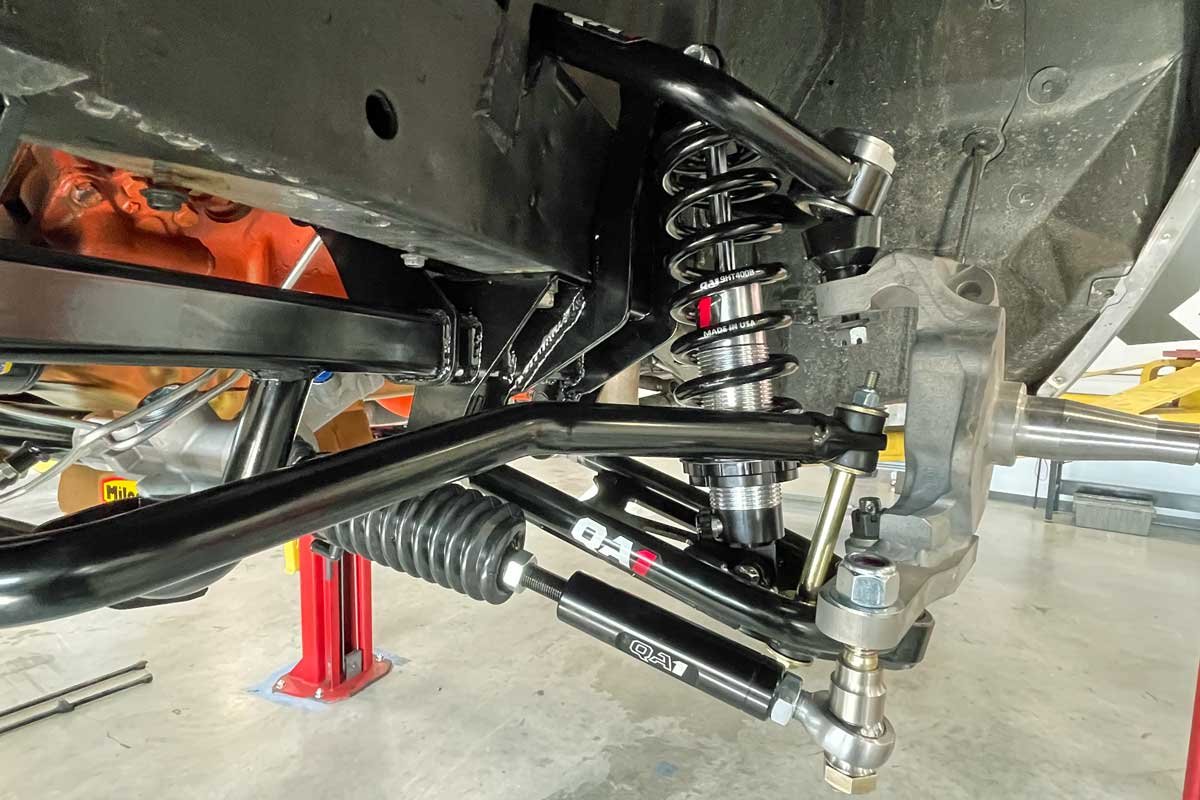
Above Left: On a select few Mopars, the factory oil pan does not allow enough clearance to fit the rack and pinion. A Milodon pan alleviates that problem. The tubular k-member is the foundation for the suspension. Above Center: The coil-over shock attaches to the k-member support and the lower control arm. The outer tie rod has spacer washers to correct (minimize) bump steer. Above Right: Also, the front suspension kit includes spindles, a sway bar, and end links.
The lower trailing arms and the shocks were secured to the axle mounts. Upon completing several measurements and setting the pinion angle (supported with a jack stand), the upper link axle mounting brackets were tack welded to the axle housing. QA1 provides a placement tool that holds the brackets and links during the tack welding. The placement tool is discarded after the tack welds are completed.
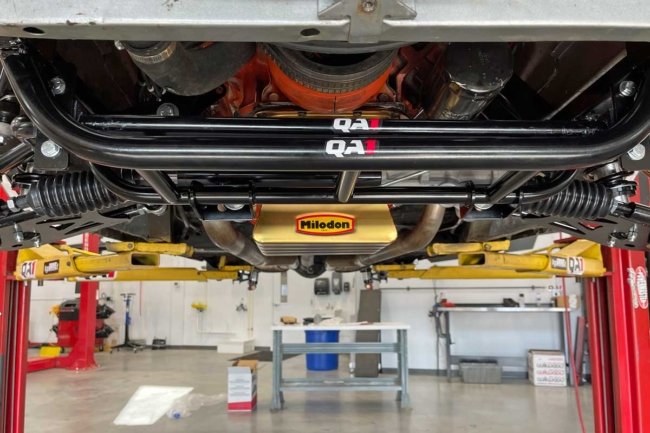
Above Left: As the assembly continued, it was easy to see the quality of the QA1 components. Above Right: The k-member bolts to the factory chassis locations. With the torsion bars removed, there is more room for the exhaust. This Charger still has the exhaust manifolds, but headers would easily fit.
With the brackets temporarily in place, all the critical measurements were rechecked. Once satisfied with the results, the QA1 techs disassembled the links and shocks and removed the axle housing to complete the welds on the brackets. The axle with fully welded housing brackets was reinstalled, and the trailing links and shocks, this time with the coils installed, were reattached.
The ride height was established, the wheelbase was adjusted, and the pinion angle was reset. The QA1 techs reattached the flexible brake hose and installed the gas tank. With the tailpipes now separated from the mufflers, the exhaust was reinstalled. The separation of the tailpipes allowed for slight adjustments of each pipe around the suspension components to complete the rear end update.
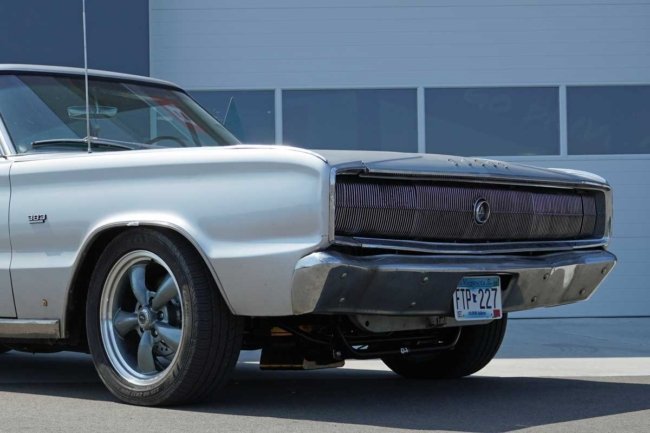
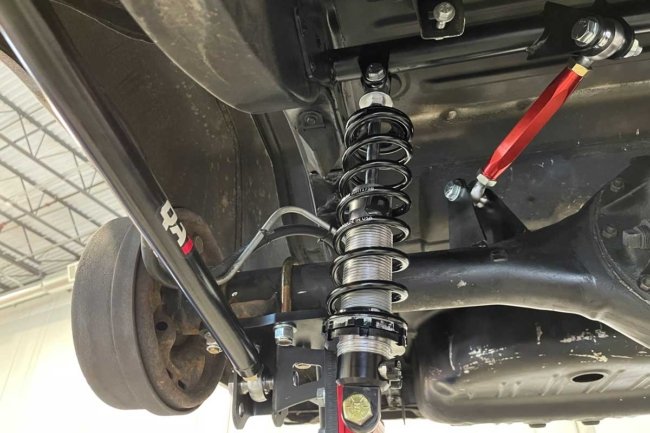
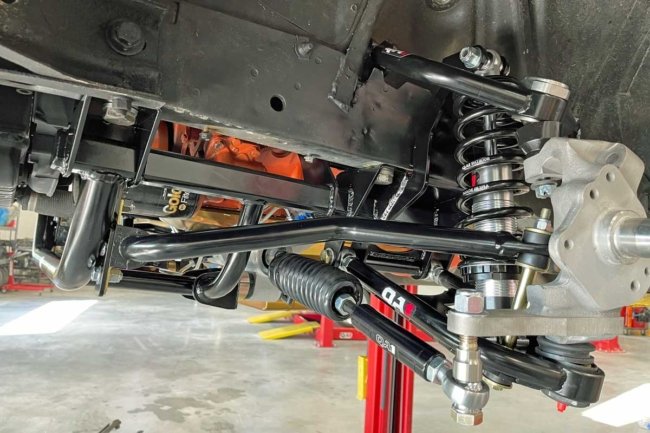
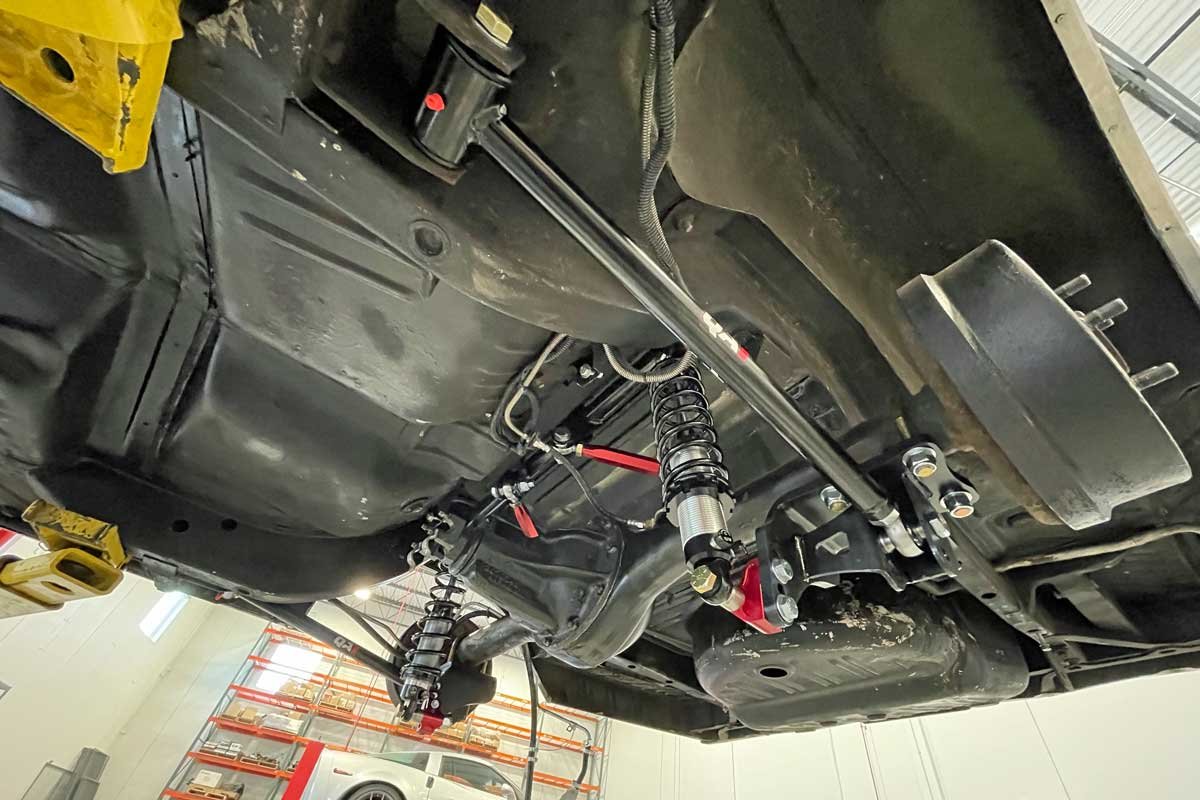
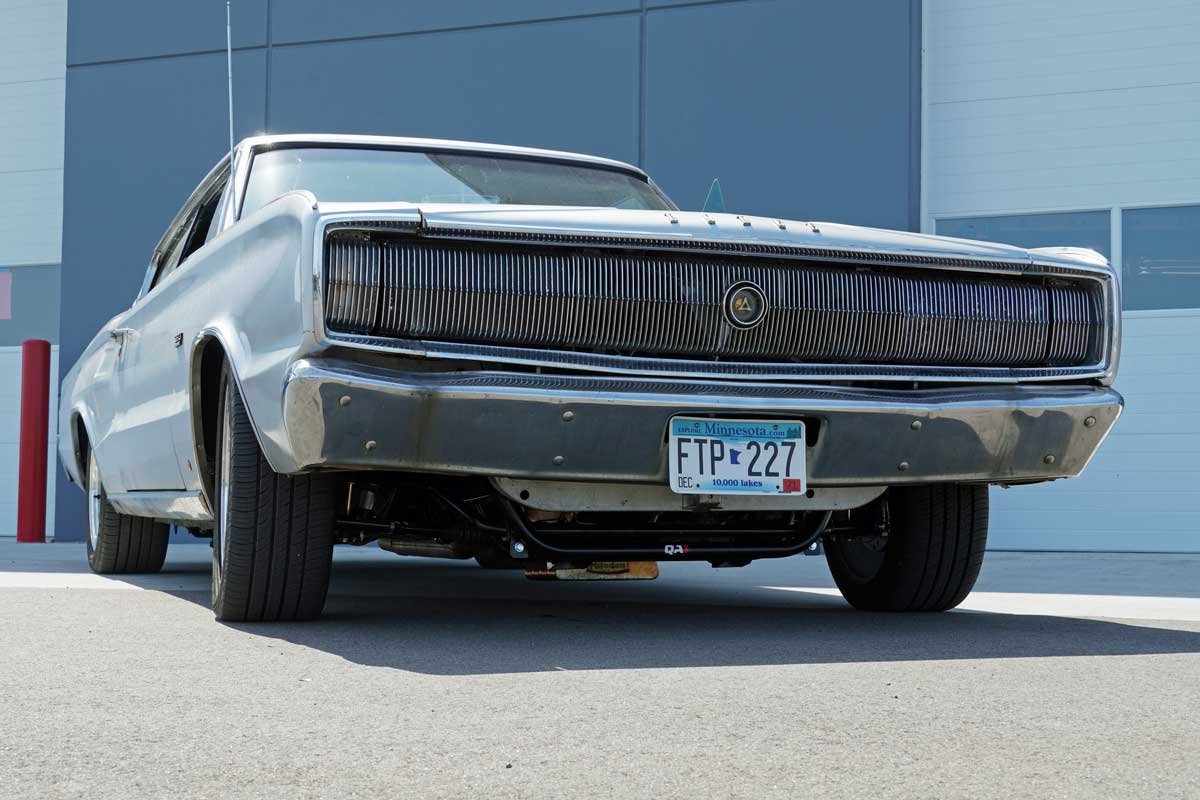
Above: The Charger’s front-end ride height was adjusted to meet the owner’s needs while maintaining the aesthetic look necessary on the street. A Wilwood rotor and caliper are peeking out from the wheel. They are sold through QA1.
Moving to the front of the Charger, the QA1 technicians disassembled the suspension. The upper and lower control arms, spindles, brake hoses, rotors, calipers, and the torsion and sway bars were discarded. The 440 was supported with a hydraulic jack, and the engine mounts were unbolted. With all the suspension components detached from the k-member, the techs unthreaded the four mounting bolts and lowered the k-member to the floor.
The Charger was readied for a tubular QA1 k-member by assembling and loosely installing the engine mounts. The assembly was lifted into place and secured with the factory bolts. The engine mounts were attached to the engine, and all the k-member and engine mount fasteners were torqued to spec.

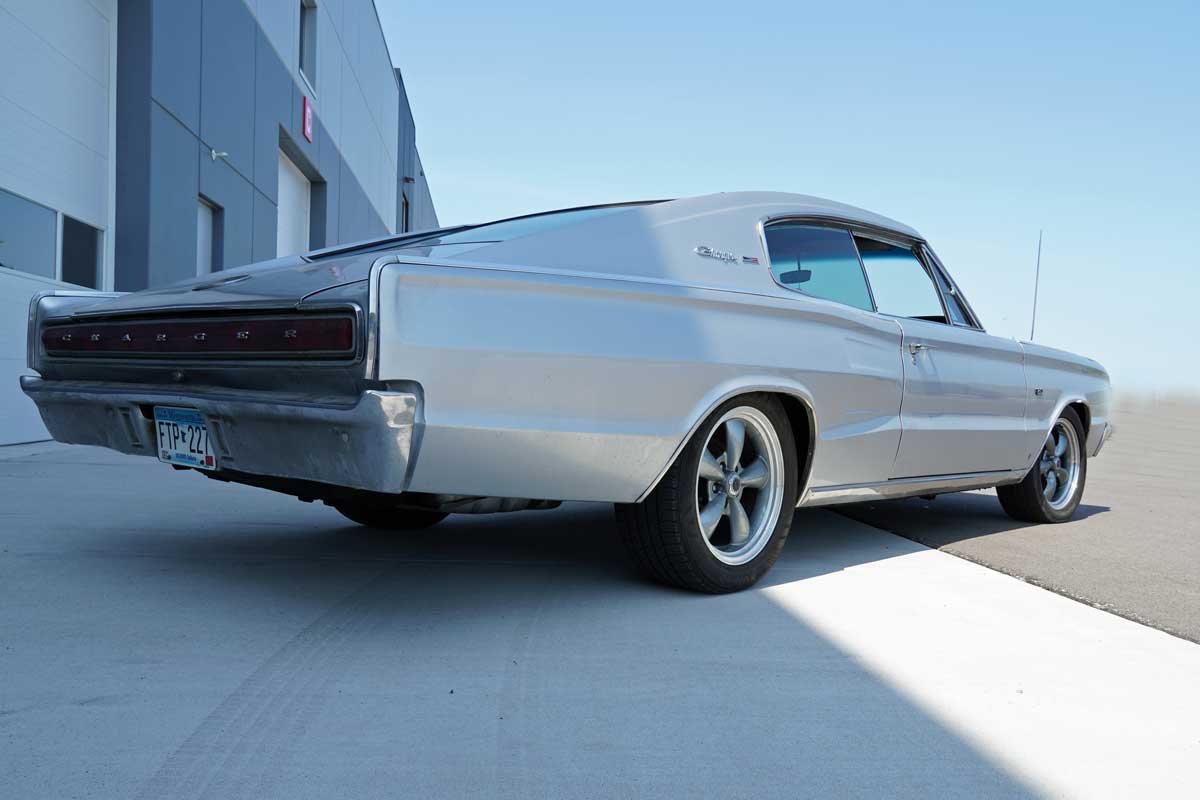
Above: With the addition of the QA1 rear coil-over kit, there is much more room for a more substantial wheel/tire combination. Because a few more mods are planned for the Charger, the owner has elected to wait before he installs new wheels on all four corners.
With specific applications, the oil pan may interfere with the installation of the rack and pinion, and Littlefield’s Charger was one of the few that had such an interference concern. So, the QA1 techs removed the factory pan and installed a Milodon pan, which provided the clearance necessary for the rack.
The kit’s rank and pinion is similar to a Fox-body Mustang, but the track width of the Charger is more significant than a Mustang. To correct the track width, QA1 provides tie rod extenders that are installed between the rack and the inner tie rod ends. With the extenders and the rack bellows installed, the assembly was slipped between the oil pan and the k-member and secured with the supplied mounting hardware.

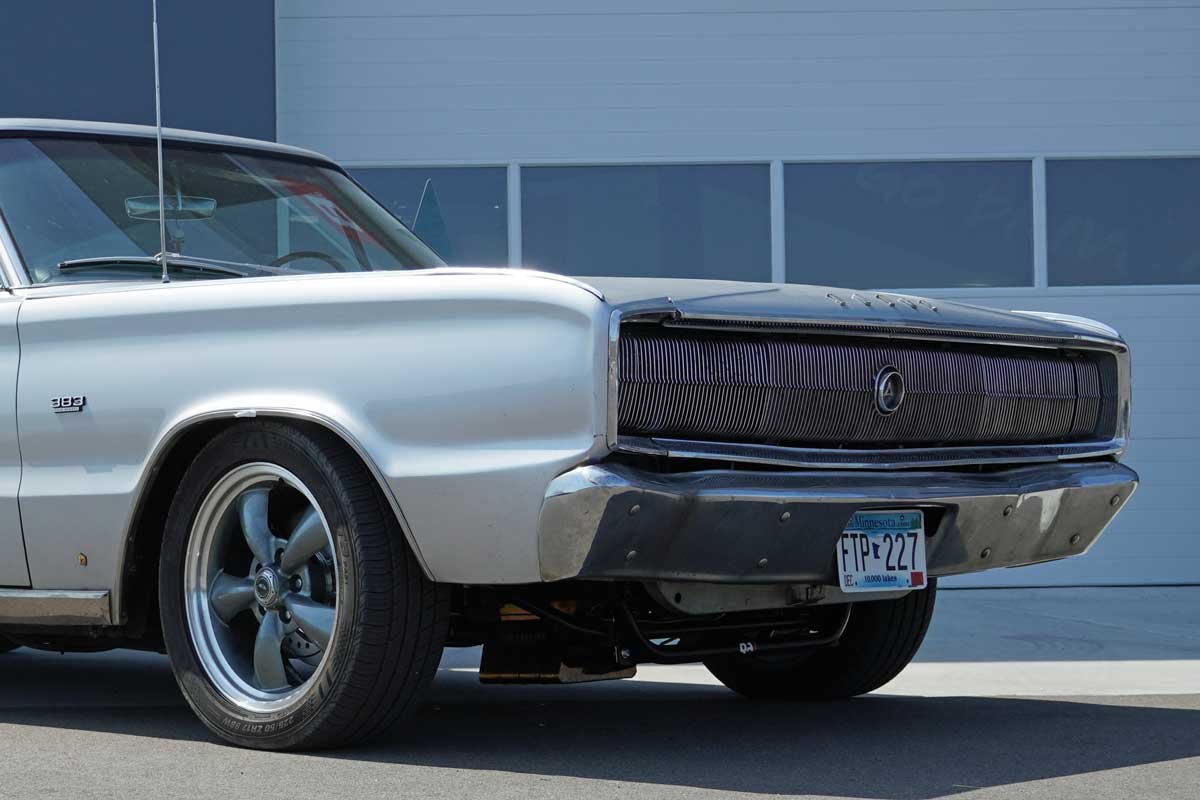
Above: The QA1 components tuck nicely under the front end of the Charger. Even with an aftermarket Milodon oil pan, ground clearance is acceptable for daily street driving.
Once the rack and pinion housing was secured, the front suspension reassembly moved quickly. The upper and lower control arms were installed. A coil-over shock was slipped through each upper control arm and mounted to the shock support on the k-member and the lower control arm. A new spindle was installed on each side of the Charger.
The outer tie rods were assembled and installed into each spindle with the correct spacer washers to eliminate bump steer concerns. Next, the techs secured the sway bar and related hardware to the k-member and the lower control arms. Finally, all new Wilwood front brakes were installed to finish the front-end upgrade.

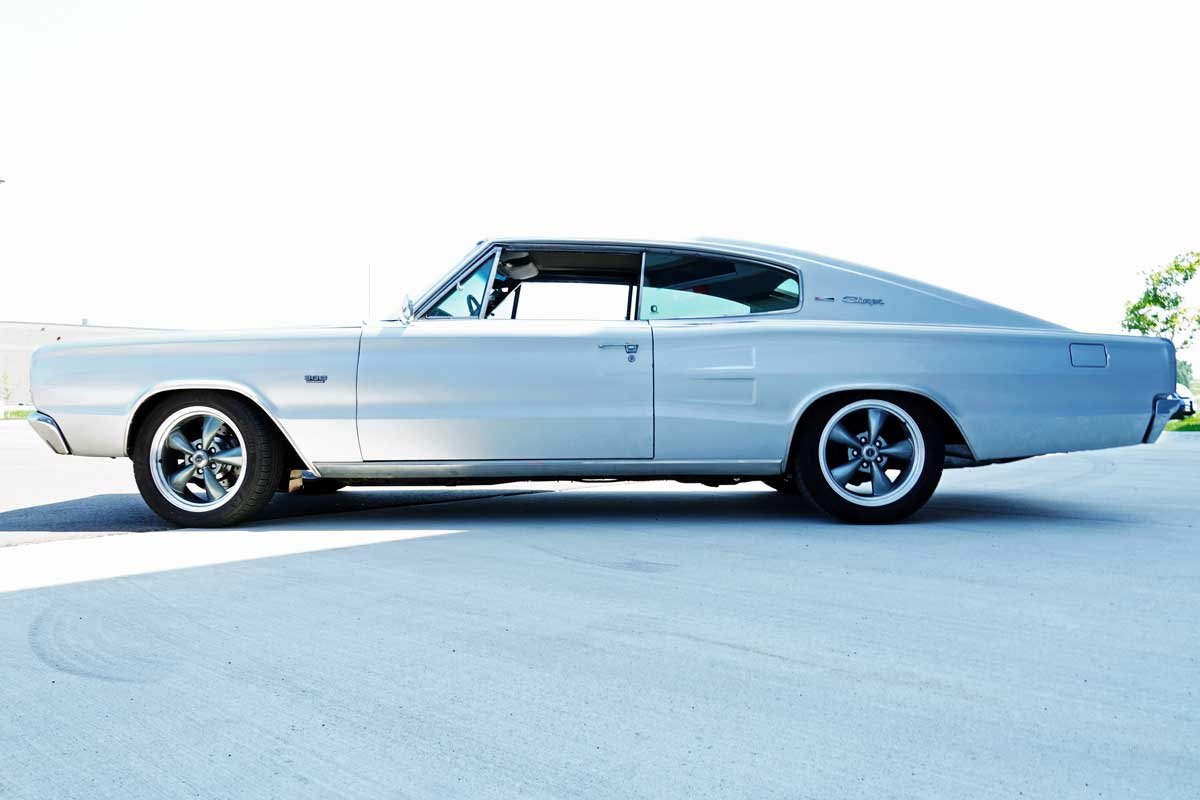
Above: Except for the wheels, the Charger looks stock. However, the stealthiness of the QA1 parts will be exposed by the improved launch capabilities, increased handling, and much-improved ride quality.
With the Charger’s suspension bolted together, the technicians lowered the Charger to the shop floor. The ride height was measured, and all the coil-over spanners were adjusted to provide the proper ride height.
The steering column was removed, and a lower portion of the steering shaft was cut from the column. A new bearing support was installed into the lower column. Once assembled, the steering column was reinstalled. A pair of U-joints and a shaft was arranged to provide a smooth, interference-free rotation.

Above: With the triangulated 4-link design, the Charger gained greater anti-squat and pinion angle adjustability. The kit offers clearance of a 3-inch over the axle exhaust system, and the wheelbase (or thrust angle) can be corrected via the lower links.
With the front and rear QA1 suspension installation complete, a quality alignment ensured proper tire wear and ultimate tire contact with the road surface. After Littlefield and the QA1 techs drove the Charger on the road, the shocks were fine-tuned to meet Littlefield’s requirements.

Above: QA1 has developed a perfect front and rear coil-over suspension kit for the A-, B-, and E-bodies. The stronger and lighter components are a tremendous improvement over the 50+ year technology of the ’60s and’70s.
If you have an A-, B-, or E-body Mopar that needs the ultimate suspension performance upgrades, QA1 has all the parts required. The suspension will transform from an adequate straight-line (drag racing) setup to an extreme corner-carving monster with minimal welding and cutting installation requirements. For additional information, contact the helpful QA1 representatives. With their assistance, your Mopar will handle like a late-model Charger.


