


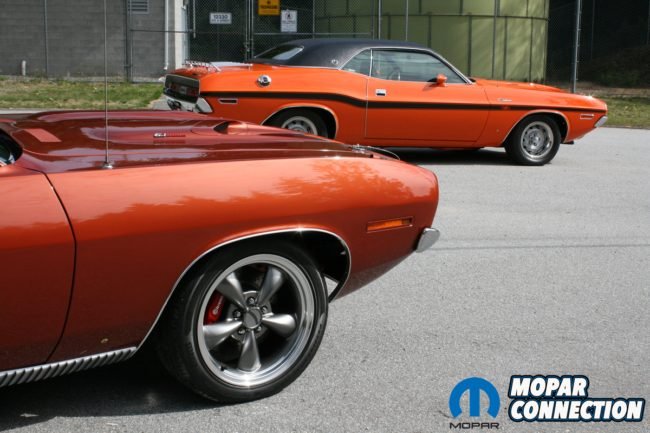
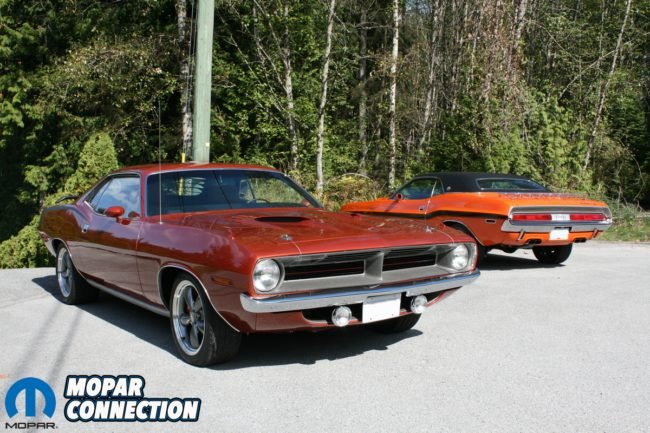
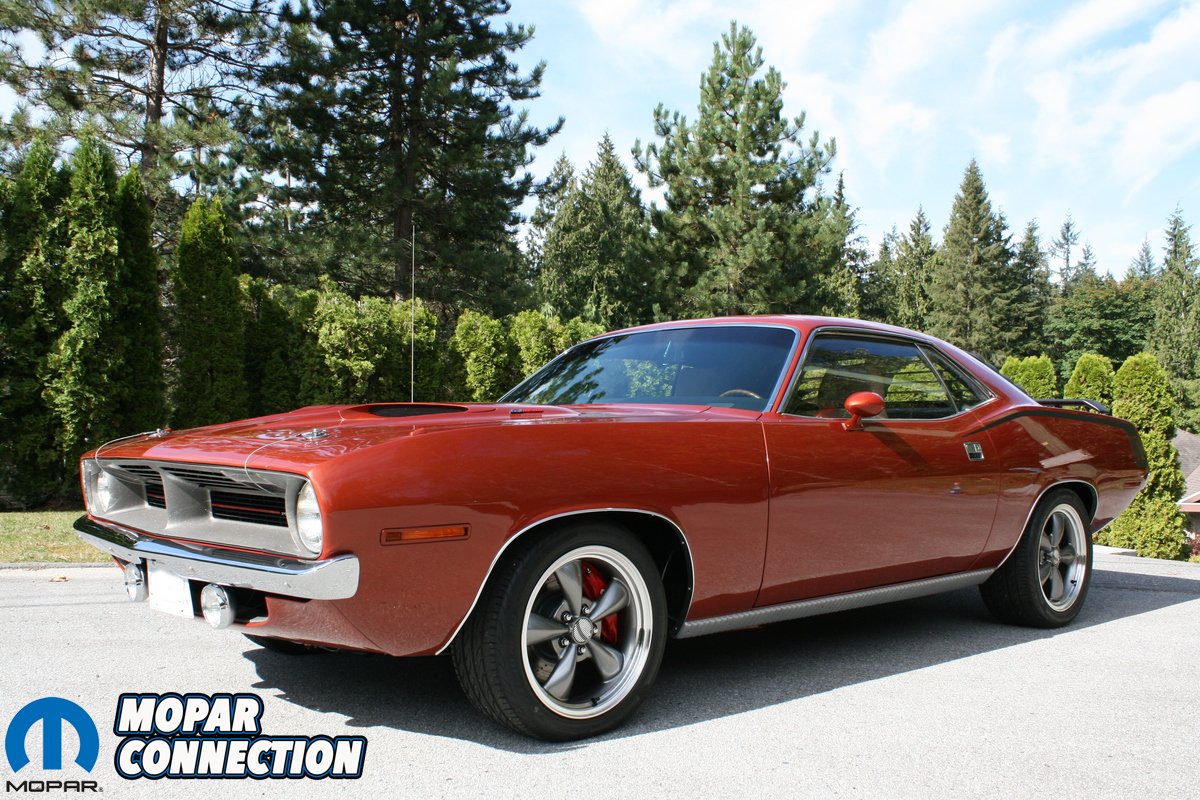
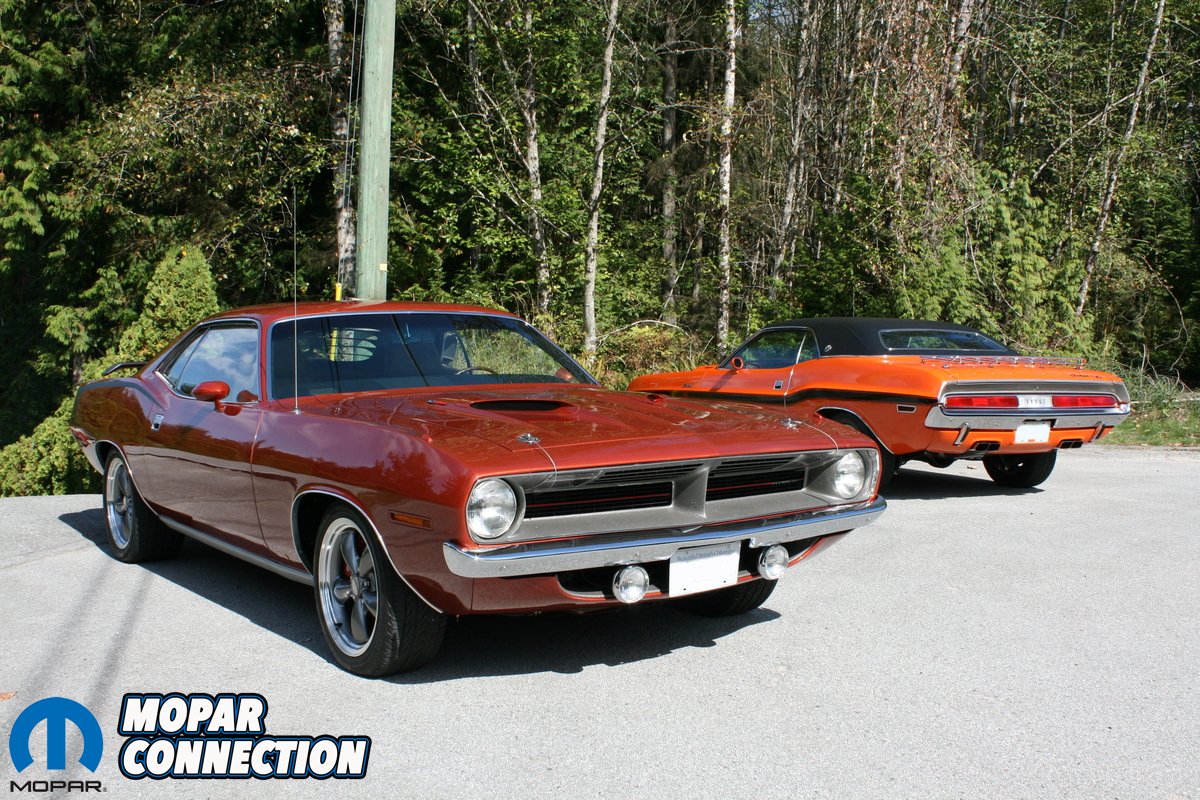
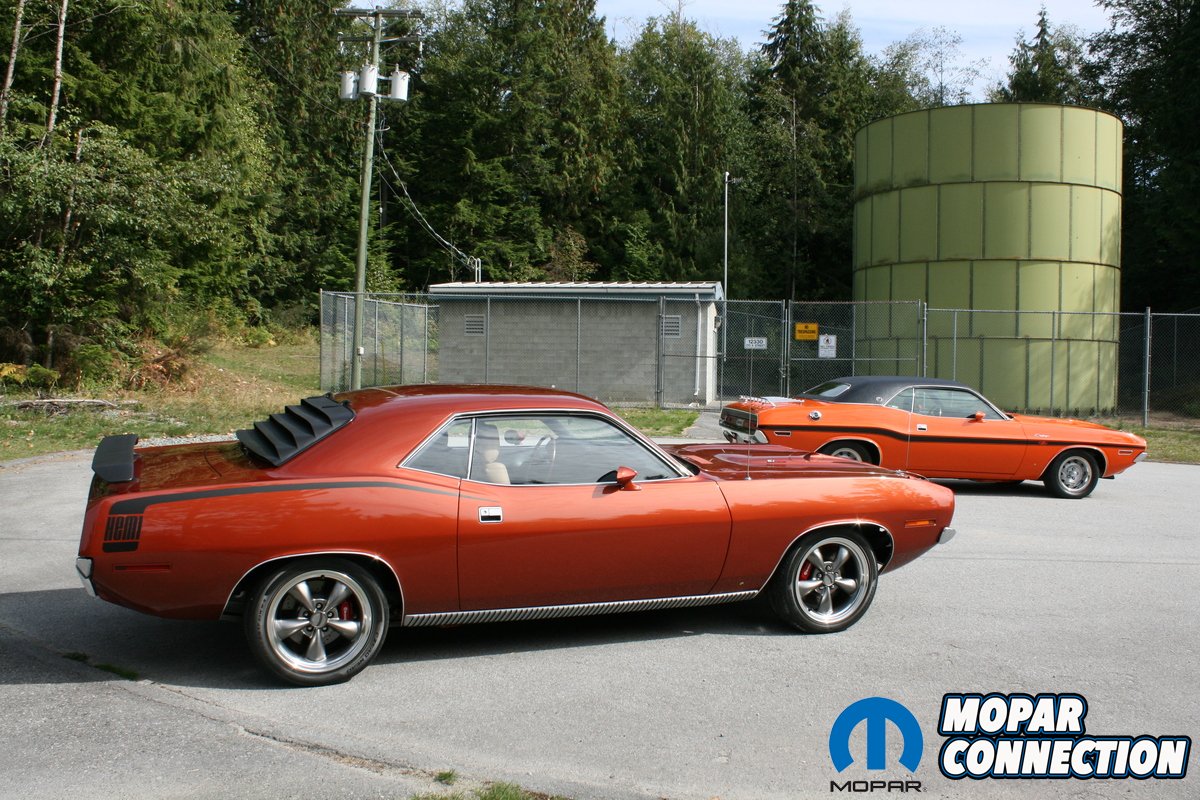
Mopars are a powerful addiction. For most of us enthusiasts, one is never enough and quite often we have multiples. Very recently, we did a feature on a stunning 1970 Dodge Challenger R/T SE that has been restored to OE specifications by Barnabas Kriss of British Columbia, Canada. Barnabas is a fan of driving of his cars so when he started planning the restoration of his 1970 Plymouth ‘Cuda, he decided to go a different route than his Challenger; something he could turn the key and drive absolutely anywhere. We have known Barnabas for around ten years and had the pleasure of checking out his ‘Cuda quite a few times in 2010 during the build.
“I bought this car back in July 2002. Like most of my other Mopars, I was not looking for one at that time. A friend of mine found the car in a back alley in Vancouver. At that time he was already busy building another ‘Cuda, and was nice enough to put me in touch with the owner. I went and looked at the car the next day and ended up making a deal on the spot. I got the car back in my shop a few days later”, Barnabas tells us.


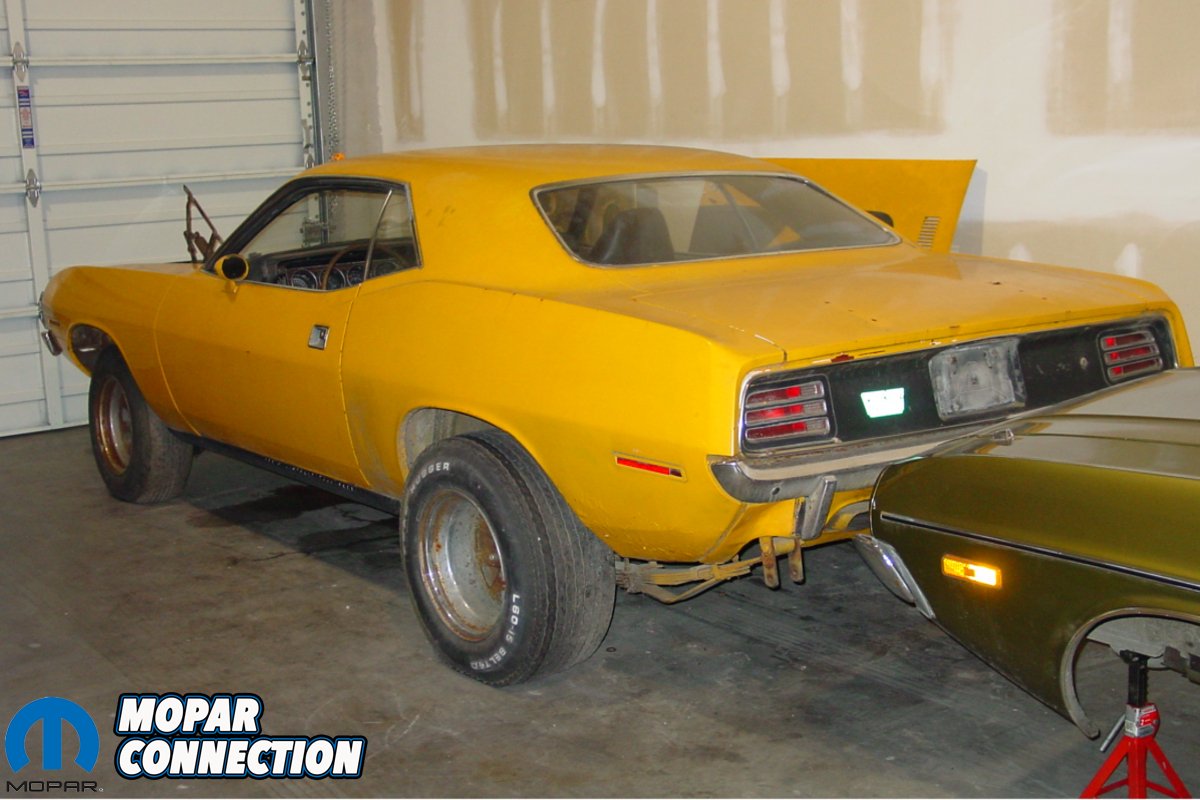
When Barnabas bought the car, he was excited to hear that it had quite the history. “The previous owner gave me quite a bit of background on the car. It was originally sold in Whitehorse, Yukon. A few years later, it ended up in Prince George where the previous owner bought it in 1975. When he moved to Vancouver, he brought the car with him. He last drove it around 1979. Since then, it sat in the back alley where I found it. Over the years, someone smashed in the driver’s window and a few very minor parts got stolen”, says Barnabas.
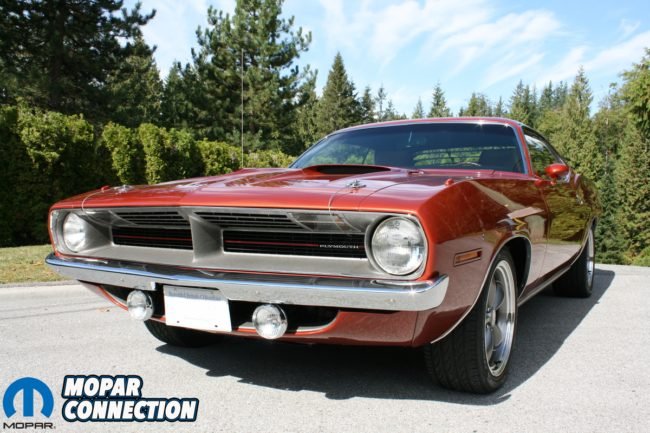
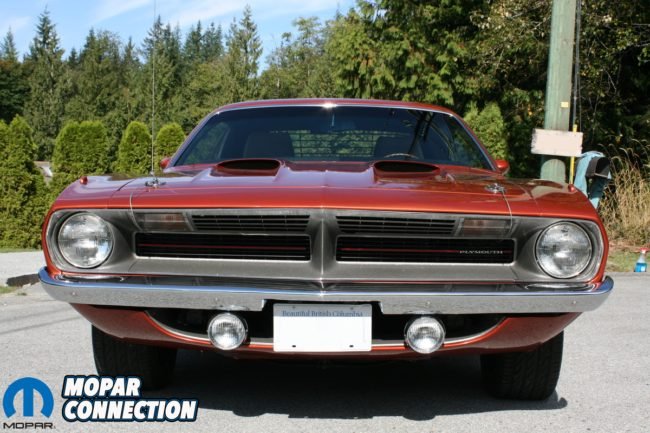
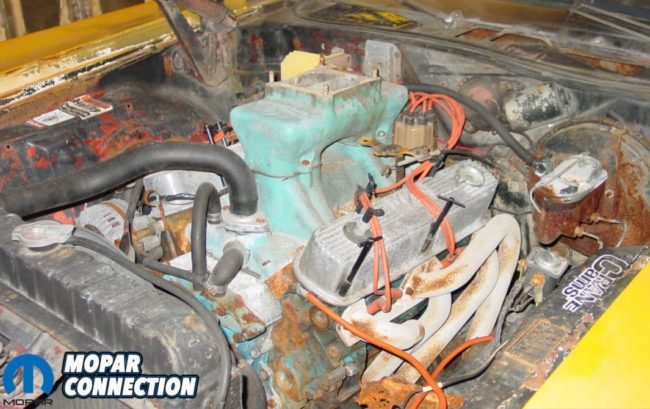
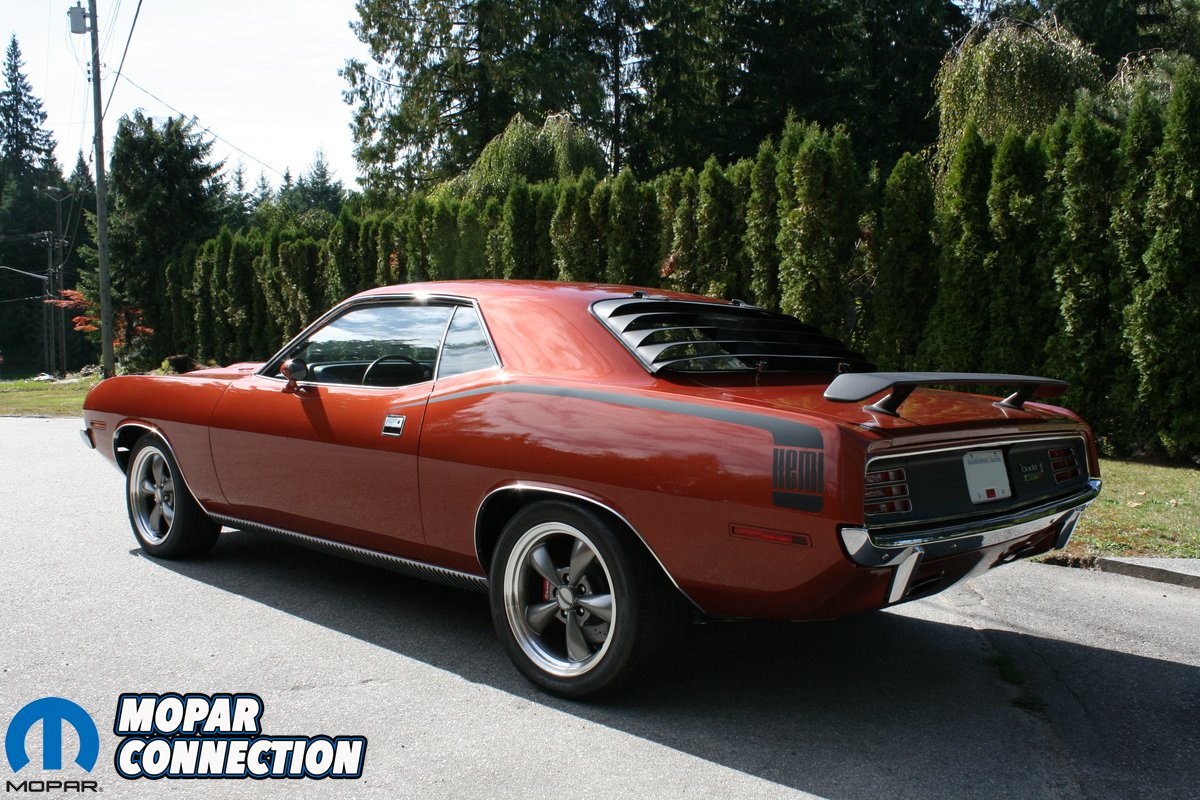
As it turns out, the ‘Cuda was an original 340 4-speed car painted in FK5 Burnt Orange and stuffed with black interior. For options, it came with the 3.91 axle package, Rallye dash, painted mirrors, console and a few others. Over the years, it got repainted a few times and eventually was sprayed in the ugly school bus yellow color Barnabas found it in. The original 340 was long gone and a 360 with a tunnel ram was in its place. Like most Mopars, the ‘Cuda was full of the typical 70’s modifications like Cragar mags, a fiberglass scooped hood, huge spoiler and a bunch of decals for good measure. Once Barnabas got the car back to his shop, the first thing he did was pull the back seat where he hit the jack pot by finding the original broadcast sheet. The car also retains its original fender tag in fantastic shape.


Barnabas says, “Originally my plan was to mostly restore the car back to stock, except for building a small block W2 headed 416 stroker motor for it. I did not start the build until 2004. I already had a lot of nice original and NOS parts that I saved up over the years and this was a good car to use some of them on.” Like the Challenger, the first thing he did was a complete disassembly down to the bare shell. Next was a trip to Redi-Strip for a chemical dip. Unfortunately, the dip brought out some nasty results and the car had more rust and bondo than what he had anticipated. Being as this was just a few years before all the good quality repro sheet metal became available, Barnabas decided to hunt down all clean original sheet metal which was a fairly major task. Some he found locally and some he bought on line from the southern U.S. Overall, the car needed one full quarter panel, trunk floor, tail light panel, trunk lid, full front floor pan, both inner fenders, one door, both fenders and hood; not to mention numerous small patch repairs. About the only panel that was perfect was the roof.
Like his Challenger, Barnabas was very meticulous in making sure the metal work was done properly. “All of the replacement parts also got a trip to Redi-Strip before installation. All of the patch type repairs were butt welded and all seams ground down on both sides. All of the full replacement panels had the factory spot welds duplicated. The factory lead seams were all redone using lead as original, not body filler like most do. All of the metal work was done by myself”, says Barnabas. After the metal work was complete, the body took another trip to Redi-Strip for a final de-rusting to remove any flash rust and apply a zinc phosphate coat. After that came the usual epoxy primer, seam sealer and pouring primer into all of the body seams while on the rotisserie to properly protect all of the metal.

Barnabas tells us, “While I was doing all of this metal work, the plan for the final finished product slowly evolved. My first idea was to change the original 4-speed to a Tremec 5-speed for better highway drivability. The biggest change came when I Iearned more about the 3rd generation Hemi engines. I asked myself, rather than a carbureted small block, why not a modern EFI Hemi with more power? Around this time, modern Hemis in old Mopars were still a new concept. After that came a bunch of other more minor ideas to bring the car up to more modern standards, but at the same time preserve as much of the original looks as possible. With this new direction the work continued.” Once all of the metal work was done, the body panels and parts were test fitted. Many of the parts required various adjustments to make gaps better than 1970 production tolerances. Having learned quite a bit about the factory hinges during the restoration of the Challenger, Barnabas carefully rebuilt the door and hood hinges with improvements. A lot of effort was put into the doors, so they would close nicely without the thump typical on E-bodies while using a pair of NOS door latches.
Once all of the panels fit correctly, Barnabas prepped and painted all of the inside surfaces and the undercarriage. He says over 130 hours were spent on prep and paint for the undercarriage and inside surfaces! With that complete, the car was then sent to Ray’s Custom Body and Paint in Maple Ridge, B.C to have the exterior painted in the original FK5 Burnt Orange metallic using R-M Diamont basecoat clear coat products. With the body shop handling the exterior paint, Barnabas restored the small parts such as the nuts, bolts, latches, brackets and other various bits. They were all re-plated in zinc, zinc dichromate and black phosphate as original. All of the suspension parts and engine brackets were powder coated for increased durability. At this time, Barnabas also sent the bumpers and other chrome plated parts to be re-chromed to a high quality shine. Other parts such as the heater box, steering column, wiper motor and pedal assembly were all rebuilt and detailed.
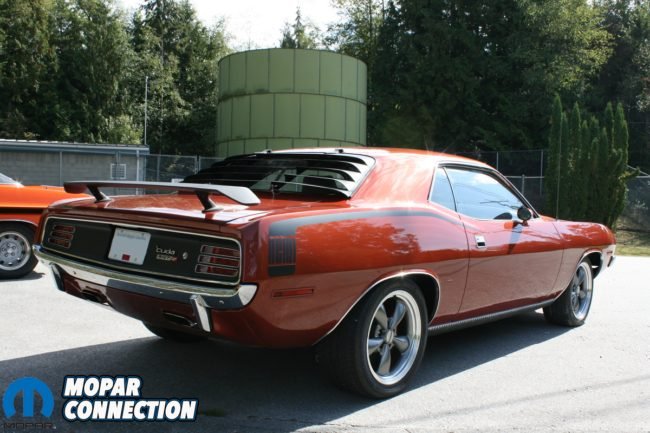
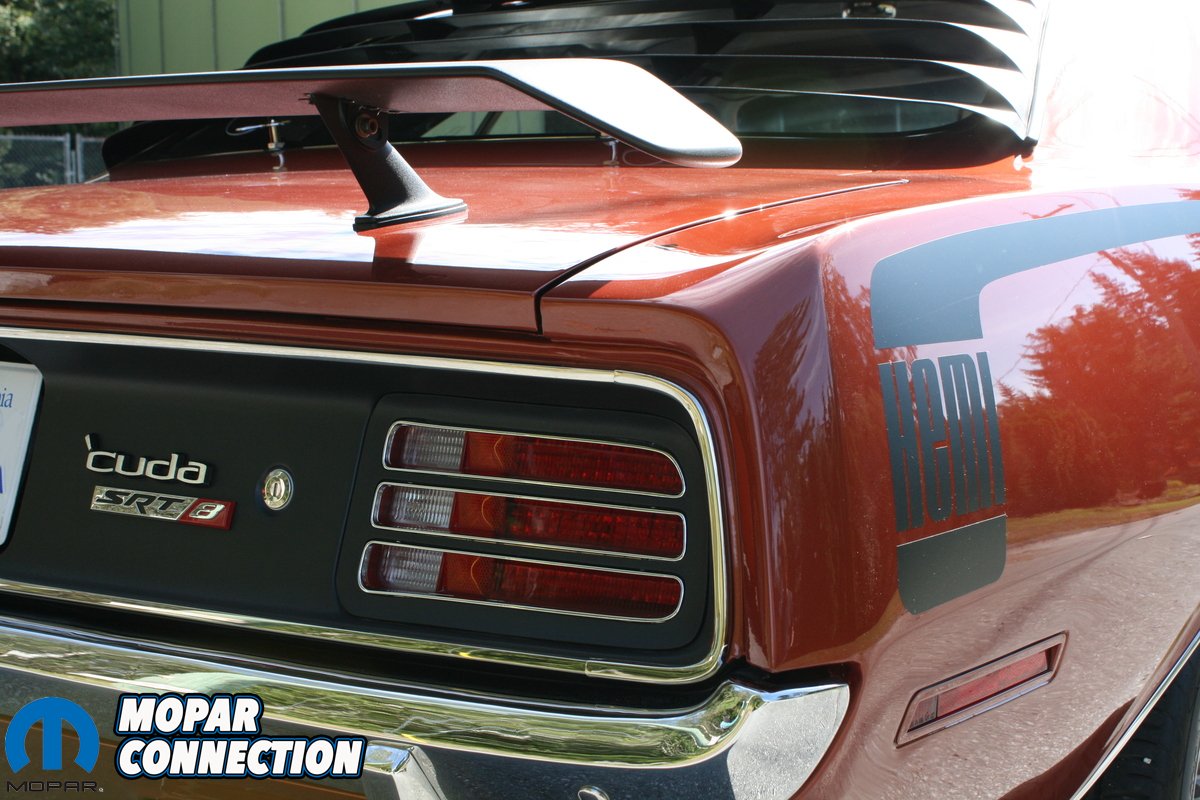
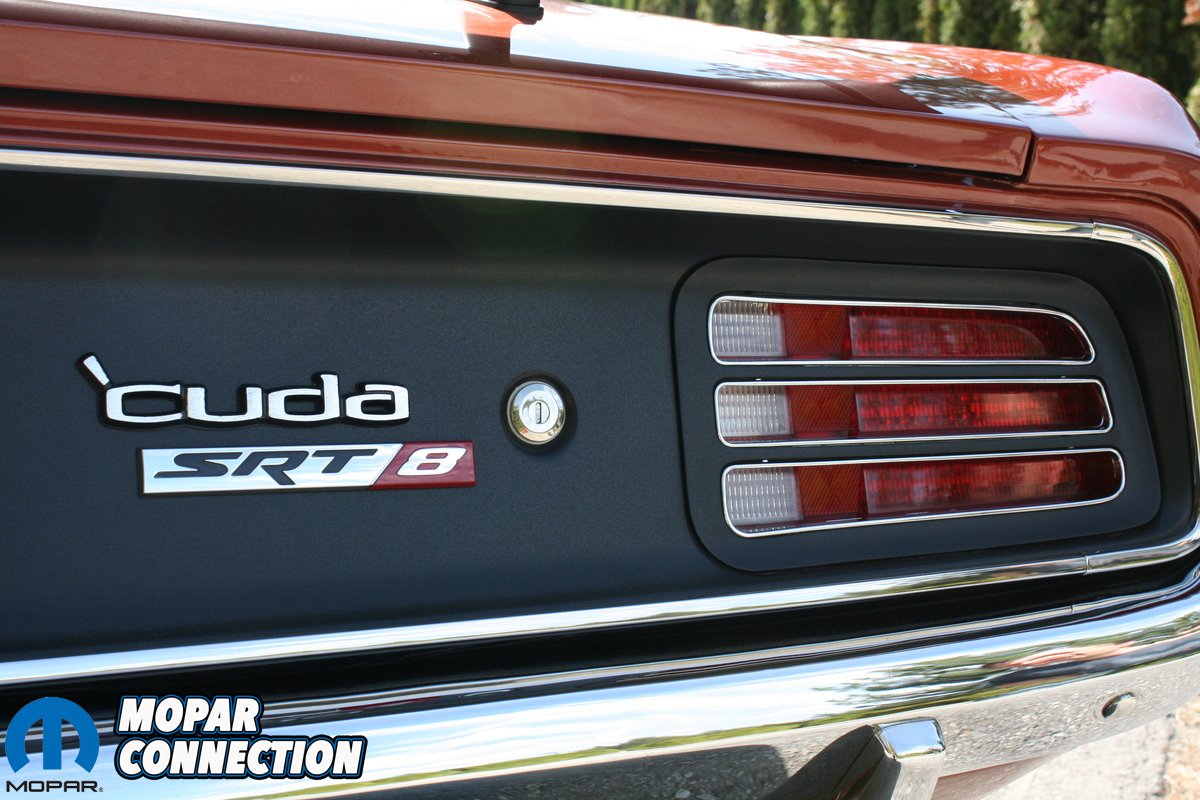
A lot of NOS parts were used for the restoration, such as all four complete side marker assemblies, tail light lenses, all emblems, wiper arms and dozens of detail items. “Besides the performance upgrades, I also decided to add a few more factory options such as the J68 rear window louvers, J81 rear spoiler, A01 light group and P31 power windows. All of the added options are original parts, not reproductions. The assembly was done in more or less the usual order: install all glass and trim, lights, bumpers, etc. Install the rear axle, then the engine/transmission/K-member assembly from the bottom up. Finally install the interior” says Barnabas.
As mentioned, many improvements were made aside from the modern drivetrain. Most of these are not readily apparent unless one looks more closely. The suspension features many upgraded parts, most of which were sourced from Firm Feel. These parts include 1.00” HD Mopar torsion bars, tubular upper control arms, HD sway bar, Koni shocks and urethane bushings. For better steering response, the factory manual steering box had faster ratio internals installed. The rear suspension had the original XHD leaf springs rebuilt and a factory rear sway bar was also added.

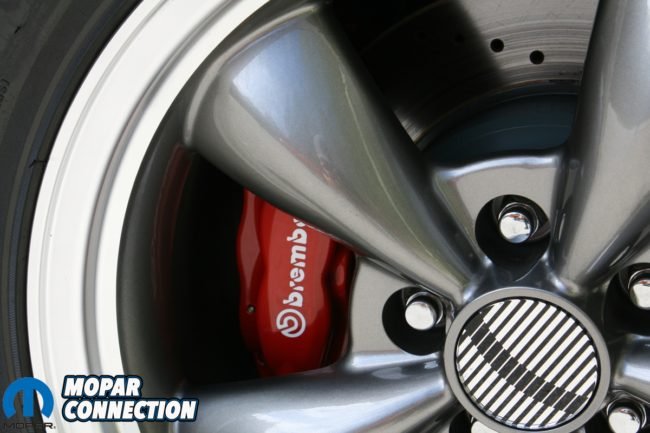
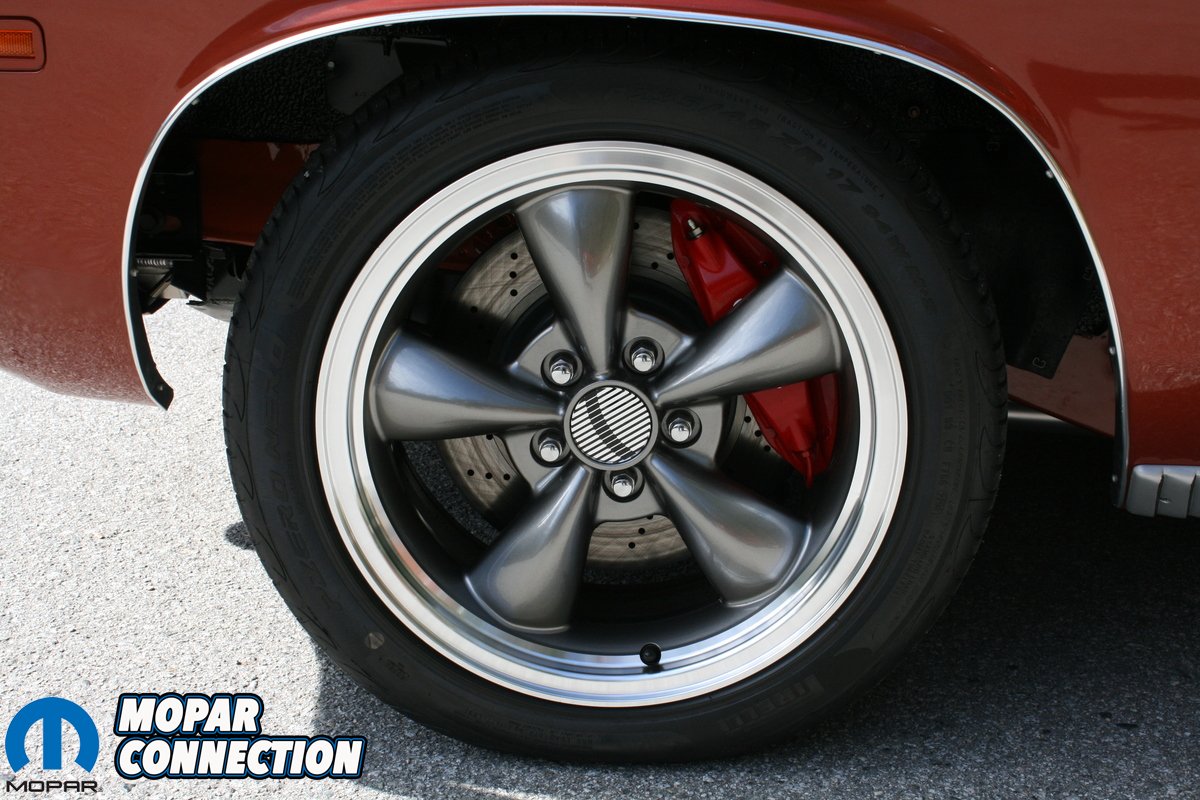
The brakes are also completely upgraded for premium stopping power. The front brakes are a kit sourced from AR Engineering and feature 13” rotors squeezed tight by 4-piston Brembo calipers. “For the rear, I did not find any readily available brake kit that met all of my criteria like the parking brake in the rotor hat, lightweight aluminum calipers and tapered adjustable axle bearings retained. That being said, I designed and machined my own parts, loosely based on the factory 1974-1975 Imperial factory rear disc brakes. I used the Imperial parking brake assembly and machined some custom brackets to mount 4-piston Brembo calipers, same as those found on the rear of the older SRT8 products and fit 12.6” rotors. This way the brakes look similar in the front and rear, and the piston sizing is very close to ideal”, says Barnabas. The wheels are those used on later model late 2000’s Mustangs; 17×8 in the front and 17×9 in the rear. They are wrapped in Pirelli P-zero tires; 235/45-17 up front and 275/40-17 out back.
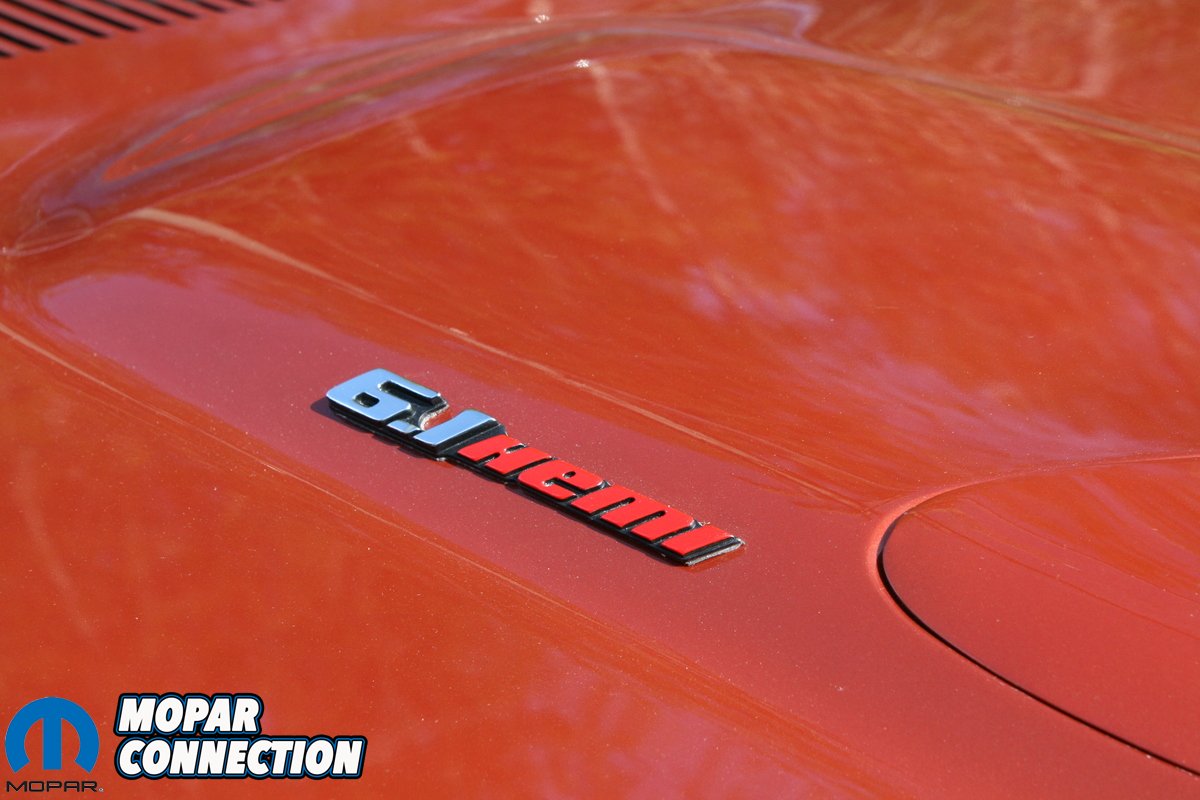
For the transmission components, Barnabas turned to then operating Keisler Engineering for a Tremec TKO-600 5-speed, billet flywheel and a ceramic faced clutch which is hydraulically actuated. The stock 8 3/4 rear end was rebuilt with a new 3.91 ring and pinion, all ARP fasteners, solid pinion spacer, an early clutch type Sure-Grip and custom made axles. Rather than find a wrecked SRT8, the engine is a brand new Mopar replacement 6.1L Hemi that was bought from Chrysler and came complete with the intake, fuel injectors, throttle body, wiring harness and other goodies. It was very quick that Barnabas decided to upgrade the engine as the stock 425 HP was not going to cut it. The first thing he did after taking it out of the crate was to disassemble it down to the short block. The heads were sent off for a complete CNC port job and upgraded valve springs. The intake flow on the ported heads is 350 CFM at 0.600” lift. A custom ground camshaft was supplied by Modern Muscle, with 0.607” lift and 300 deg. Duration. The intake manifold was also ported, using CNC porting on the runners and further hand porting on the plenum. The fuel injectors were upgraded to 46 lb/hr units and the throttle body was upgraded to a 92 mm unit.

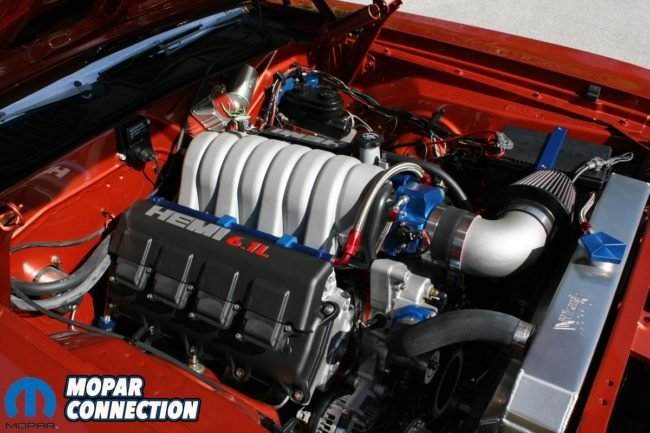
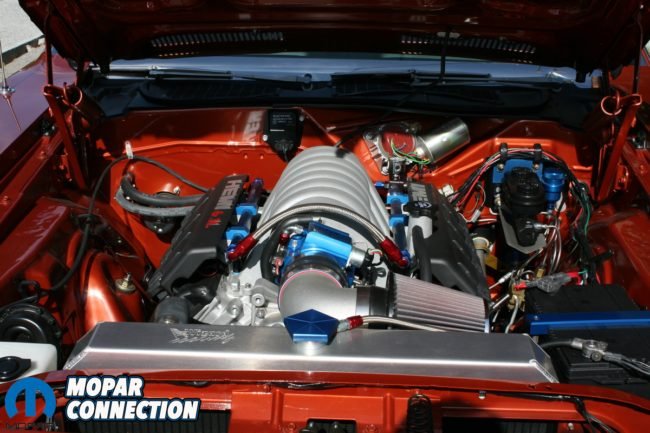
A Milodon oil pan, TTI motor mounts and headers were used to make the engine fit nicely into the E-body. A full custom made mandrel bent stainless steel exhaust system was fabricated by M-tech Automotive in Port Coquitlam, B.C. A reproduction fuel tank was cut open to install proper baffles and in-tank pump needed for the EFI system. The Hemi is kept cool by a custom aluminum radiator. The engine bay showcases quite a few custom fabricated pieces by Barnabas such as the Pentastar radiator cap and battery tie-down. To control everything, a FAST XFI engine management system was installed under the dash. Barnabas tells us this system is way more flexible than the factory style computer as all of the parameters are fully adjustable using a laptop. The wiring was a big job but fairly straight forward. While doing the engine wiring, a lot of other electrical upgrades were also added such as all major loads switch through relays and upgraded wiring from the alternator to the battery (a common problem area).
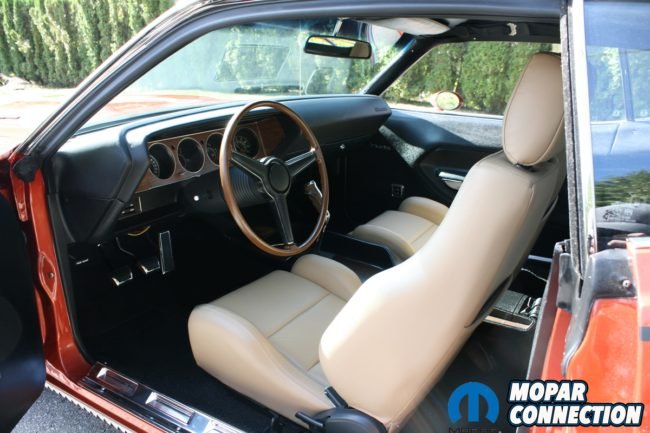
Another major upgrade was the instrument panel. For Barnabas, it was important to keep the stock type appearance as most aftermarket gauges just looked out of place to him. The speedometer was converted to electric, eliminating the speedo cable and a digital odometer was installed. The clock was upgraded to quartz, ammeter upgraded to volt meter and the tachometer upgraded to modern electronic internals. All of these are hidden behind the stock gauge faces. He tells us this project took about 80 hours alone to complete! In addition, the factory AM radio was upgraded to modern internals with 180W, AM-FM and USB input. After all of the electrical items were complete, it was time to fire up the engine. It started up almost instantly using a tune from a similarly built engine. It only needed minor adjustments to fit Barnabas’ build.


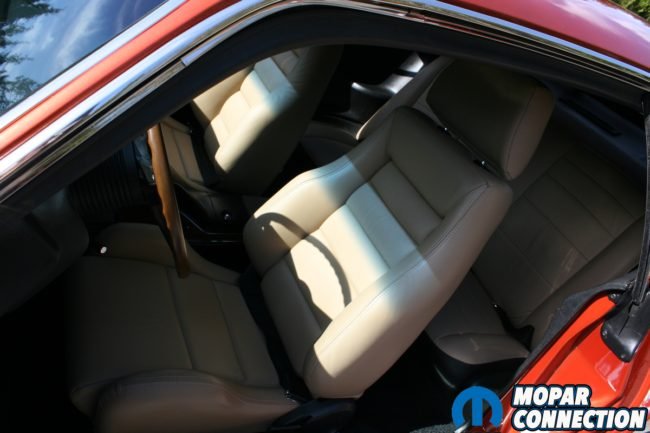
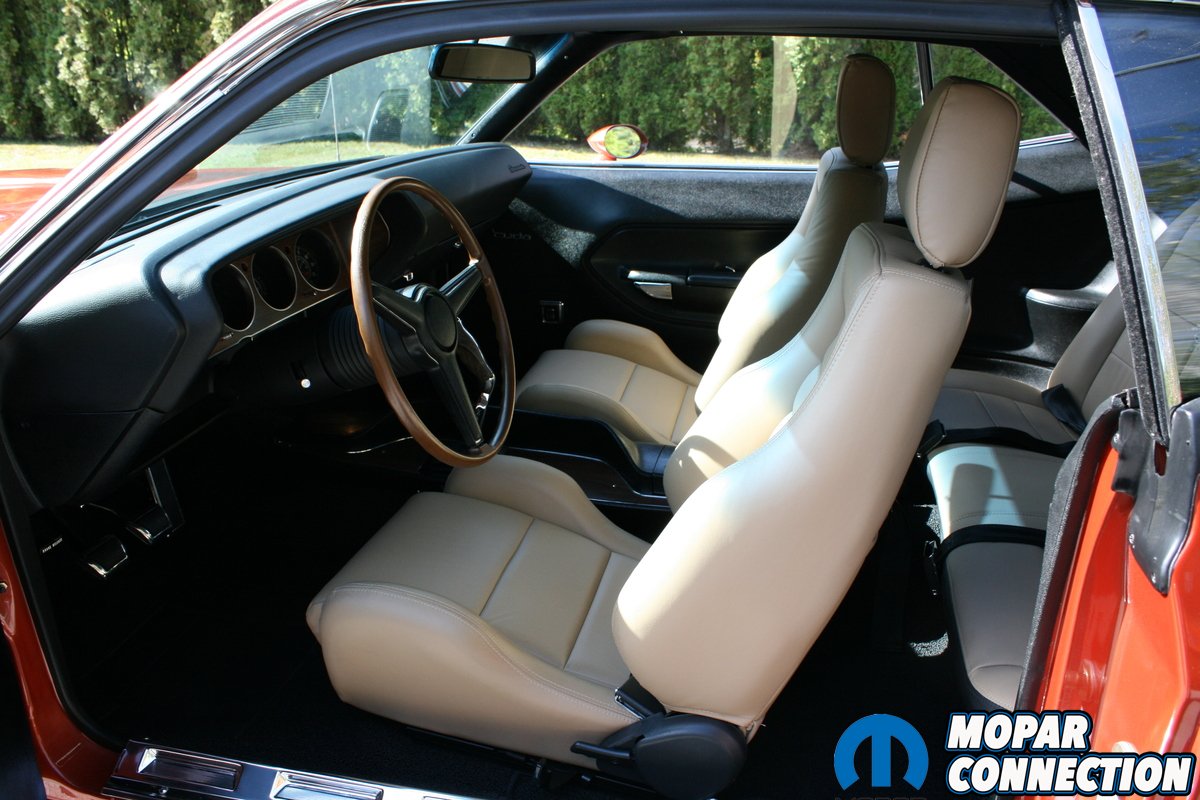
The last item to finish was the interior. A nice original dash pad was one of hardest parts to find, as Barnabas says the reproductions available at the time were not very good quality. After years of searching, he managed to source one on-line from a member on Moparts.com. A reproduction headliner and carpet were installed and the original door panels and console were cleaned and re-installed. Instead of using the original E-body front seats, Barnabas decided to use Corbeau seats that were custom ordered in tan leather to keep him in place better while cruising around. Additional matching leather was ordered for the rear seat and it was re-upholstered in the matching pattern by 360 Fabrications in Abbotsford, BC.
In July 2011, the ‘Cuda was finally finished after about 2000 hours of work. Barnabas has entered the car in numerous shows where it usually does quite well, bringing home trophies almost every time! Besides a possible future power steering installation, Barnabas says he plans on enjoying the car for many years to come.


