


Likely the first thought that comes to mind when preparing to replace a quarter panel is not what is the easiest way to do it. It’s pretty safe to say that everyone wants the replacement to look perfect whatever it takes.
Well, as it turns out, easiest might also be the best. Muscle Car Restorations has probably replaced hundreds of quarters over its thirty-plus-year history and at this point they have got it down to a near science. Sure, every car is a bit different so the process can be tweaked as needed for each individual case but the basic process is pretty much the same for most.
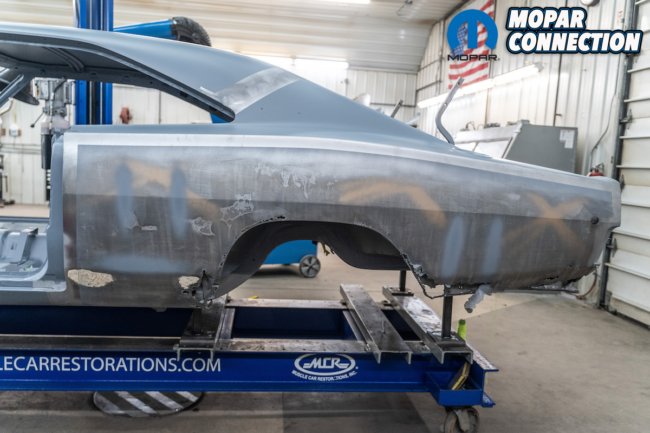
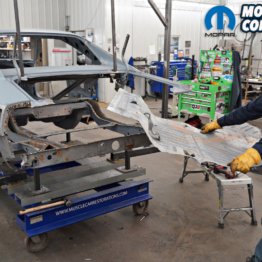
Above: This is the typical B-body quarter as they come back from chemical stripping. Doesn’t look like it has been replaced before but some sort of repair was undertaken in the past. No matter, it all has to go.
Above left: This is the portion of the quarter that MCR usually removes. You can see that this leaves the upper body line, door jamb and quarter to tail panel area intact. This also preserves the quarter to trunk lid gap. Note that the wheel tub, trunk floor, and tail panel have already been replaced. The quarter has to come off first to replace those but of course it can’t go back on until that work is finished. Above right: The new AMD quarter is trimmed of the areas that won’t be used and the e-coat is removed from all of the weld points with a 3M bristle brush.
At first it might seem logical to always replace the entire quarter panel with a new one. But if you’ve never attempted to do that then there are some potential pitfalls that you likely are not aware of. If you think about it (or better yet go look at one), there are a good number of contact points that a quarter has with the rest of the body and all of those need to line up perfectly if the desired result is to be achieved.
There’s the jamb behind the door, the contact with the roof, the trunk gutter area is not only a height issue but also affects the quarter to trunk gap width, and there’s the contact with the tail panel around the tail light. Add to that the precise location of the marker or side light and the body line that must line up with the one on the door and there are more than enough points to cause problems getting everything to look right.

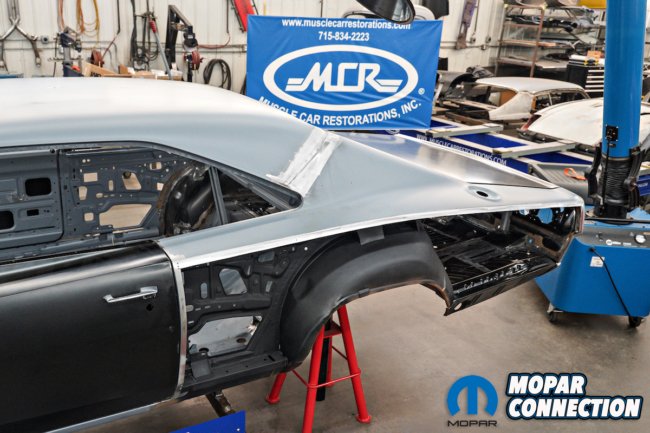
Above: The new panel is then fitted onto the body with sheet metal screws holding it in place. At this point it overlaps what’s left of the original panel but it won’t stay that way.


Above left: Sound deadener is applied to the back of the quarter to reduce cabin noise. Above right: With the new panel fastened to the car, a line is scribed around the new panel to mark where the final cut will be made on the body.
“Wouldn’t a new quarter panel do just that?” you ask. Not necessarily. That question is based on the assumption that all car bodies of the same model were identically constructed at the factory throughout however many years they were produced. Anyone who has actually worked on these cars knows very well that’s not the case. Add to that 50-plus years of road use, and possibly abuse, and it’s not hard to find that things have moved around a bit.
“Yeah, but if the new panel is an exact replacement for the OEM ones then shouldn’t it be just like the one that was taken off the car?” Again, not necessarily. That assumes that all quarter panels are exactly the same. It should be noted though that MCR has been using Auto Metal Direct (AMD) panels exclusively for pretty much as long as they’ve known about them. In fact, the only way MCR uses other’s sheet metal is if AMD doesn’t yet make it so they feel that AMD panels are the best factory fit out there.


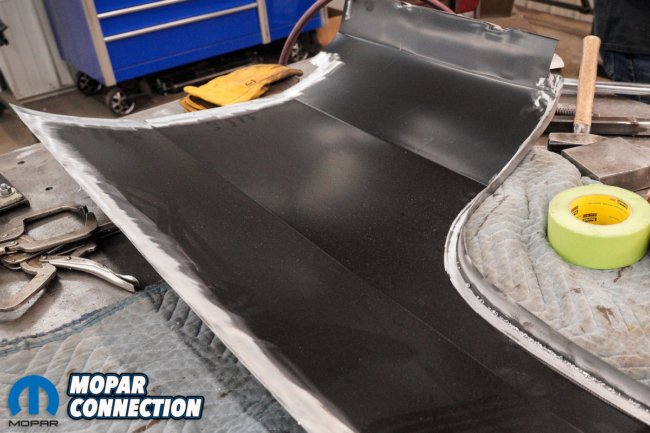
Above left: Carefully cut along that line to remove the final excess metal from the body. Above right: Set the new panel in place clamping it along the bottom edges and in the wheel well. If you’ve cut along the scribed line correctly, the edges should line up perfectly. (If not just clean up where necessary) Placing 3/8th-inch neodymium magnets along the seam will perfectly align the two parts and hold them in place as the first tack welds are added.


Above left: Start the welding process by placing a quick full penetration tack weld about every inch or so between the magnets. Continue this around the whole panel. Above right: A close up of what the seam and welds should look like.
“So then, what’s the process and how does it make the installation easier?” The solution is simple. Leave all of the critical attachment points in place, if possible, and only replace the bad parts of the panel. That way all of the factory contact points remain, well, factory. In other words, the parts of the panel that that make the difference between a good or bad fit are left undisturbed.
This involves cutting the panel around its perimeter and removing it from the wheel well and the lower body seams. This results in fewer alignment points and ultimately a fit as close to factory perfect as possible. There is a bit more welding this way but it’s not as big a deal as it first might seem. We’ll show you how.


Above left: Once the first set of tack welds are completed, go around the whole panel again placing another set of tack welds in between the first set. When done, the welds should be about an inch apart. Above right: The next step is to begin to fill in the gaps between the tack welds with a series of quick overlapping spot stitch welds. Note that this is not the same as running a bead weld; doing that will overheat the panel and cause warping. Think of it like laying down a series of quick overlapping tack welds.


Above left: It’s critical that each series of spot stitch welds are immediately air quenched. It is also a very good idea to move around the panel so each spot stitch area can cool completely before the next series of welds are added nearby. Above right: As the process continues, eventually the entire seam will be welded.
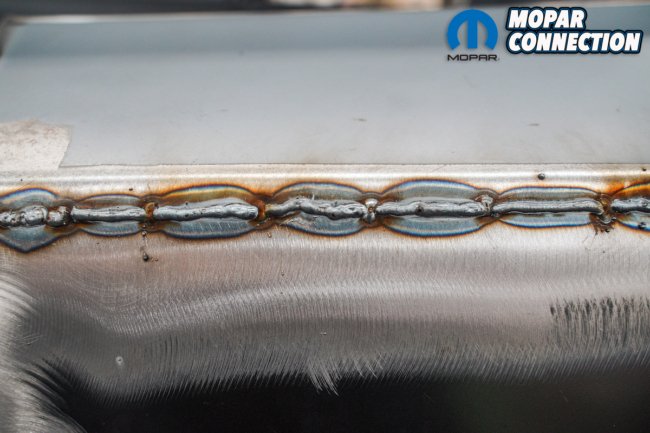

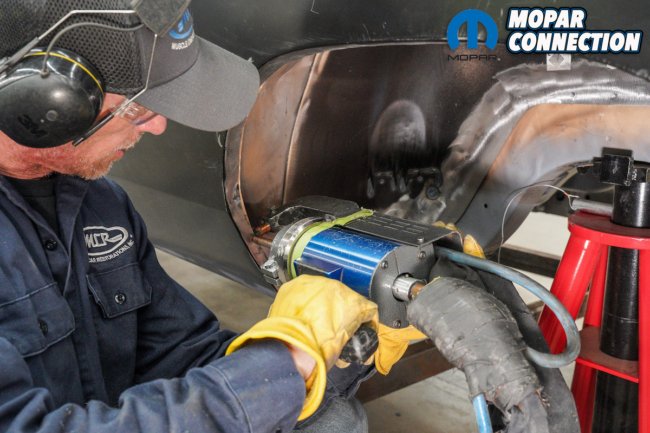
Above left: Here’s a close up section of the final weld. Note that the heat band stays very narrow. This greatly reduces the chances that any heat warping could occur. Above right: The final step is to grind down the weld flush with the sheet metal. This will test your skill with a grinding wheel a bit but is not really all that difficult. Just be sure to stay off the surrounding metal as that could get thin real quick.


Above left: This is what the final result should look like. The seam has virtually disappeared and will require very little body work before it’s ready for paint. Above center & right: The rest of the quarter is spot welded to duplicate the original factory look. If a spot welder is not available, plug welding these seams is a perfectly good alternative.
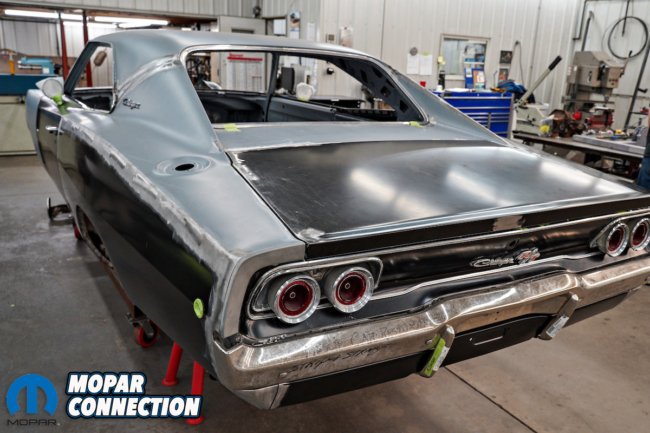
Above: The finished job will be indistinguishable from an original full factory quarter. MCR mocks up the quarter extension, taillight and bumper to confirm that everything fits just like it should. This must be done before any body work and especially before any painting is done.


 Mopar Connection Magazine – The ONLY Daily Mopar Magazine © 2022. All Rights Reserved. Mopar Connection Magazine is the ONLY daily Mopar Magazine bringing you the latest Mopar news, technology, breaking news, and Mopar related events and articles. Find out the latest information about Mopar, Mopar products and services, stay up to date on Mopar enthusiast news, dealership information and the latest Mopar social media buzz! Sign up for the Mopar Connection Magazine newsletter for the latest information about new products, services and industry chatter. Mopar Connection Magazine is the best and only source you need to be a Mopar industry insider!
 by
by