


With Project Trail n’ Thrash (TNT) back on the road legally, it was time to make it hold to its name. We are not going to lie, this is a whole new type of project build for us. We have a lot to learn but very excited to do so. Our first stop for parts was Extreme Terrain. Like their sister sites American Muscle and American Trucks, the Extreme Terrain site was super easy to navigate and made sure we were only viewing parts that would fit our 2013 Jeep Wrangler Sahara Unlimited.
Extreme Terrain carries an array of products from all the top manufactures in the Jeep industry. What we recently learned is they also have a few exclusive brands that are only found at Extreme Terrain. We like to be different and started looking at their exclusive brands for parts that would fit our needs.

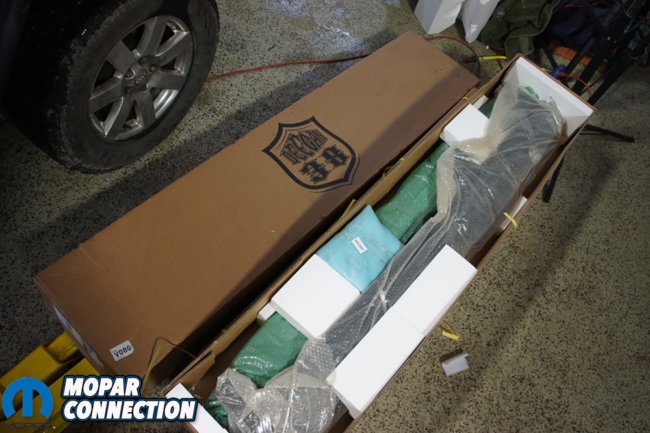
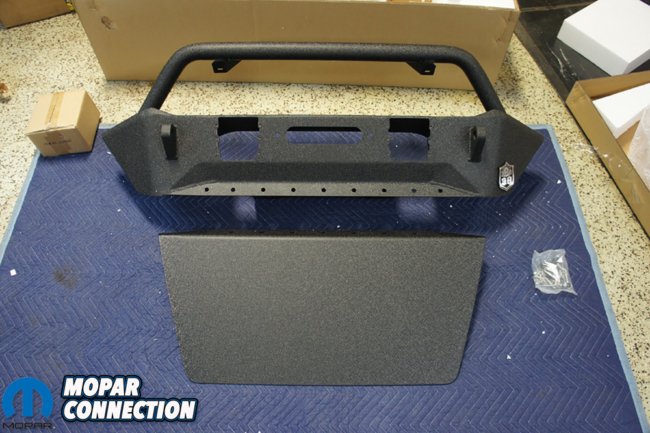
Above: This was only a couple of the boxes we received. Project Trail ‘n Thrash was ready for a new look.
We knew the first thing we wanted to do to the Project Trail ‘n Thrash was armor (bumpers, rock sliders, fenders, etc.). This is almost a necessity for off-road and even on road since the JK/JKUs come equipped with plastic fender flares and bumpers. They do pass crash ratings but are still a weak point of the JK/JKU platform. New armor will help keep the Jeep protected from trees, rocks, and other obstacles on the trails while giving the Jeep some aggressive character.
Choosing armor is not as easy as you may think. Extreme Terrain has pages upon pages of bumpers, sliders and fender flares to choose from. Although there were a lot of parts to search through, it was relieving to know that whenever we found something we liked it would fit our Jeep. There is nothing worse than spending hours searching a site and finally find something you like and then be told it does not fit your vehicle.

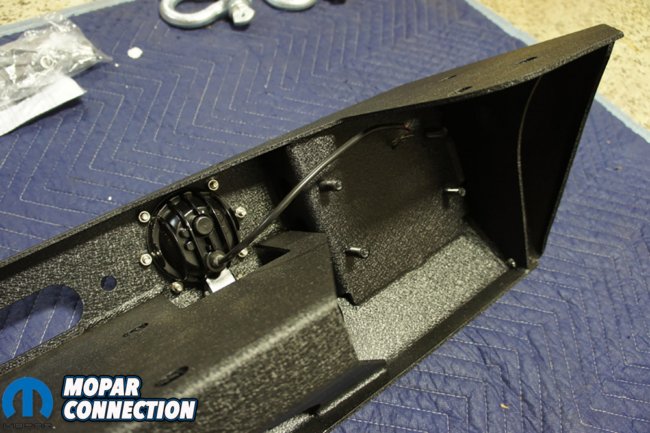
Above Left: The RedRock 4×4 stubby bumper with stinger came with everything we needed for installation. Including D-rings, LED fog lights, wiring harness, and all the hardware to mount it in factory location. Above Right: You can see the bumper is powder coated inside and out for superior protection.
We started with a search for front and rear bumpers. We wanted functional bumpers that would not break the bank. For the front we narrowed it down to a stubby bumper to help maximize tire clearance for future upgrades. You can check out Extreme Terrain’s Stubby Bumper page by clicking the link you will find videos, customer reviews, customer photos and all the JK/JKU stubby bumpers they offer.
Even though we narrowed it down to stubby front bumpers, Extreme Terrain still had a lot of choices. The next features we wanted was built in winch mount and led fog lights. Another important feature was we did not want to trim our frame rails for installation, we wanted to bolt it on and go. This started to narrow things down a lot. We really love the look of a stinger bumper and ended up choosing the RedRock 4×4 Stubby Winch Front Bumper with Stinger Bar and LED Fog Lights. It met all of our requirements and gave us an aggressive look.
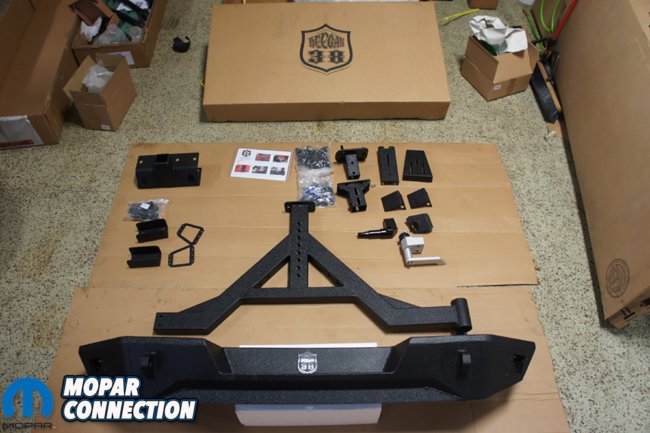
Above: The Deegan 38 rear bumper and tire carrier was a little more intricate than the front bumper. We could tell it was going to be very sturdy and handle any our spare with no issues.
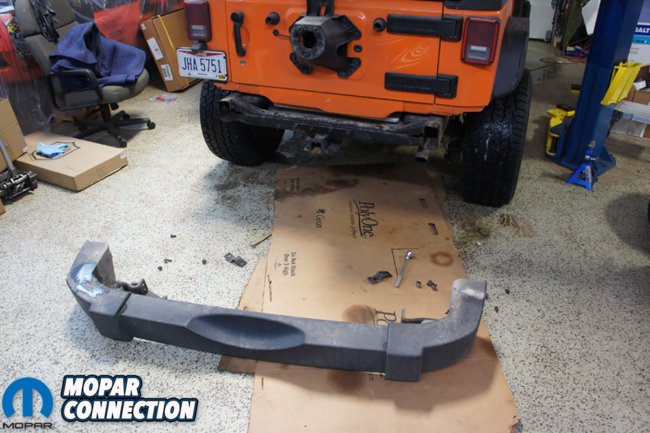

Above Left: The first step was removing the factory plastic bumper. Above Right: The factory tire carrier needed to be removed that covers the rear vent. We eventually ended up installing a RedRock 4×4 Spare Tire Delete Plate.
Next up was choosing a rear bumper. There are lot less options for rear bumpers compared to the front. Looking to the future, we knew the factory rear door tire carrier would not last because eventually we plan to upgrade to 37” tires. Having a tire carrier built into our bumper would be ideal and allow us to carry a lot larger spare tire. There is some conflicting thoughts on carrying a spare but we think its best, you never know what might happen.
We also wanted the sides of the rear bumper to protect the rear bottom corners of Project TNT. After looking through a few we decided that extra lights for backing up would be a huge help at night. The Deegan 38 rear bumper and tire carrier fit all of our wants and looked awesome. This would take a lot of stress off our rear door and be a huge upgrade from our stock plastic bumper.
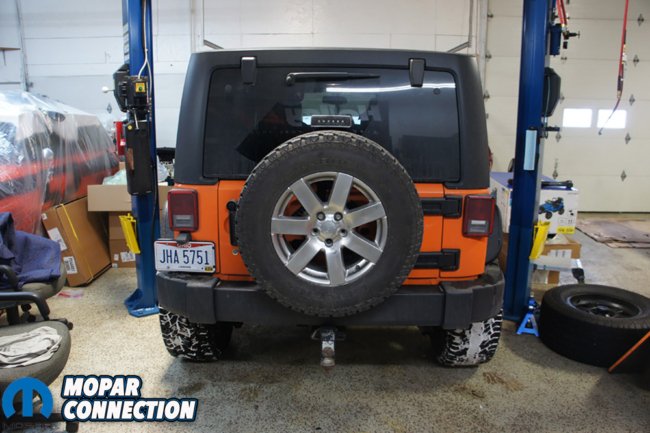

Above Left: You can see the factory tire carrier, spare tire and rear bumper. Above Right: What a difference the Deegan 38 rear bumper and tire carrier made. We felt comfortable hanging our bigger spare off the back. There was a big weight difference in the tires and glad that weight was supported properly and not by the factory door and hinges.
With our bumpers chosen it was on to rock sliders or side steps. Once again Project TNT was outfitted with plastic side steps. These had to go immediately. We still wanted a something that we could step on but keep as much ground clearance as possible. We needed something that had a good shape that could slide on rocks or pivot around trees without being folded in half or get caught up on a bulky bracket.
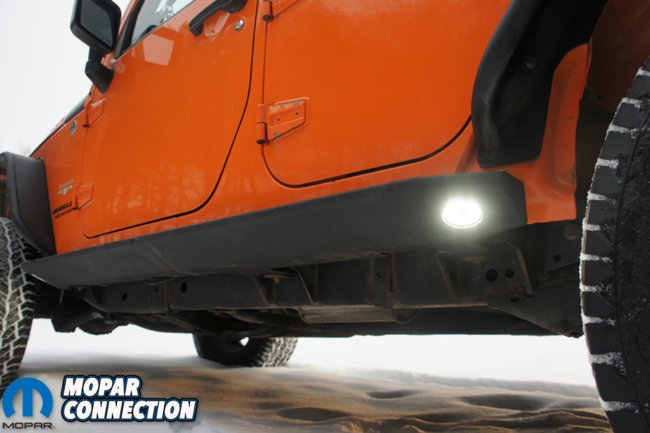
Looking through the multiple pages, we noticed once again that Deegan 38, which is an Extreme Terrain exclusive brand, offered HD Rock Sliders with LED Rock Lights. Like most, we are a sucker for more lights, but these lights make sense. At night these would help light up the trail and see obstacles under the Jeep. These would also have a great profile and bolted to the frame and the rocker for added strength. Another perfect fit for Project TNT.
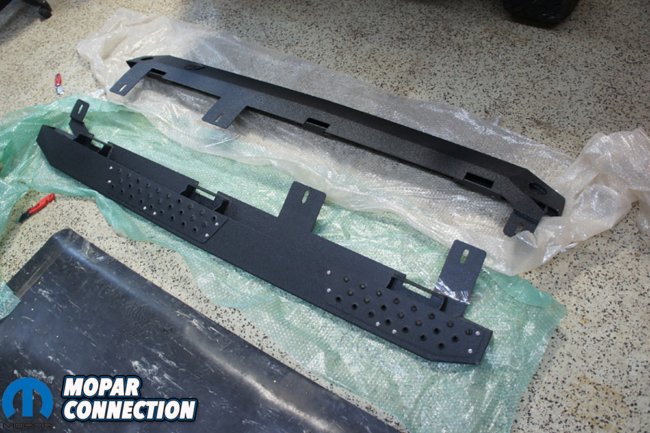

Above Right: Our Deegan 38 Rock Sliders with LED Rock Lights were packaged very well. Above Center: It took us a few to get our sliders unwrapped. Once again we were very impressed with the build quality and powder coating of our sliders. Above Right: The rock lights that came with the Deegan 38 sliders were KC Hilites Rock Lights. Very easy to mount and came with a complete harness for easy installation.
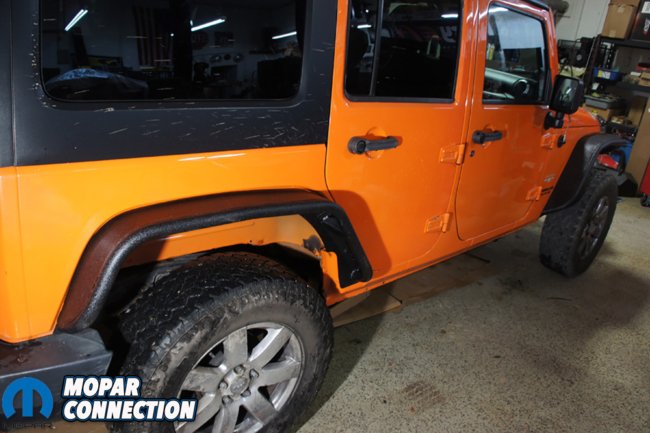
Now that we had our bumpers and rock sliders chosen, next up were to get rid of the factory plastic fender flares. We were told by multiple people that one of the first things that take majority damage on the trails is the plastic fender flares. They get scratched up very easily or will catch a tree limb and rip completely off causing even more unnecessary damage. No one plans to destroy their Jeep, we wanted to be prepared for anything.
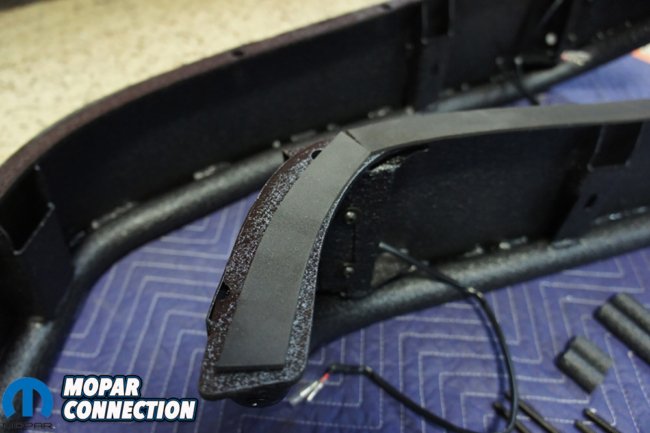
Fender flares are a debatable item for many. There are aftermarket companies that make stronger and flexible plastic flares, others make them out of aluminum or steel. We opted to stay away from plastic, narrowing it down to steel or aluminum. Aluminum was a little pricey and not as many options. We wanted a strong flare and something unique. The Barricade Tubular Fender with LEDs would end up being our choice.


Above Left: We recommend to have help installing the Deegan 38 sliders, they are not light weight. Above Center: We installed our KC Hilites Rock Lights before we installed the sliders on Project TNT. Above Right: The sliders looked incredible, gave us more clearance and still incorporated a nice solid step for getting in the Jeep.
The tubular design made the flares much stronger than other steel flares. These were probably a little heavier than other steel flares but, we liked the extra protection. They also had built in LED marker lights that gave a very unique look and one that we have not seen. They were one of the best deals for a complete matching set on the site.
Now that the we had all sides of Project Trail ‘n Thrash protected, we had one other piece that we wanted to replace while we had the front bumper off. Project Trail ‘n Thrash needed a new grill to some damage our factory grille encountered. It took on some previous damage and wanted to change it out with something more aggressive. We wanted to keep the distinctive 7 slot look of the original Jeep grille and narrowed down our options quickly. A Deegan 38 grille popped up and immediately knew it was the one.

Above: Our Barricade tubular flat fenders came with all the needed hardware. These were also very well built and knew they would help protect us on the trails.
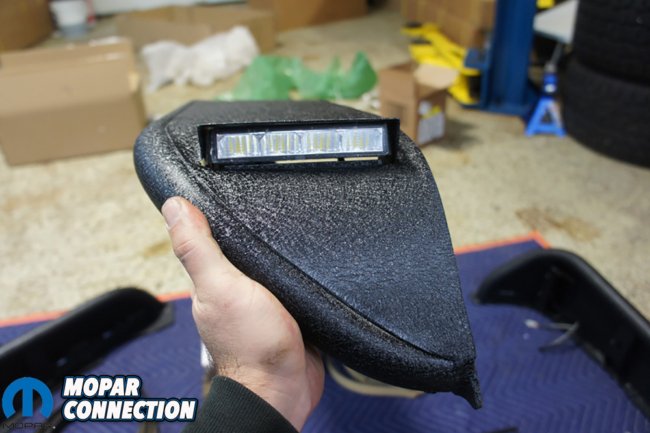

Above Left: The Barricade fender flares came with adhesive foam tape for a tight seal against our fenders. Above Center: The LED lights gave Project TNT a unique look while adding some extra light. Above Right: You can see the Barricade flares were welded together for extra strength and powder coated inside and out.
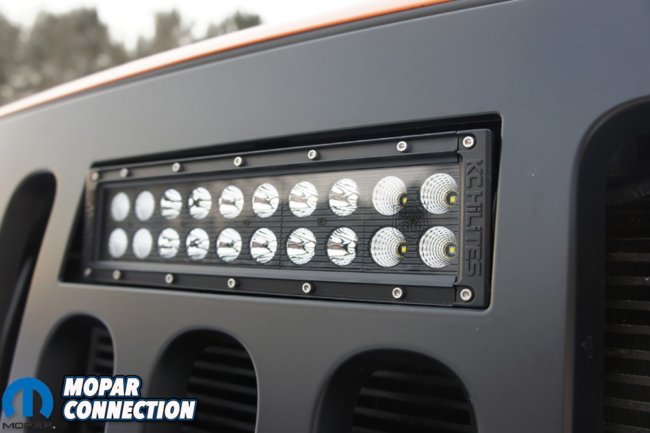
The Deegan 38 grille had a classic look with the addition of a built in 10” KC LED light bar. The grille is made from durable ABS plastic and came in a matte black finish. The turn signal indicators mounted on the backside of the grille for extra protection. The angry eyes were not overwhelming and has grown on us over the last couple months.
Our poor UPS delivery driver probably hates us by now. The plethora of ordered parts were not light. We had parts showing up every other day for a couple weeks. By the time we received all of our parts, we were able to get the Jeep inspected and fully insured for the road.


Above Left: We figured it was a good time to grab a nut insert tool. Extreme Terrain offers a Smittybilt Nut-Sert tool and we highly recommend it. Above Center: We had to drill out our factory holes just a little bit but the nut-serts went right in. Above Right: With the nut-serts in, the Barricade flares bolted right on with no issues. All the holes lined up perfectly.
With a garage full of parts, it was time to get to work. The parts were heavy and built tough. We really enjoy the look of the premium two stage textured powder coating. Each piece was powder coated from the inside out for superior protection. The textured look gave us that unique style we wanted, yet would provide us with years of protection from the snow, mud, rain, etc. All of the parts were built using heavy gauge steel that would give us the extra protection on and off-road that we wanted.
We started with the front bumper and grill first. They were fairly easy and would change the face of Project TNT. We are not going to bore you with the removal or installation, as you can find majority of that info on Extreme Terrain’s YouTube channel right here. Their videos are great source for comparing products and installations.
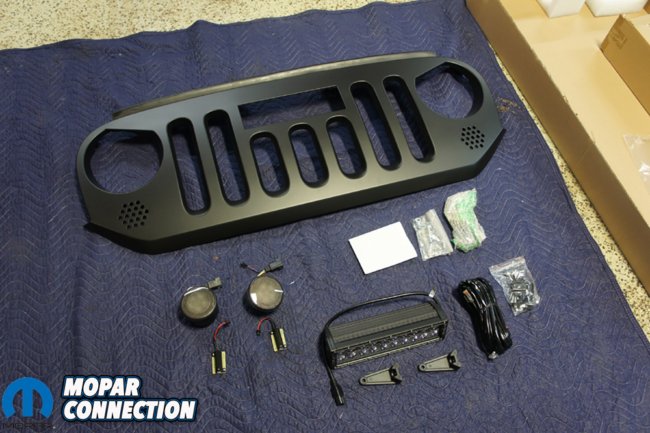
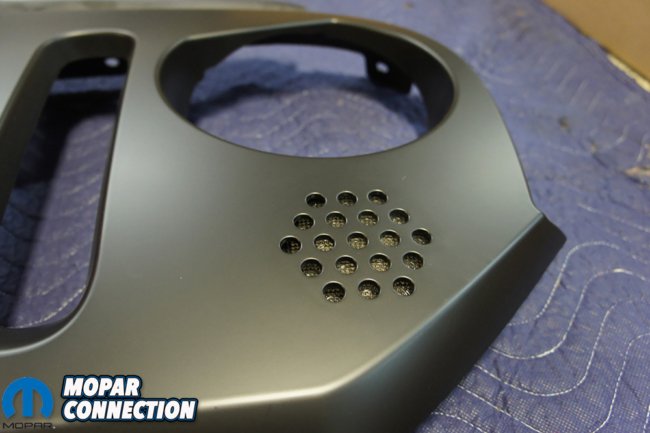
Above Left: The Deegan 38 grill came with a 10″ KC HiLites LED bar, mounts and wiring harness. Above Right: While upgrading the grille we opted to pick up a set of Axial Smoked LED Turn Signals.
The RedRock 4×4 stinger came in two packages. The stinger came in one box and the lights, hardware and bumper came in another. Now, a stinger is normally to help prevent from rolling over when descending down a steep hill. This stinger bolts on and is pure ascetics but will assist us in knowing where the front of the Jeep is during trail rides. The stinger is also not a tow point, that is what the D-rings are for.
The bumper fit well and went on fairly easy. It was time to switch out our factory orange grill. Our grill looked pretty good but did have some damage on the passenger side. The Deegan 38 grille went right into place. Wiring and mounting the KC HiLites LED light bar took the longest. With the grille in and bumper on we waited until dark to see how the light and stinger worked and unfortunately it did not. The stinger was positioned directly in front of the light bar in the grille.
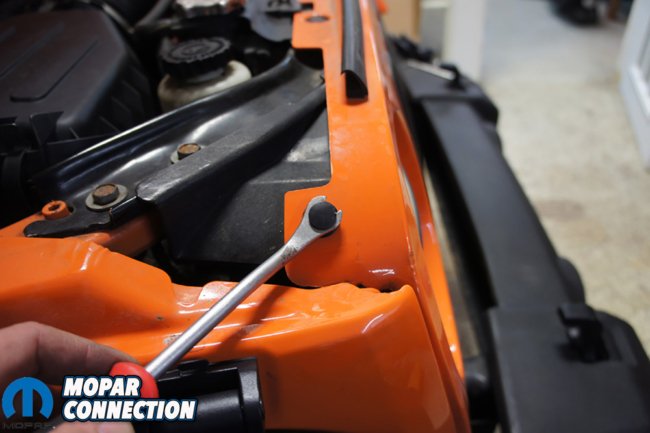

Above Left: Removal of the factory grille was fairly easy. Using our clip tool we removed the clips across the top of the grille. Above Right: With the top clips out we gently pulled the bottom of the grille out to pop the grill loose. You can see in the picture there are metal clips that hold the bottom of the grille in place.
This issue would render our KC HiLites LED bar useless at night. We could easily unbolt the stinger from the bumper but we wanted some sort of bar protecting the front. We quickly went back to Extreme Terrains website and started to browse front stubby bumpers. Since we had the Deegan 38 grille, rock sliders, and rear bumper with tire carrier, we opted for the Deegan 38 front stubby. The Deegan 38 stubby came with KC HiLites LED fog lights, built-in winch mount, and had dual locations on the front bar to mount more lights. We even bought the optional skid plate for a little extra protection.
It sucked that we had to wait for the new bumper but we knew that it was built to work with the Deegan 38 grille. Luckily Extreme Terrain ships quick and only took a couple days to get to our door step. We unboxed the Deegan 38 bumper and mounted it to the front of the Jeep. This bumper had the same premium textured powder coating and built very well. It surpassed our expectations and happy with the new look for Project TNT.
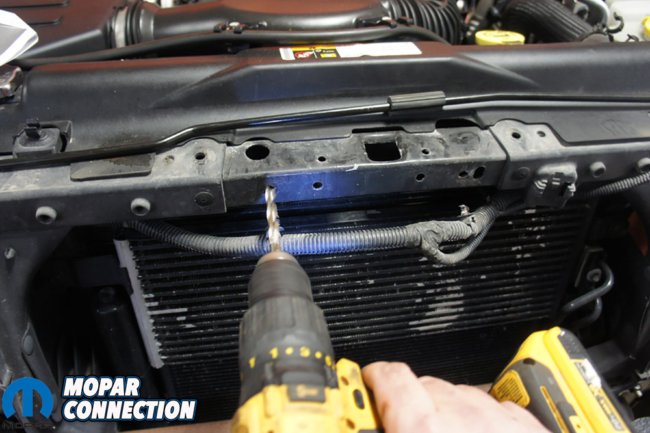
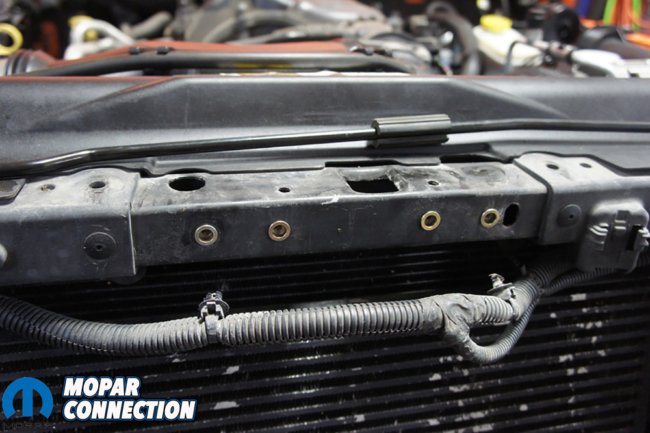
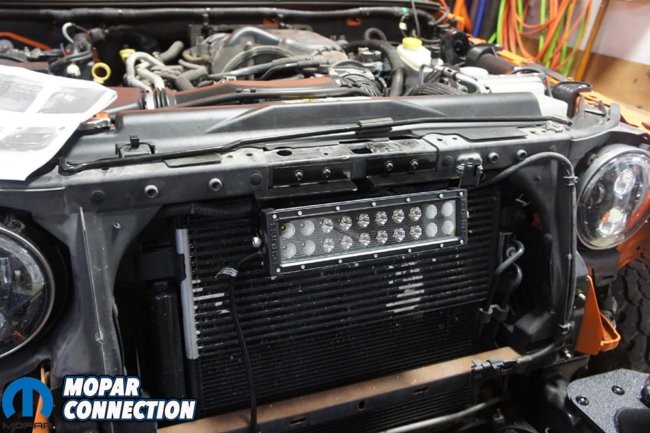
Above Left: The KC HiLites LED bar mounts using existing holes in the header which we needed to drill a little larger. Above Center: With the holes drilled larger, we were able to place our nut-serts. Above Right: The KC HiLites 10″ LED light mounted perfectly.
The KC HiLites Deegan 38 fog lamps wired in easily to our factory fog light plugs. We ordered fog light extensions from Extreme Terrain and cut them in half so we had a factory plug end for the new fogs. Best part is the push bar was just low enough to not interfere with the KC HiLites 10” light bar in the grille. The grille and bumper combo gave the Jeep a mean look and functions better than factory.
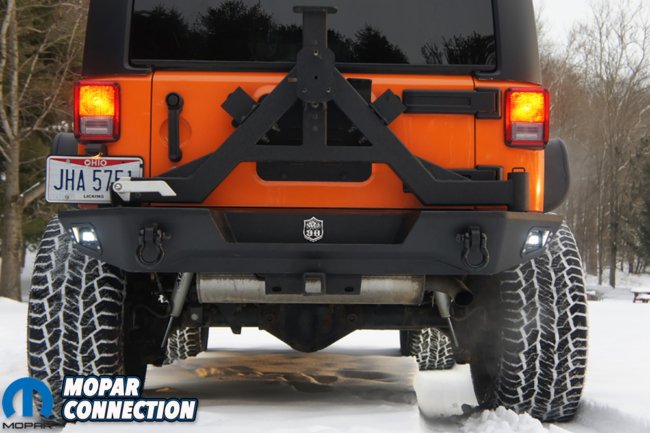
Next up was the Deegan 38 rear bumper with tire carrier. This was a heavy piece and although we installed it by ourselves, we would highly recommend having a helper. Just like the front, the rear bumper had the same premium two stage textured powder coating. The rear bumper came with a new rear hitch and everything needed to mount your spare and relocate third brake light if you wanted.

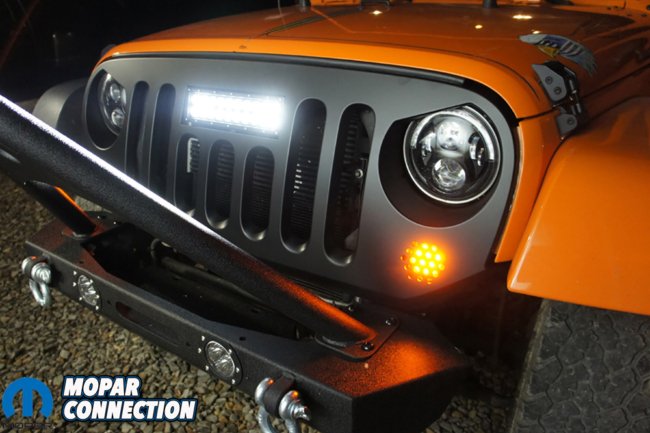

Above Left: Now that the KC HiLites light was mounted, we popped the new grille in. The aggressive new look is exactly what we wanted. Above Center: We waited until dark to test out the KC HiLites light in the Deegan 38 grill. Notice our smoked led turn signals light up amber when in use and have a white halo for parking lights. Above Right: We were worried this would happen. The RedRock 4×4 Stinger was directly in the way of our KC HiLites LED light bar.
The corners of the bumper have spots for the Deegan 38 KC HiLites mini flood lights. The bumper does not include the lights and will need to be purchased separately. If you do not want them, the bumper includes block-off screens. You might be able to find other LED lights that work, but the Deegan 38 mini floods are an exact fit.
The bumper tied in nicely to the factory locations and did not require any drilling. The instructions lead us right through the installation with ease. The bumper is very sturdy and the dual bearing hinged tire carrier provided a smooth swing and plenty of strength. The tire carrier will accommodate up to a 37” tire, which is our ultimate goal.


Above Left: Since the RedRock 4×4 Stinger blocks our light bar, we headed back to Extreme Terrain’s website to find something different. We ended up picking a Deegan 38 Stubby bumper with LED lights. Above Center: The Deegan 38 Stubby came with KC HiLites Deegan 38 fog lights. We installed them and mounted the bumper. Above Right: The new look is not exactly what we originally wanted but rounds out Project TNT better than expected.
With the front and rear Deegan 38 bumpers installed, it was time for our Deegan 38 HD rock sliders with LED Rock lights. It would be wise to have help with these also, as we did not. Being a 4-door Jeep, these sliders become awkward to mount because of their length and weight. We installed the KC HiLites rock lights into the sliders before we mounted them on the Jeep. The factory plastic steps were only bolted to rocker and were removed easily.
The Deegan 38 HD rock sliders come with all the hardware needed and came with a light harness and switch for the rock lights. We wired the lights in after they were mounted but in hindsight learned that it is easier if you do it before. The hardware kit included plates that are used to mount the sliders. They have small metal rods attached to them to help you hold them in place to get the bolts started. Once they are all in and the bolts are tightened down, you can bend the rods back and forth to break them off.

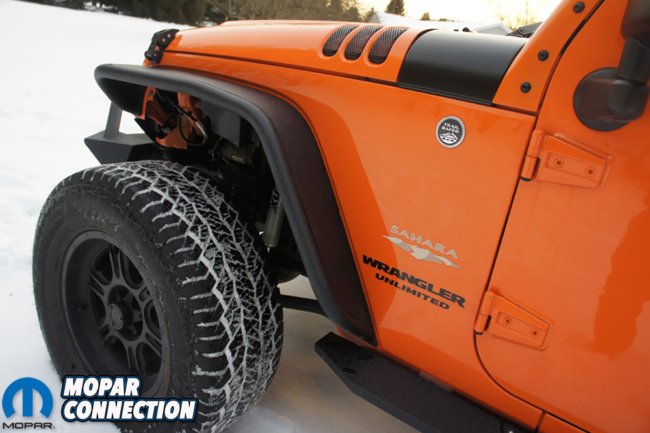
Above Left: We really love the Deegan 38 Rock Sliders and use them every day getting in our Jeep. Above Center: We took our spare tire off so you had a better view of the Deegan 38 Rear Bumper with Tire Carrier. Above Right: The Barricade fender flares look awesome and have kept the majority of mud and rocks off Project Trail ‘n Thrash.
The rock lights on the rock sliders worked awesome after we wired them into our Raxiom Switch Panel, more on that in an upcoming article. We would never have guessed that the rock lights might be our favorite. They light up a ton of ground under the Jeep at night. They will be much needed when we are trail riding at night, along with all the other lights that are integrated in our Deegan 38 bumpers.
We were amazed with the overall look of the bumpers, sliders and grill. The Deegan 38 HD rock sliders tied in the front and rear bumpers perfectly. They also hugged the Jeep tightly just like we wanted. The small Deegan 38 metal badges were a nice touch on the bumpers and sliders. But, we were not done yet.
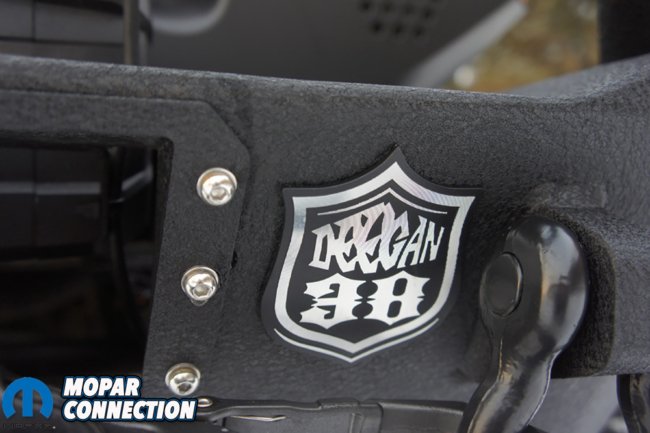
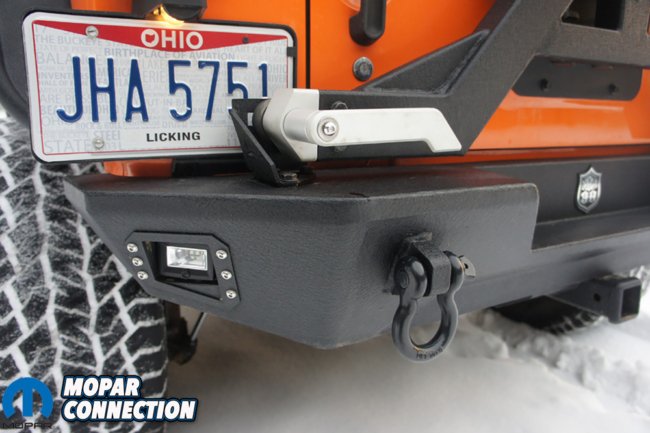
Above Left: The metal Deegan 38 badges are a great touch to all of our new armor. Above Center: Although it’s small, it’s mighty. The KC HiLites bar offers a combo beam for outstanding performance. Above Right: The small Deegan 38 flood lights really help us see in the night when we are backing up.
Next up was the Barricade Off-Road Flat Style Tubular Fender Flares with LED lights. As we unboxed the flares we were happily surprised that they had a similar premium powder coating like our Deegan 38 products. These flares were built with 1.5mm thick carbon steel and 38mm x 2.5mm round tubing for superior protection. We were not going to rip these off like our factory plastic ones.
To start, we needed to remove all the plastic factory flares and inner fenders. You can go about removal two ways, one very carefully and not break clips or you can just pull them off and hope the clips do not break. We were not worried about reusing the clips or the flares and opted to pull them off, most the clips broke.
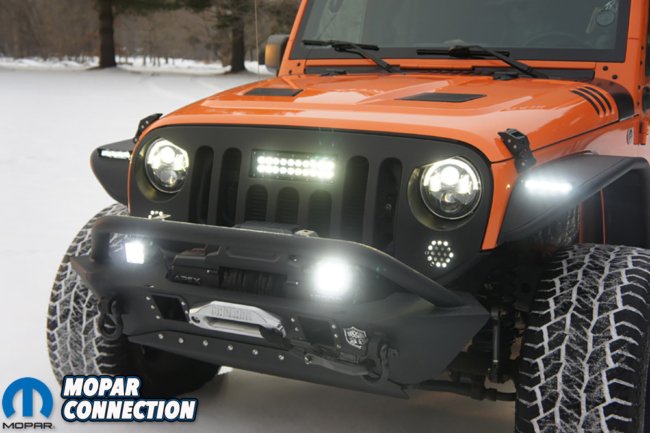

Above Left: It might be hard to see but there is still room for more lights. The fog lights were moved to the front bull bar for now because our winch needs spaced up. Above Right: The mini flood lights mounted in the Deegan 38 rear bumper are positioned perfectly.

Above Left: The rock lights were surprisingly bright and lit up the ground perfectly. Above Right: It might not seem like it but this picture was taken in the middle of a pitch black field. All of the lights did a wonderful job. Note we did not have our rear bumper lights wired in yet.
With the fenders off, we started to prepare for the Barricade tubular metal flares. The fenders came with a hardware kit that included nut inserts and a tool. We did not use the provided tool but instead our Amazon special nut insert tool, and it worked great. The new flares holes matched up perfectly with our factory holes. With our nut insert tool, we popped in the needed nuts quickly and bolted the flares right on.
Once the flares were on, we spliced into the existing wiring of the side marker light for the new LED lights. We could have put them on a switch but this way they come one with the headlights. They do add some additional light but nothing extravagant that would blind oncoming traffic.
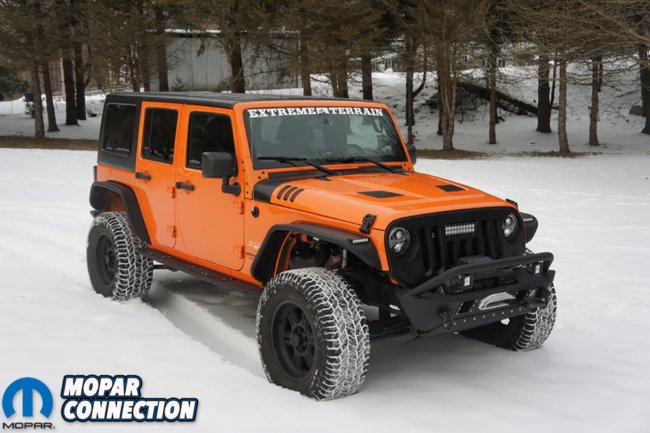
Above: Driving Project Trail N Thrash is even more exciting now. The aggressive look of our Jeep is not only easy on the eyes but also highly functional. We picked each piece carefully and with a lot of thought and it turned out exactly as we planned.
With the armor and grill installed we took a step back to take in the new look of Project Trail ‘n Thrash. It came out better than we anticipated. The best part is we get to drive it daily, unlike some of our other projects that do not see rain, snow, mud, etc. You know you did something right when you cannot walk away from it without turning around at least once to look at it. Now we are ready to hit the trails. There is plenty more to do and Extreme Terrain will be there to help us along the way.


