


For the last decade, I have used a retired Charger Pursuit Package as a “company car” affectionately called “Adam-12” to haul my photo equipment into Mopar events and as a “test bed” for aftermarket components. The most asked question about the Charger has been, “Is it fast?” And a close second is, “Why did you get a police car?”
To answer the first question, yes, it is fast, but no faster than a Charger R/T. And for the second question, I wanted to test newer technology. Over the following year, I will cover the events that transpired to rebuild the Charger.

Above: In 2014, your author picked up a 2006 Dodge Police Pursuit Charger with 80K miles on the chassis. The Hemi had been replaced at 53K miles, and the automatic transmission was replaced at 65K miles. When the Charger was purchased, it had several codes and driveability concerns. Returning the Charger to civilian duty would take some time, so follow along over the next year as the progress continues.
In 2006, Dodge got back into the police car business with a serious attitude by introducing the Dodge Charger and Magnum Police Pursuits. After completing their service duty, municipalities auctioned the cars at substantially reduced prices compared to similarly equipped non-police versions.
The usually high-mileage Police Pursuits are now in the hands of private citizens to use as daily drivers or weekend warriors. Is purchasing a former police car a worthwhile investment or a never-ending problem you bought from the local municipality? In 2014, I jumped into the deep end and purchased a 2006 Dodge Charger Police Pursuit to experience the pros and cons of a (relatively) low entry price.

Above: After towing the Charger home, I cleaned the interior. The front seats were in rough shape and would require new upholstery. The rear seat was removed, and its condition was so nasty I threw it away. Scattered throughout the interior was several live 9mm rounds, shotgun shells, drug testing kits, Tootsie Rolls, and hundreds of Dunkin Donuts napkins. Worst of all, a small plastic baggy with a brown crystal/powder was found in the rear seat area. All the ammunition, drug test kits, and the baggy were turned over to the Pennsylvania College of Technology Police (my employer). The brown substance turned out to be heroin.
As Elwood J. Blues of The Blues Brothers famously stated about police cars, “It has a cop motor, cop tires, cop suspension, and cop shocks.” The public believes police cars accelerate faster, stop shorter, and corner better than the average non-police version of the exact vehicle. Some of that may be true, but most are not.
The Pursuit came with the following differences from the non-police versions:
100-amp battery feed in the trunk
160-amp high-output alternator
160-mph calibrated speedometer
800CCA battery
Cloth seats with manual controls
Column shifter
Firewall grommet pass-through
Emergency rear door lock override
External oil coolers
Performance-tuned suspension
HD brake linings and rotors
Hour meter
225/60R18 V-rated Goodyear tires
Performance-tuned steering
Police interface module coupled with an equipment center console mounting bracket
Rubber carpeting
Severe-duty cooling system
Software-controlled alternating head and tail lamps
Police-related pre-wiring
For the Police Pursuit package, a 3.5L V6 or 5.7L V8 Hemi were the engine options, and both were stock. The transmissions were automatic five-speeds. A unique electronic stability program (ESP) had three settings, and the traction control and anti-brake lock system (ABS) had additional features.
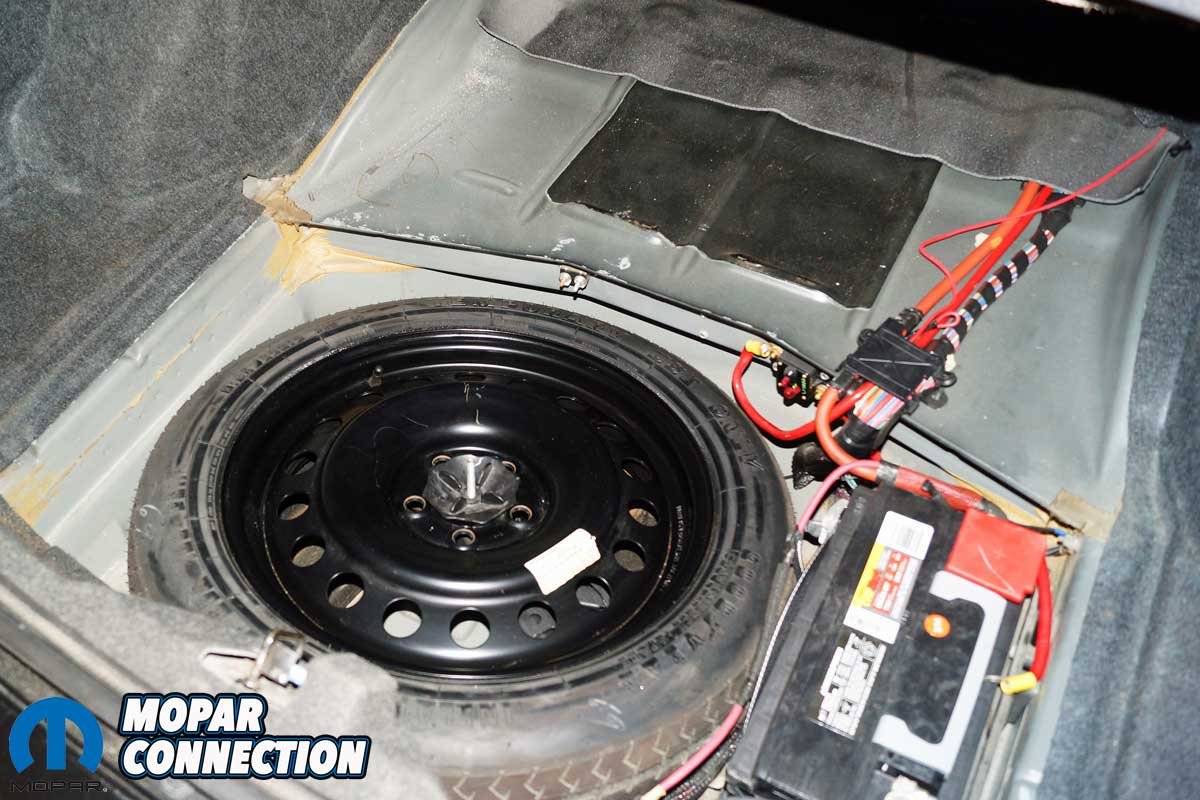
Above: I cleaned the trunk of the Charger, and just like the interior, I found ammunition and drug test kits. Additionally, I found road flares and nylon gloves. The Police Pursuit Package had an 800 CCA battery, additional wiring, and a circuit breaker that fed the police equipment and lights. The wires were cut before the car went to auction. However, with some work, all the cables could be repaired.
I got a 2006 Dodge Charger with 80K miles on the odometer, a 345 horsepower 5.7L Hemi, a New Automatic Generation 1 (NAG1) transmission, and a few options. The extras included:
Red and blue lights installed on the grille, mirrors, and package tray
Two spotlights
Front push bumper
Rear cage
Two-tone paint scheme (think black and white)
Power driver seat
The 5.7L engine was a factory replacement long block installed at 53K miles, and the NAG1 was exchanged at 65K miles. Included with the Charger was eighty-one pages (font 8) of service repair work performed during its seven-plus years of service. The repair bills totaled more than $50K.
The Charger was sold to me without a warranty and a stated engine stalling problem. Based on my 25+ years of automotive repair experience (at the time), I believed I could resurrect the Charger, so the stalling problem did not deter me. The purchase price was decent, so I dropped $4800, filled out the paperwork, and towed the Charger home.

Above: From the factory, the Police Pursuit Package Chargers came with 225/60R18 V-rated Goodyear tires. When I picked up the Charger, it had Goodyears on all four corners. One of the 18×7.5-inch steel wheels was bent and would require replacement in the future. Looking through the repair history provided at the time of the purchase, I noticed several wheels had been replaced while the Charger was in service. Also, one of the hub caps was missing when I picked up the Charger. A suitable replacement would have to be found.
After unloading the Charger from the trailer, I washed the exterior. I observed the surface, finding a few dents, plugs covering holes in the trunk and roof, and a rusted area on the driver’s side quarter panel from a previous repair. With the exterior cleaned, I removed all the seats and vacuumed the interior and the trunk.
With the Charger cleaned and the interior reassembled, I focused on the multiple pages of service work to determine what repairs had been performed. Based on the information, the Charger had been intermittently stalling for almost 35K miles, and the dealership technicians installed nearly 160 spark plugs, 48 coils, and two PCMs attempting to correct the stalling problem, yet the issue persisted.

Above: When the Hemi was replaced, the technician(s) that performed the repair routed the wiring harness loom incorrectly, and the harness was no longer clipped to the passenger’s side valve cover bolt/studs. The unsecured harness slipped onto the exhaust manifold, resulting in terrible damage to the wiring. After I repaired several wires, several engine code concerns were cleared up. Low-quality work would be found throughout the Charger as I moved forward with the restoration.
I accessed a Chrysler WiTech scan tool and checked for codes. The scan tool displayed 21 codes related to the powertrain control module (PCM), transmission control module (TCM), ABS, and cabin compartment node (CCN). Many codes involved low battery voltage, so I charged the battery.
After charging, clearing the codes, and attempting to run the Hemi, nine codes returned immediately, and they were still related to the PCM, TCM, ABS, and CCN. Another review of the dealership repairs gave me some new ideas.
The dealership suggested an engine wiring harness, which would cost $3,825, including labor, to fix the stalling problem, but the township decided to auction the Charger. I followed Chrysler’s testing procedures for the remaining PCM codes, and each code required a wiring harness inspection.

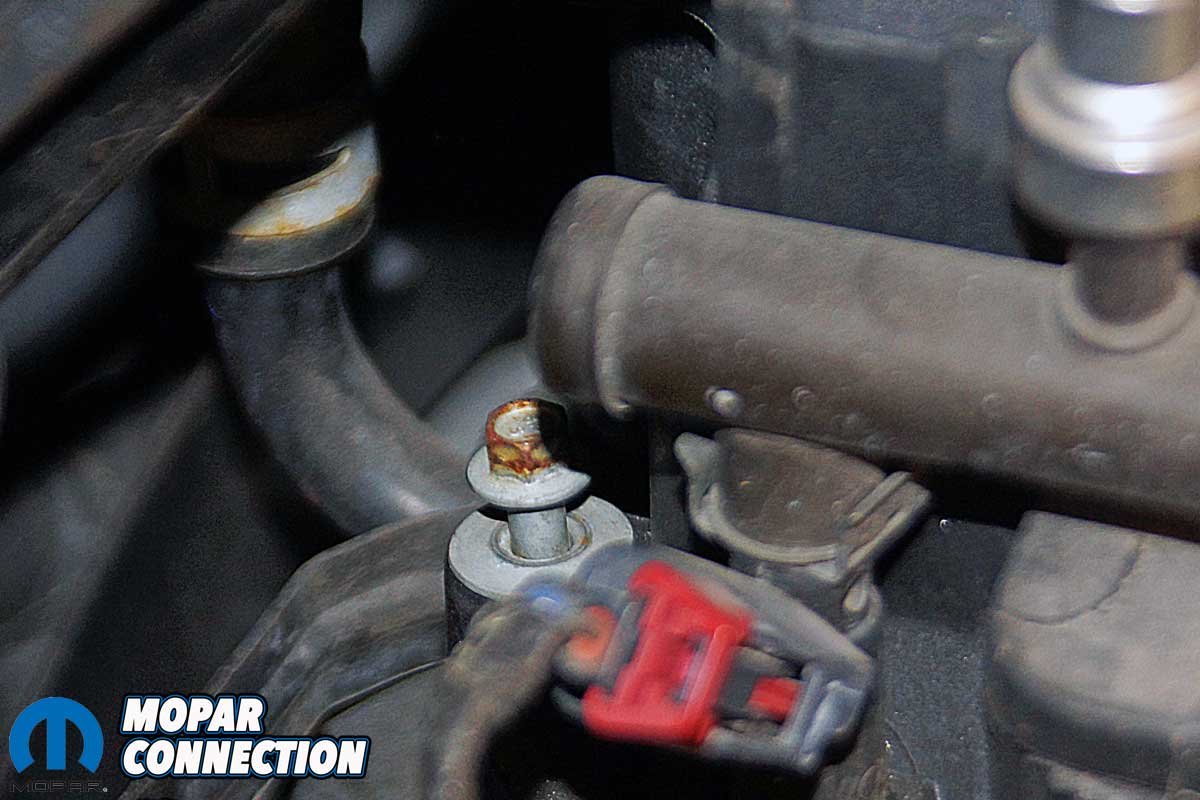
Above: The O2 sensors set several codes. I was unsurprised to find more technician-related wiring damage on one of the sensors. The O2 sensor heater circuit was open, which resulted in a code and a significant driveability concern. A new NTK O2 sensor was installed, but the heater circuit codes remained. More diagnostic procedures were required.
I almost immediately noticed the technician who had installed the replacement engine placed the main wiring harness on the wrong side of the engine’s dipstick. The main harness could not be attached to the passenger side valve cover in its current location.
The harness loom touched the exhaust manifold, and the manifold’s heat damaged (melted) some of the wiring. After taking the entire harness apart, I repaired six wires for opens or shorts to other wires—all the damage was related to the technician’s repair.
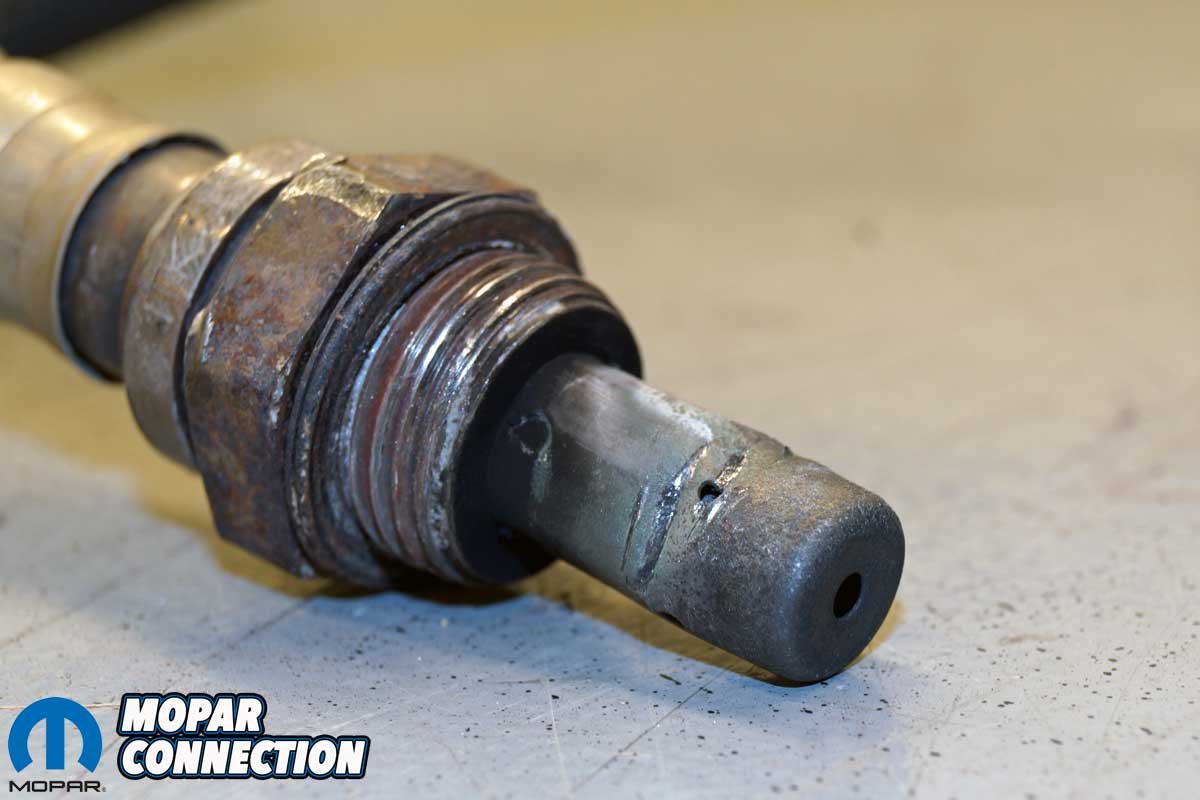
Above: Another O2 sensor suffered from what appeared to be technician damage. It appeared the O2 sensor thimble was squeezed or bent to get it to drop into the exhaust manifold O2 sensor bung. A pair of pliers, side cutters, or a chisel damaged the O2 sensor. When I found this damage, I replaced the remaining three O2 sensors with NTK units.
After completing the wire restorations, I cleared the codes and re-checked. I was down to seven codes—four PCM and one each in the ABS, TCM, and CCN modules. I was making progress, but the stall concern still existed.
The four PCM codes were related to the O2 sensor heater circuits. I tested the heater circuits as instructed by the Dodge service information; three out of four of the heater circuits passed the various resistance tests, voltage available tests, and the WiTech-assisted amperage tests. I observed the O2 sensor that did not pass and found the heater circuit wiring harness was damaged.
Above: The quality control at the dealership was low. When the engine was replaced, the manifolds, engine front cover, and valve covers were swapped from the damaged engine to the new long block. Several intake manifold bolts were not even threaded into the cylinder heads. Once I found the loose bolt, I checked and retorqued every external engine fastener as needed.
The sensor was replaced and passed all the heater circuit tests, but sensor-related codes remained in the PCM. At an engine temperature of approximately 125°F, the PCM attempted to go into a closed loop, but the O2 sensors sent incorrect values, and the PCM adjusted the fuel trim to the point of engine stalling.
Keeping the engine at 3000 RPM warmed the O2 sensors sufficiently without needing the heater circuits, which provided more accurate feedback, and the engine continued to run, although poorly. However, letting off the throttle, the engine stalled within thirty seconds. According to the Chrysler service information, the failure was likely the PCM.
I did not want to replace the PCM, so I reviewed the harnesses again and found questionable wiring on another O2 sensor. I purchased three more NTK O2 sensors to match the previously replaced sensor.

Above: After extensive testing, a new PCM was required. Although the dealership had replaced the PCM twice, all the testing pointed to the PCM not controlling the O2 sensor heater circuit drivers. I contacted All Computers Resources, INC. for a new pre-programmed PCM. To order the PCM, I had to provide All Computers Resources with odometer and VIN information. Tightening the manifold bolts, screwing in new O2 sensors, and replacing the PCM fixed all the engine-related codes.
Upon removing the other upstream O2 sensor, I found some mechanical damage that likely occurred during one of the many engine repairs at the dealership. While not expecting the NTK O2 sensors to fix the problem, they did help with the diagnosis.
Based upon the constant O2 sensor heater circuit high-side driver failures, I finally determined the PCM was at fault. However, the dealership had previously replaced two PCMs, so I was concerned. With great reservation because of the cost of a PCM, I purchased a new one from All Computers Resources, INC. that came pre-programmed with the VIN and mileage I supplied on the order form.

Above: I had to get used to this view in the mirrors. Nobody wanted to pass a vehicle that appeared to be a police car. When I initially tested the new PCM, I was surprised to see cars backed up 5, 10, and even 20 deep cruising in the passing lane. Occasionally, a brave soul would slowly creep by the police car, but I always messed up traffic.
The PCM arrived four days later. I installed it, and the codes for the O2 sensor heater circuits were all gone. There was no check engine light, and the engine ran for thirty minutes. I took a few test drives without any stalling concerns. The PCM appeared to repair the Charger; the Hemi had excellent power, a steady idle, and sounded good.
Check in next month as I address the three remaining codes. Also, I will remove the red and blue lights from the package tray and repair the holes in the trunk and roof once required for the wiring for antennas and the roof light bar.

Above: The Charger’s driveability concerns were gone. Three codes from other electronic circuits remained, but the Charger could be driven. The plans are extensive. The Holstein cow paint package will be removed, and the Charger will be returned to its factory Brilliant Black hue. The tires require replacement along with one wheel. There is much to do; however, the project is off to a good start.
Over the next year, follow along as I will add carpet and update the factory seats and the entire interior. To renovate the exterior, stay tuned as the rusted area on the driver’s side quarter panel, the dents, and the body holes are repaired before painting. The Charger will be repainted in the Chrysler brilliant black paint matching what was initially applied at the factory.
Thus far, I am about $5500 into my $12,000 budget, which includes the purchase, tax and title, PCM, four O2 sensors, and miscellaneous trim pieces, fasteners, and clips.


