


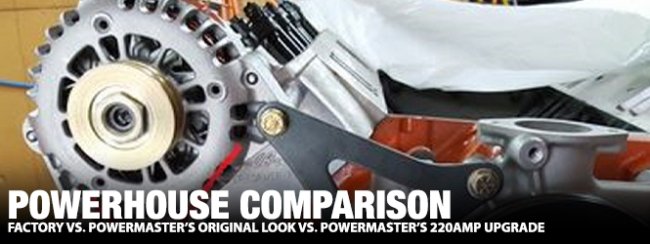
We continuously see aftermarket manufacturers’ online and magazine advertisements offering ever-higher output alternating-current generators (alternators) for the muscle car era Mopars. With the introduction of additional electrical loads from new components and the occupant’s electrical devices, a factory alternator may not keep up with the increased electrical demands.
Powermaster Performance has stepped in with its 95-amp Chrysler “Original Look” alternator to meet the needs of the Mopar charging systems. If more amperage is necessary, Powermaster has an alternator that has a 220-amp output. To get more information about the alternators, we contacted Powermaster representative Chris Donaldson.
Before we get into the benefits of the Powermaster alternators, why not just use a factory round-back (‘61-’71 models) or square-back (’72-’87 models) alternator? When our beloved Mopars were built, few electrical components were installed, so less amperage was required. The electrical system consisted of a wiper motor, an AM radio, the blower motor, the ignition, exterior/interior lighting, and maybe an air conditioning (AC) compressor.

Above: Powermaster Performance offers Mopar alternators that range from a factory appearing 95-amp output to a massive 220-amp output. All the Powermaster alternators are available in natural, chrome, or black finishes.
A 35-, 46-, 60-, or 78-amp alternator found on the ‘60s or ‘70s Mopars usually handled the amperage requirements, but with the add-on electrical components, the alternators could quickly fail to meet the higher amperage demands, which would force the electrical system to rely on the battery for the additional amperage. If this became the norm, the battery would soon drop its voltage to the point of poor vehicle operation or a no start/run condition.
To combat the low-amp output concerns, Powermaster has developed a 95-amp Original Look alternator. Donaldson stated, “the 95-amp alternators work with a mostly stock setup with a few electrical upgrades – like a single electric fan, AC, or an upgraded ignition system.” The alternators come in the round- or square-back style, and both designs provide an excellent output at idle (approximately 65-amps). Each style alternator mounts in the factory location without the need for modification or fabrication to the brackets. The pulleys are available in a single- or double-V belt or a serpentine design.


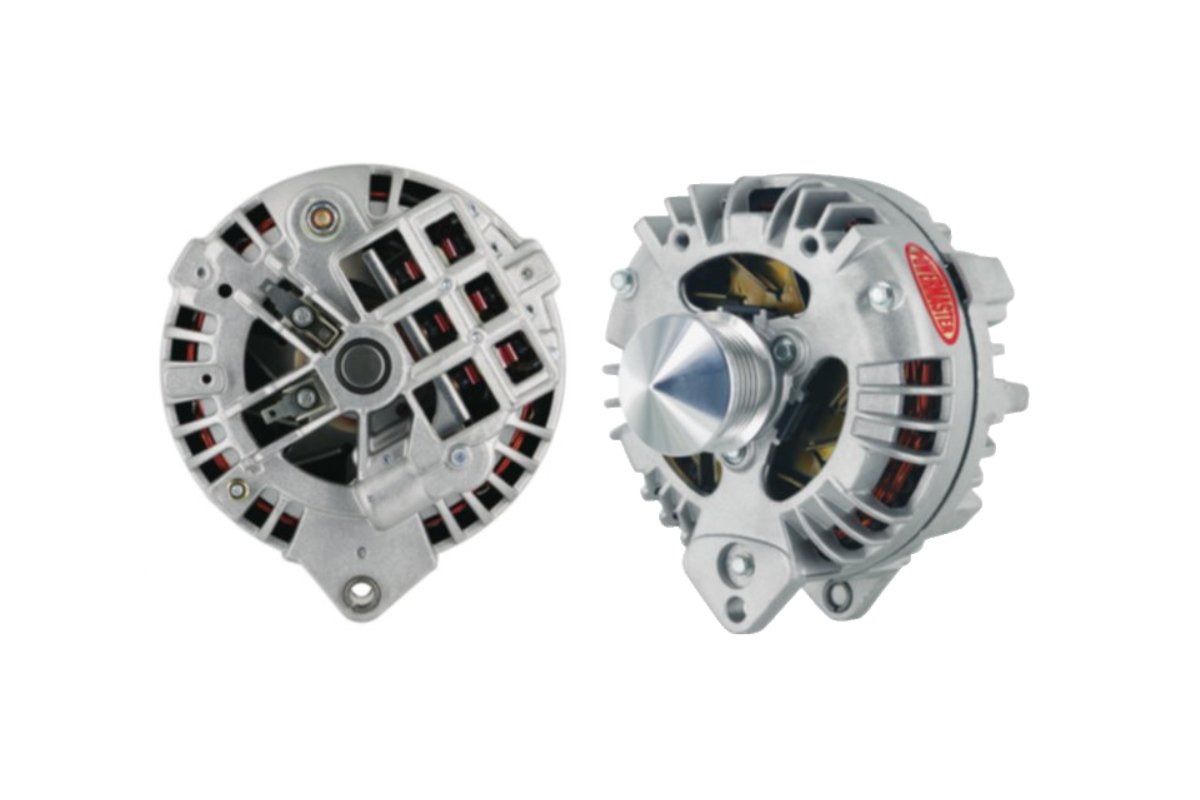
Above left: This Powermaster “Original Look” 95-amp alternator is a round-back 1961-71 style that can be selected in a two-field wire design for use with a factory external voltage regulator. Another option is an internal voltage regulator, 1–wire design. The alternators come with a single- or double-V belt or a serpentine pulley. Above right: Powermaster also has a 1972-87 Original Look 95-amp square-back alternator. It has all the same features as the round-back design. It can be externally regulated, or it can be ordered with a 1-wire hookup. There are three pulley options.
The Powermaster alternators come in two voltage regulation designs. The alternators can be constructed to work with a factory external regulator, or they can have a 1-wire option. Donaldson explained, “the ease of wiring is the number one benefit (of the 1-wire design); however, the regulator used in these (Powermaster) units is much more responsive compared to an original equipment (OE) setup. This helps a lot on vehicles with electric fans since the alternator can respond quickly to the extreme on/off load of high-draw components.”
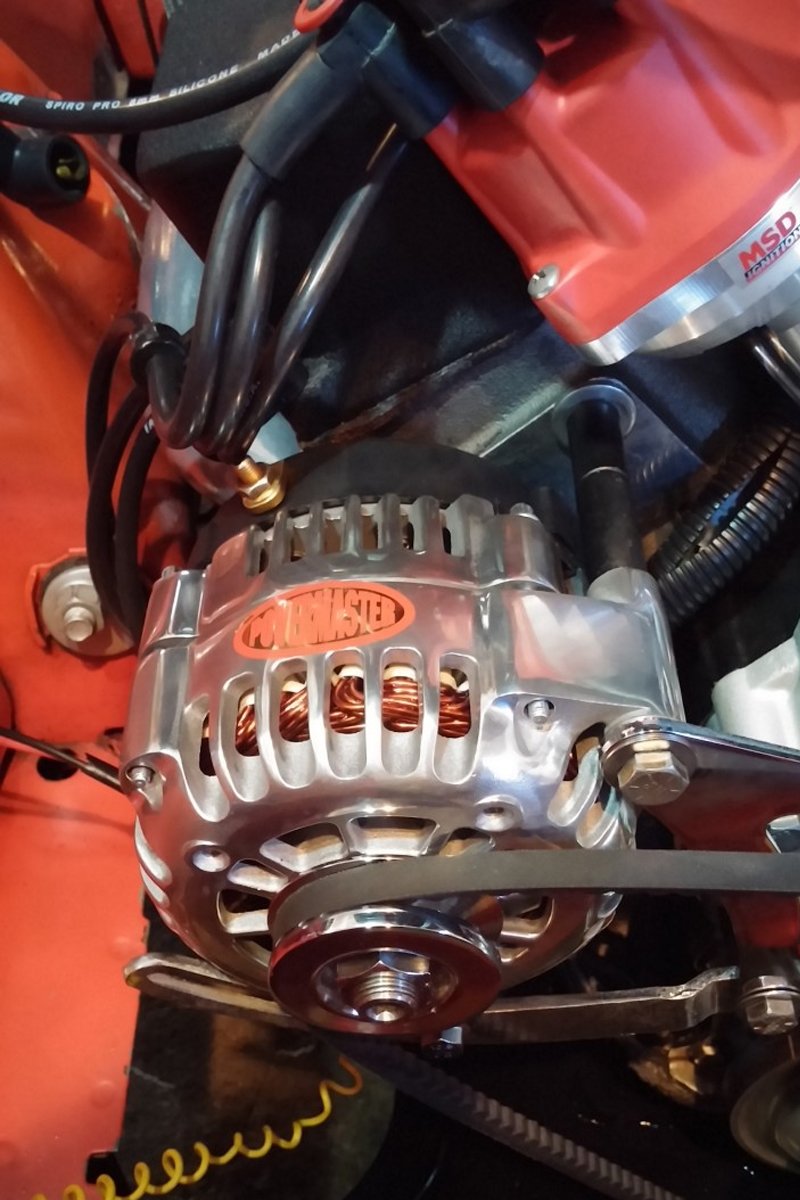
Is 95-amps still not enough? Then, it is time to move up to the ultimate in amperage output; Powermaster offers the 165- and 220-amp series of alternators. Donaldson acknowledged, “the 165-amp unit is by far our most popular Mopar alternator. It works well with a resto-mod with a dual fan setup, AC, EFI conversion, electric fuel pump, upgraded stereo, and HID headlights.”


Above left: The 165-amp alternator is the best seller for Powermaster. At idle, the 165-amp unit develops 100 amps. The alternator works well with a resto-mod with a dual fan setup, AC, EFI conversion, aftermarket electric fuel pump, upgraded stereo, and HID headlights. Above right: To mount the 165-amp alternator, the factory non-AC mounting brackets work with the Powermaster “trim-to-fit” spacers, which compensate for the different head castings and thickness variations. If the factory AC brackets are used, some bracket modifications are required.
Donaldson continued, “the 220-amp unit handles all the previously mentioned electrical draws and additions such as fans for transmission (cooler), nitrous solenoids, serious stereo upgrades, multiple fuel pumps, etc. Remember, it’s best to go over your (amperage) needs with an alternator, so if there are more upgrades down the road, the alternator will already be able to handle the additions.”
The 165- and 220-amp alternators attach to the engine of a non-AC car with the factory mounting brackets. Powermaster supplies “trim-to-fit” spacers with these alternators to compensate for the different head castings and thickness variances. If the alternators are used with the factory AC brackets, some bracket modifications will be required to fit the alternators.

Above: The 220-amp alternator also works with the non-AC mounting brackets without modification. Minor fabrication is required with the AC brackets. The trim-to-fit spacers and a Powermaster eccentric bolt provide the maximum amount of adjustment.
The charging system wiring must be modernized to accommodate the increased amperage whenever a Mopar muscle car’s alternator is upgraded. Donaldson stated, “we normally recommend running a new power cable from the alternator to the battery or starter positive post. This gives you a high current bypass, and since current takes the path of least resistance, your bulkhead becomes much safer.” The power cable should be a minimum American Wire Gauge 8-gauge for alternator output less than 140 amps, and the cable should be a 6-gauge with an alternator output above 140 amps.
In addition to the new power cable, three options are available for the ammeter. It could be upgraded (shunted) to handle the current. It could be replaced with a voltmeter. Or the wiring could be disconnected from the ammeter gauge and tied together. In all three choices, amperage will still be applied to the bulkhead and the under-dash wiring, but most of the charging system amperage will bypass the bulkhead and ammeter. Powermaster recommends adding a power cable even with the lower charging output of the Original Look alternator.

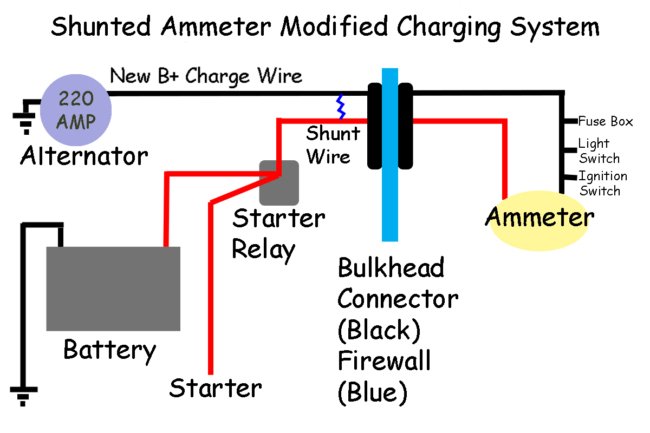
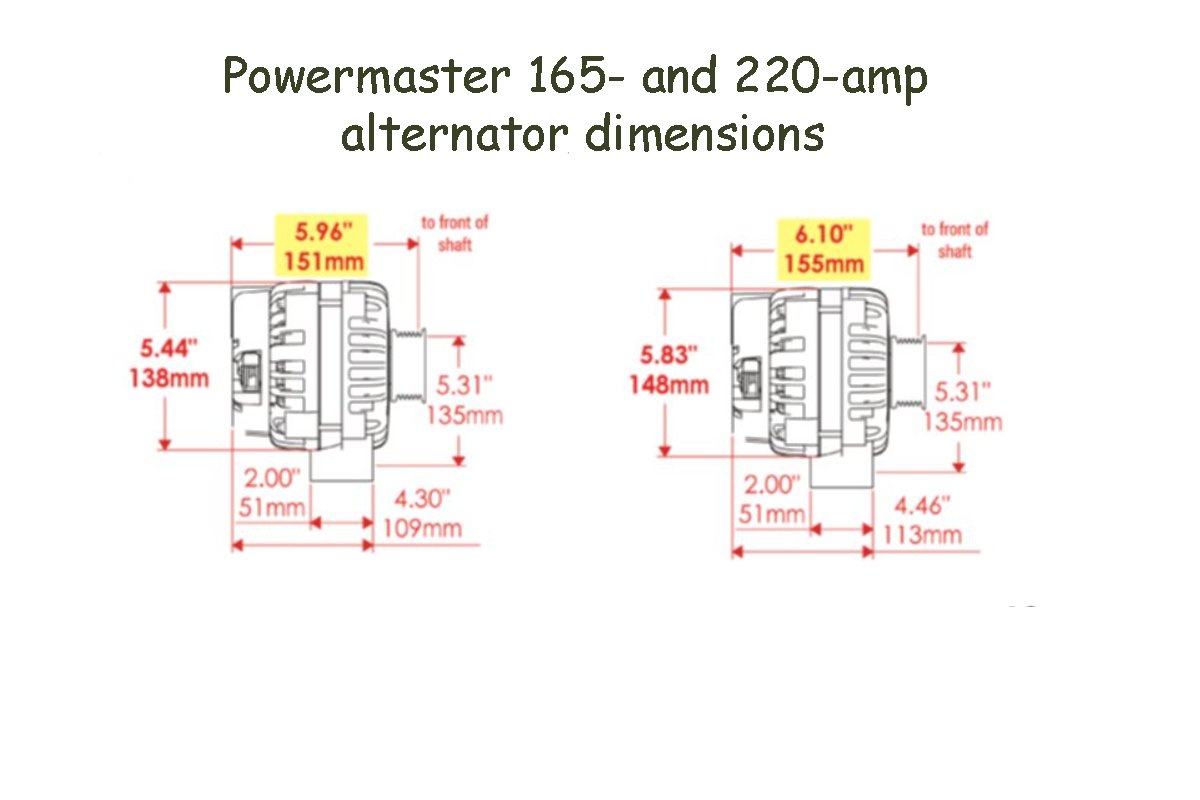
Above left: If a custom installation is planned, Powermaster provides the dimensions of the 165- and 220-amp alternators. The measurement on the left is the 165-amp alternator, and the right is the slightly larger 220-amp alternator. Above right: When installing a Powermaster alternator, a new power cable needs to be run. There are three options on how to do this. The first option is to add a shunt wire between the two new power cables at the bulkhead. This design is the least popular modification as the shunt must be matched to the amperage requirements. In this design, the ammeter needle will still move but not as dramatically as it had previously when all the current flowed through it.
If minor electrical upgrades are in the works for your Mopar, consider a Powermaster 95-amp Original Look alternator for the bolt-in performance needed for the new electrical demands. However, a tremendous electrical demand increase requires stepping up to a 165- or 220-amp Powermaster alternator.
These alternators provide all the amperage necessary (and have some in reserve) for the high-draw components added to any muscle car era Mopar. Regardless of the amperage demands, Powermaster has an alternator that can meet your needs; check the online catalog for more information.

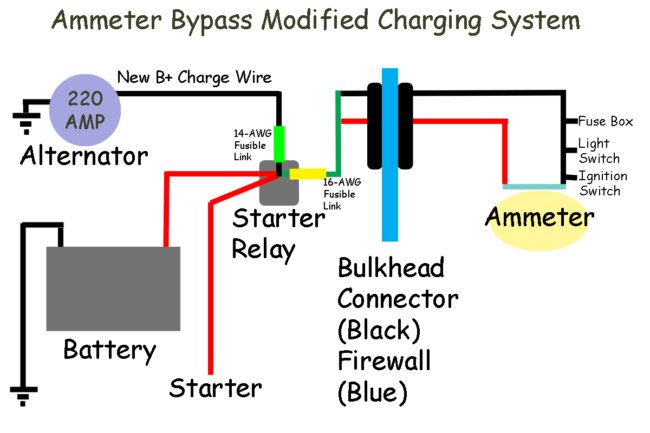
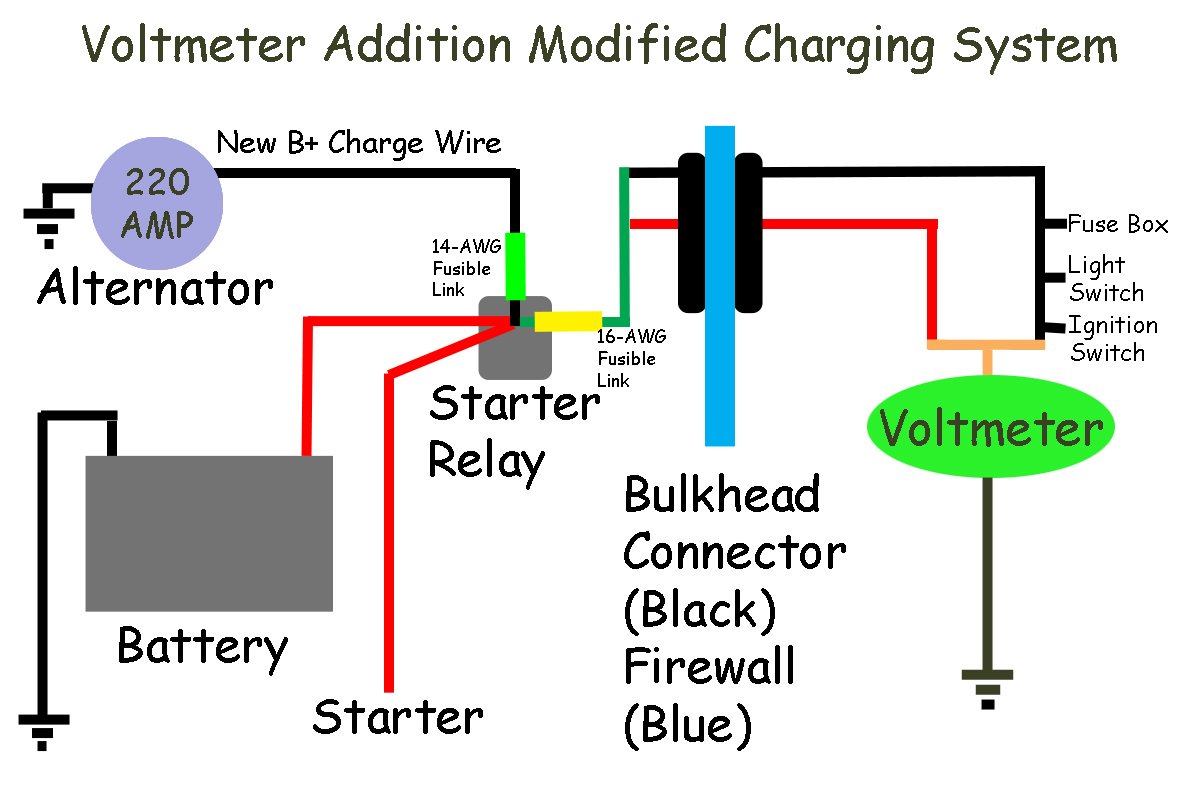
Above left: A second wiring option is to replace the ammeter with a voltmeter. The power cable now bypasses the bulkhead and attaches to the starter relay terminal. Battery voltage is supplied from the starter relay terminal to the voltmeter and amperage is applied to the under-dash components via the bulkhead. Above right: The third, and possibly the best option, is to bypass the bulkhead with the power cable and attach it to the starter relay terminal. Battery voltage from the starter relay terminal feeds the ammeter wires, which have been disconnected and tied together. With the wires tied together, there is amperage supplied to the under-dash components while limiting the current flowing through the bulkhead. In this design, the ammeter is a non-functioning gauge.


These are great looking and useful if you need extra power. However it cannot be emphasized enough, as the article mentions if you install one of these upgraded alternators it is imperative that you bypass the factory bulkhead connectors at the firewall. Failure to do so in the best case means one day your bulkhead will carbonize from the high current and you will find yourself stranded on the side of the road with no electrical power. In the worst case as you are driving smoke starts coming from your engine compartment and you lose your car to a fire. That can happen even after you have parked it in your garage and gone inside your residence and then your house goes up too. —Nothing to play with.
After bypassing the bulkhead connectors, you can convert your ammeter into a voltmeter while keeping the original look of an ammeter. Aftermarket voltmeters of the same size are available for $15 and you can retain the original appearance by pulling needles and replacing with the original ammeter face. Do an online “how to” search for more details.
Has anyone engineered a bracket to raise the alternator? So someone could put a A/C compressor underneath, or vice a versa?
[…] Hit the image to check out the full story on the Powermaster original look alternators […]
[…] Hit the image to check out the full story on the Powermaster original look alternators […]