


Nighttime driving may not be something we often do with our classic Mopars, but wouldn’t it be enjoyable to have the best lighting available when low-light driving is necessary? Over the years, many vehicles have been updated with halogen headlamps. Of these cars, most have not had the wiring improved. The factory wired the headlamp switch in series with the parallel-wired headlamps. The series section of the circuit required the headlamp switch to flow the total circuit amperage. Any resistance in the circuit caused a decrease in voltage available to each headlamp.
Now, add 50+ years of usage and age (of the wires), and the voltage drop across the series circuit may have increased substantially (less voltage available to the headlamps). Our objective was to reduce the voltage drop concerns by adding relays and new headlamp wiring. We planned to do the conversion without cutting any of the factory wires, and we wanted to perform the update for less than $75.

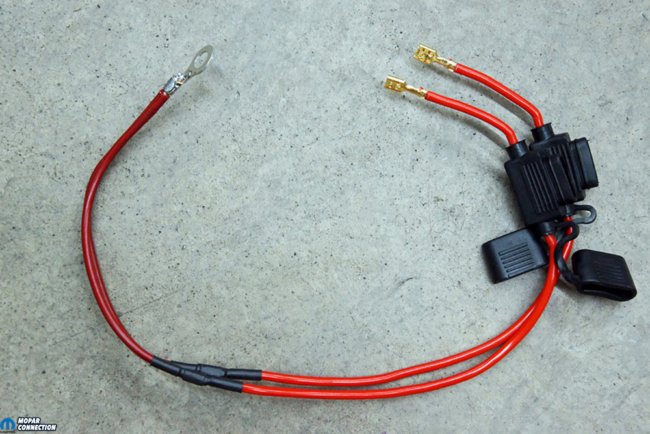
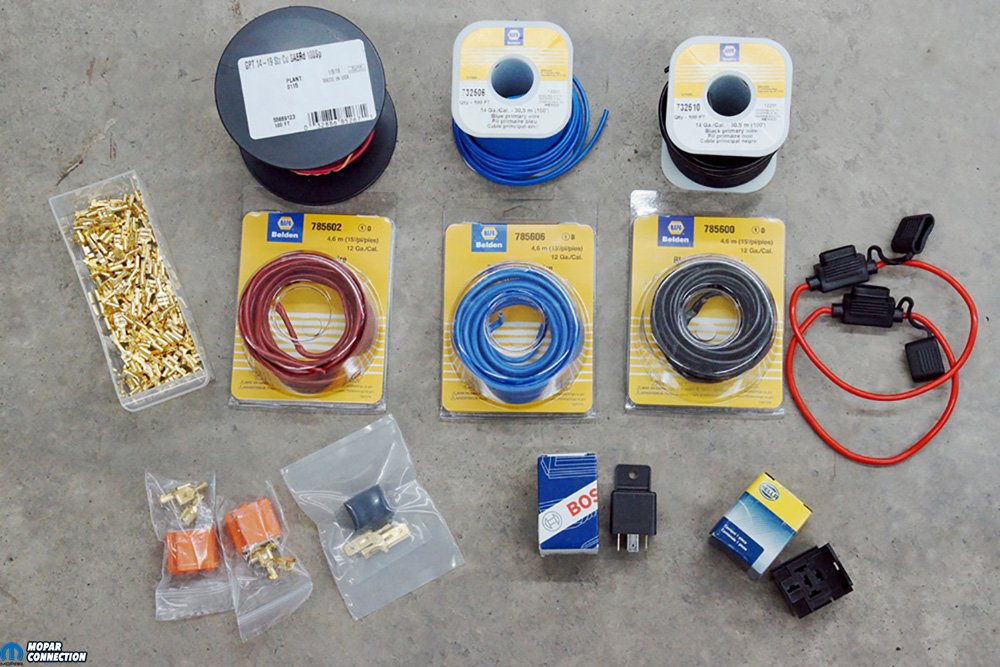
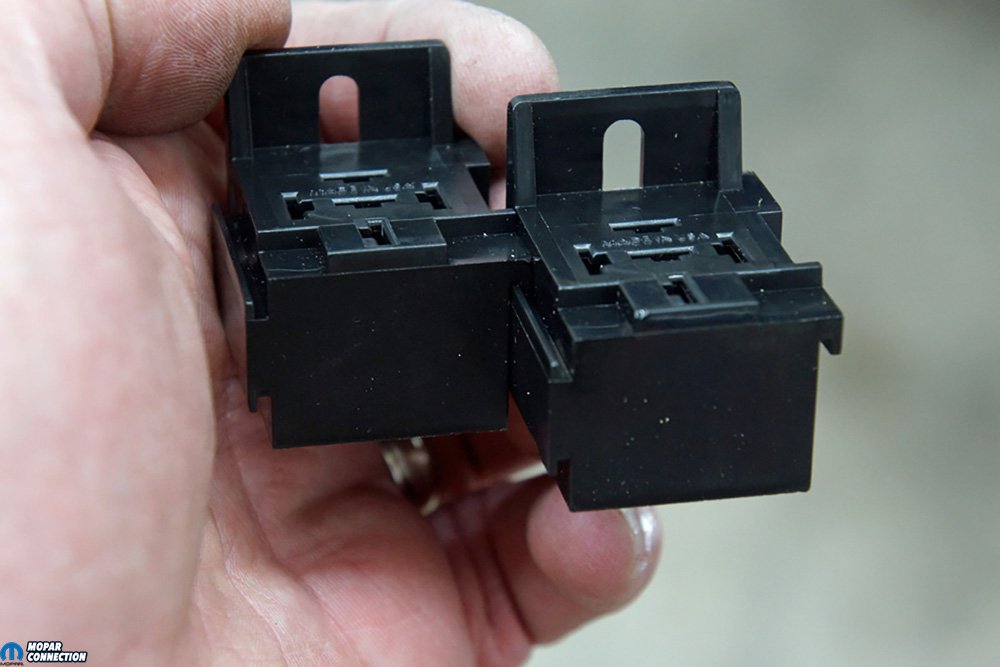
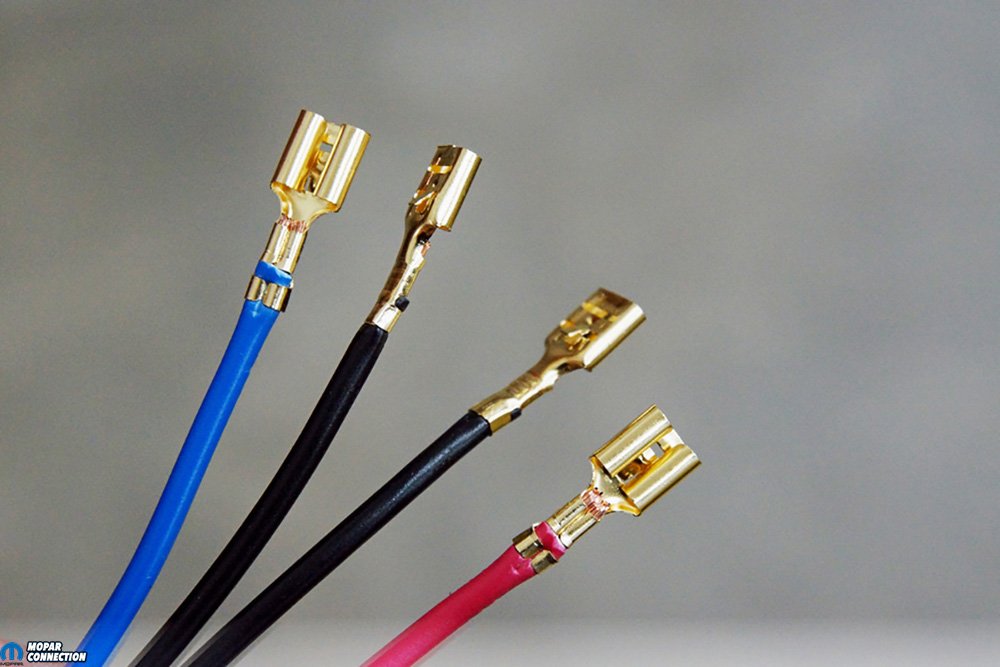
Above: Our relay headlamp conversion required 12- and 14-gauge wire, fuse holders, relays and sockets, terminals, and headlamp male and female connectors. Our objective was to perform the conversion for under $75.
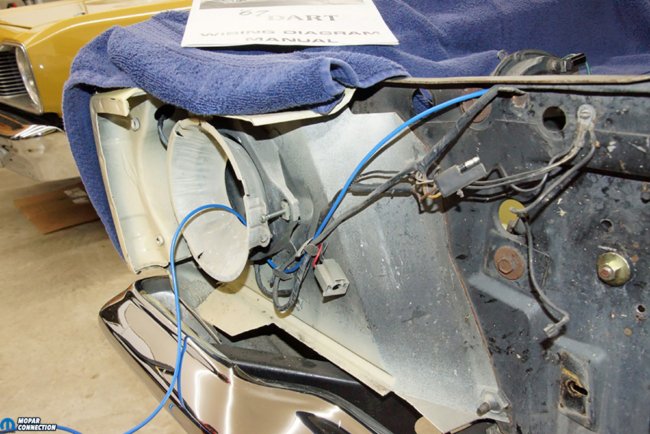
Our 1967 Dart was a great candidate for the relay conversion. We had recently removed the headlamp bezels and grille for repairs and some paint touch-up, so we had unobstructed access to the headlamps. To test the headlamps, we connected a battery charger to the battery and set it to a constant 13-volts.
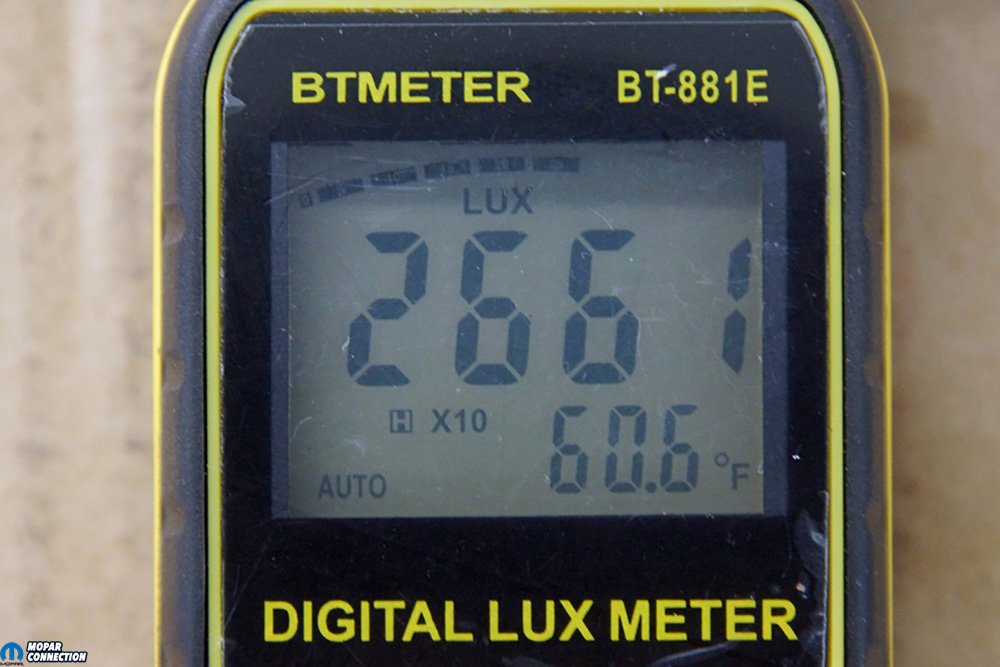
We measured the voltage drop at each headlamp, and we had 10.8-volts (left front) and 10.79-volts (right front), which meant there was a voltage drop of approximately 2.2-volts between the source (battery) and the headlamps. The voltage drop to the high-beam headlamps was more astonishing, rising to 3.8-volts. To measure the low-beam headlamps’ illumination, we used a lux meter. The low-beam lights each provided approximately 2660 lux measured at 10-feet in front of the Dart.


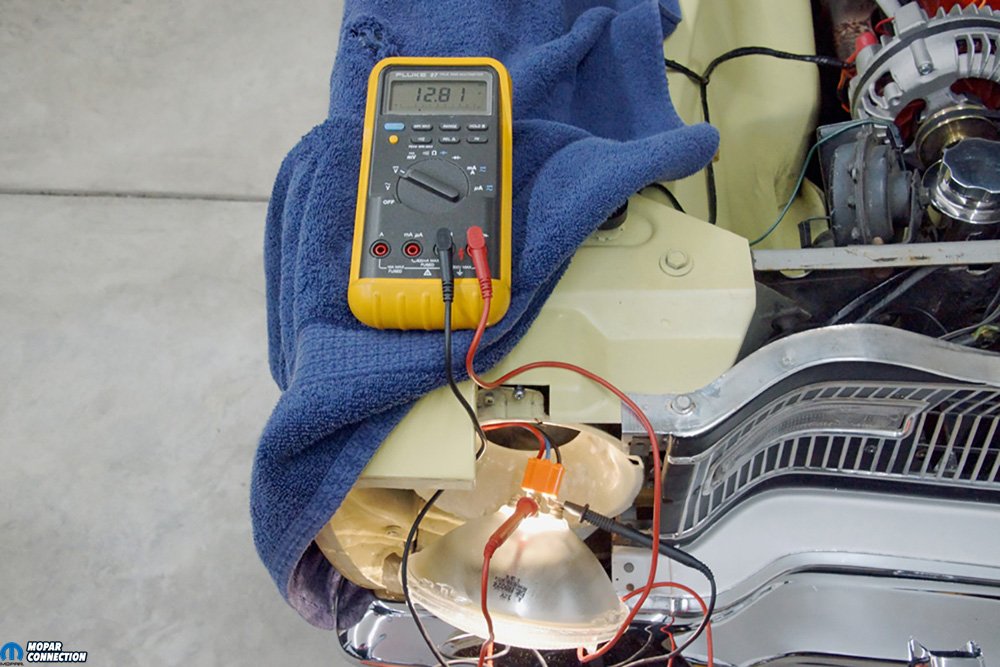
Above Left: With a battery charger attached to the battery and set to 13 volts, we measured the voltage drop across the low-beam circuit of the 6024-passenger headlamp. The light dropped 10.79 volts, which meant the rest of the circuit consumed 2.21 volts. Above Right: The passenger side high-beam headlamp had less voltage to drop than the low-beam. The wiring and headlamp switch of the circuit dropped almost 3.8 volts.
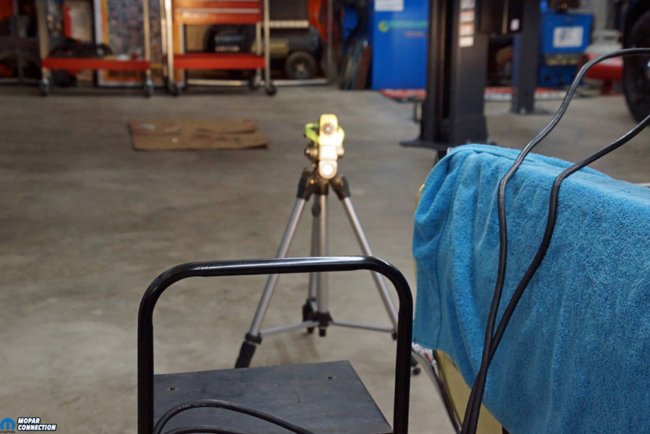

Above Left: With the headlamps turned on, we set the battery charger to 13 volts. We placed the headlamps in low-beam and put a lux meter 10-feet in front of the Dart. Above Right: The lux meter is the SI derived unit of illuminance, measuring luminous flux per unit area. It is equal to one lumen per square meter. In photometry, this measures the intensity as perceived by the human eye, light that hits or passes through a surface. Our meter read 2661 lux.
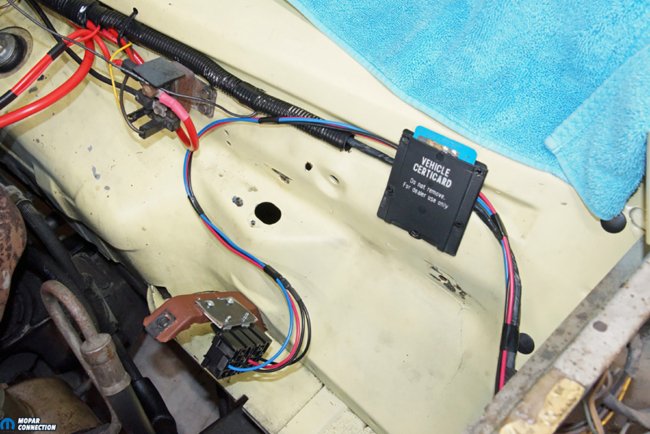
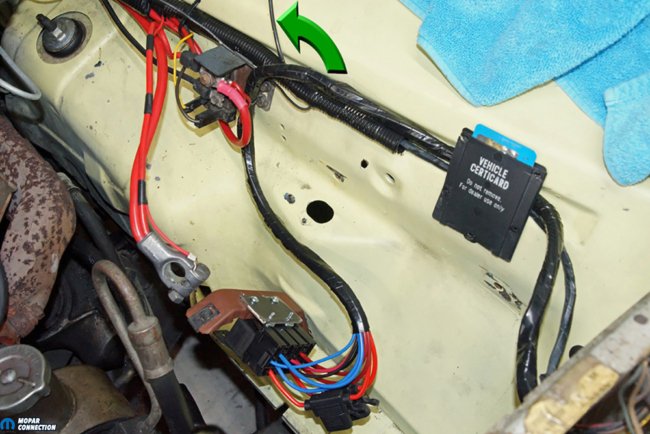
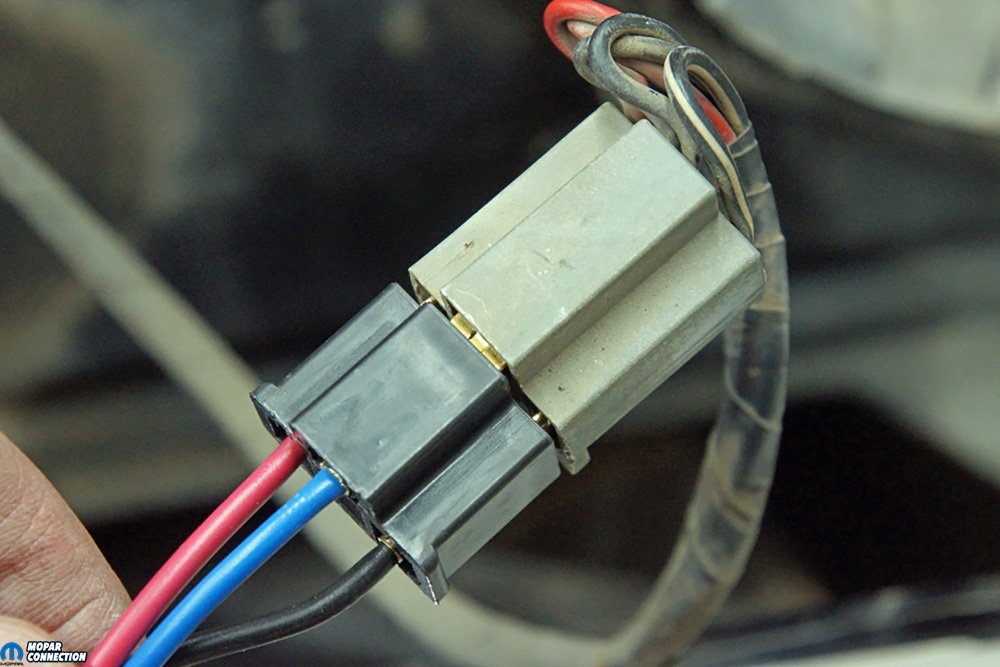
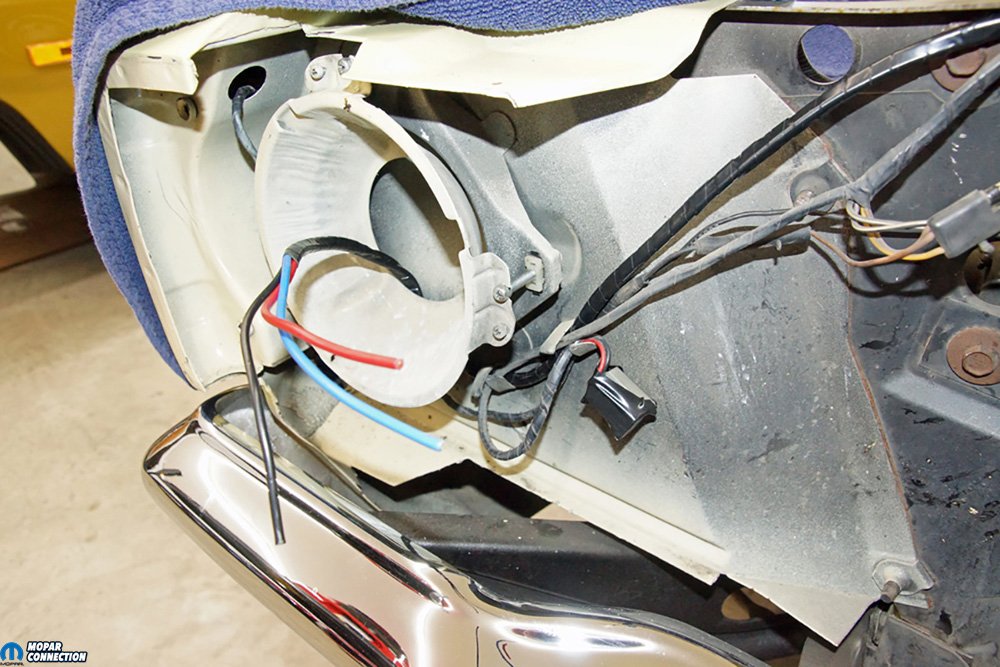
With the voltage drop information, we disconnected the 3-pin headlamp connectors and removed the headlamps. The lights were a pair of 6024 halogen units that appeared to be about twenty years old. With the disassembly completed, we looked for an area to install two relays and an accessible 12-volt source. Since we had already performed the ammeter bypass, we selected the 12-volt starter relay stud for our installation. However, if the bypass had not been completed, the best choice would have been the alternator B+ post straight to the relays, thus circumventing any additional current through the bulkhead and the ammeter.
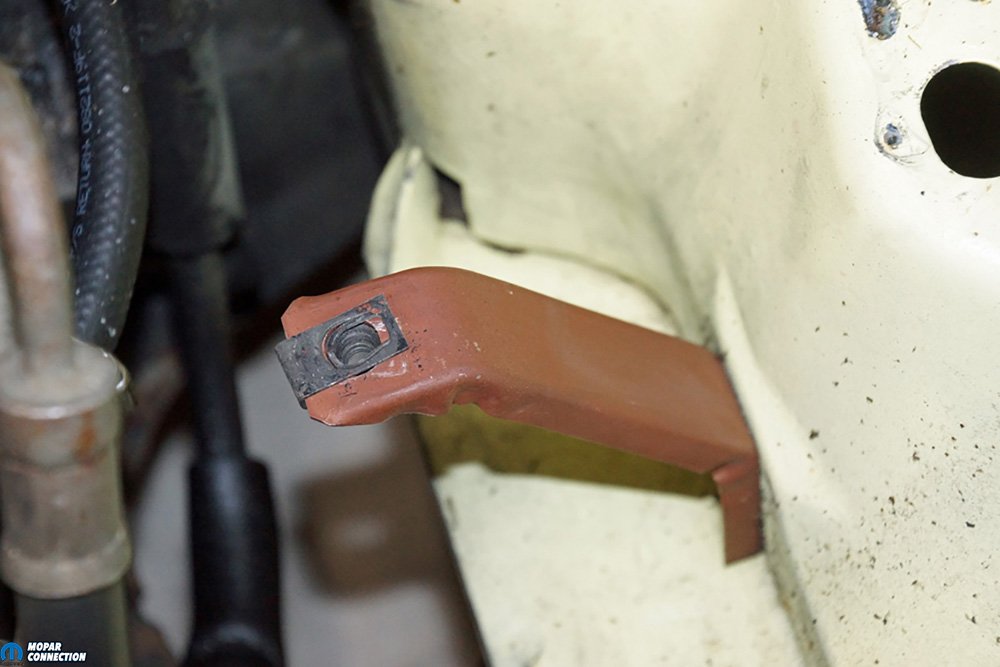
We wanted to hide the relays, and we did not want to drill holes into the Dart’s chassis, radiator support, or fender aprons. After some test fitting, we found the battery tray support bracket would conceal the relays and provide a safe mounting point. Although we would have to drill two small holes into the support, we could replace it if we ever elected to remove the relays or restore the Dart.


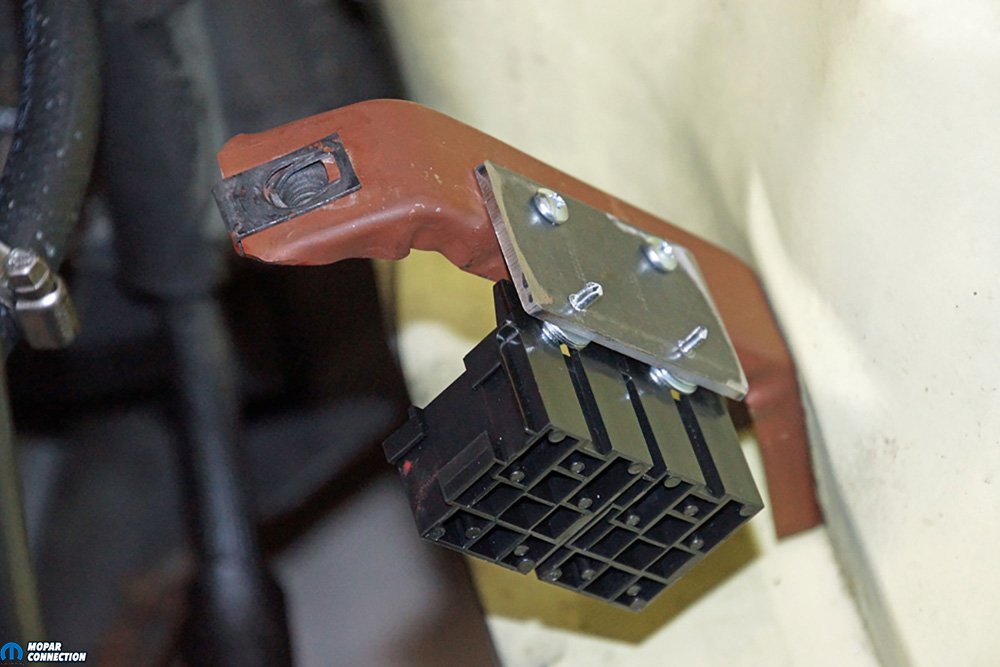
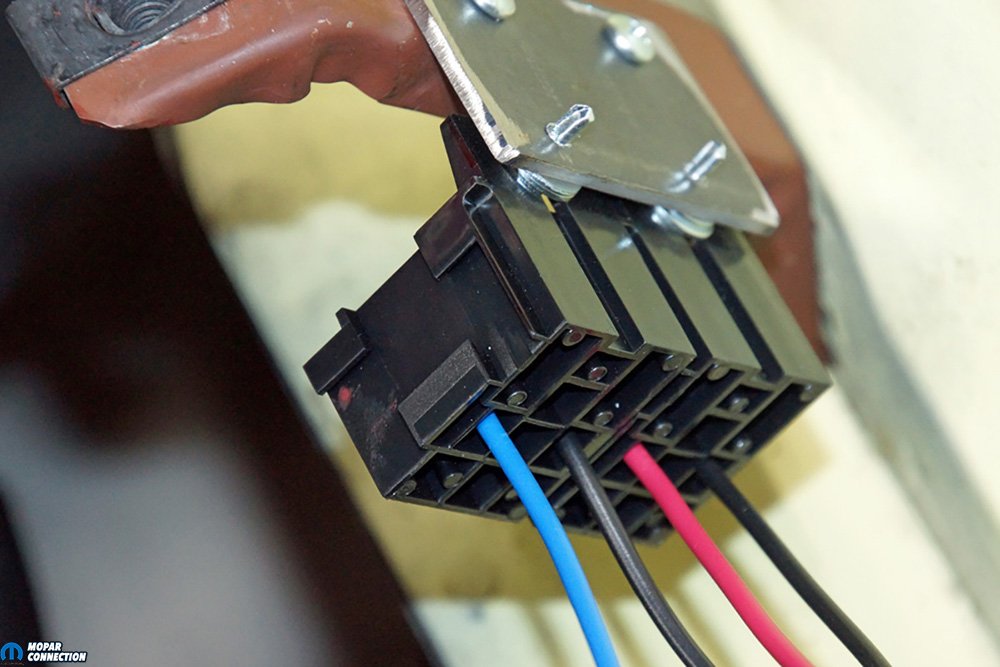
Above Left: We wanted to hide the relays and sockets out of sight. After looking over the engine bay, the battery tray support bracket was deemed a perfect mounting point for our Hella relay socket brackets. Above Center: The relay socket assembly was reinstalled, and we tested for an interference-free fit between the battery tray and the relays and sockets. The fit was perfect. However, shimming (with a washer) of each relay bracket was required for the relays to clear the support bracket. Above Right: We snaked the wiring from the relay sockets around where the battery tray would be. Each new wire followed the factory wire harness to the driver headlamp housing bucket.
We disconnected the battery cables, pulled the battery, and removed the battery tray to access the tray support. After removing the support bracket, we drilled two holes through it. Two matching holes were placed in a 2x3x1/8-inch scrap of flat steel. Lastly, two additional holes were drilled into the scrap steel for mounting points for the relay sockets. We purchased a pair of Hella interlocking 5-pin Relay Socket Brackets (part no. H84989011 ($10.20 each)).
The bracket, steel plate, and relay sockets were assembled with four sheet metal screws. We reinstalled the bracket and temporarily installed the battery tray to ensure an interference-free fit of the relays. The relay sockets and relays were nicely screened from view without interfering with the battery tray.


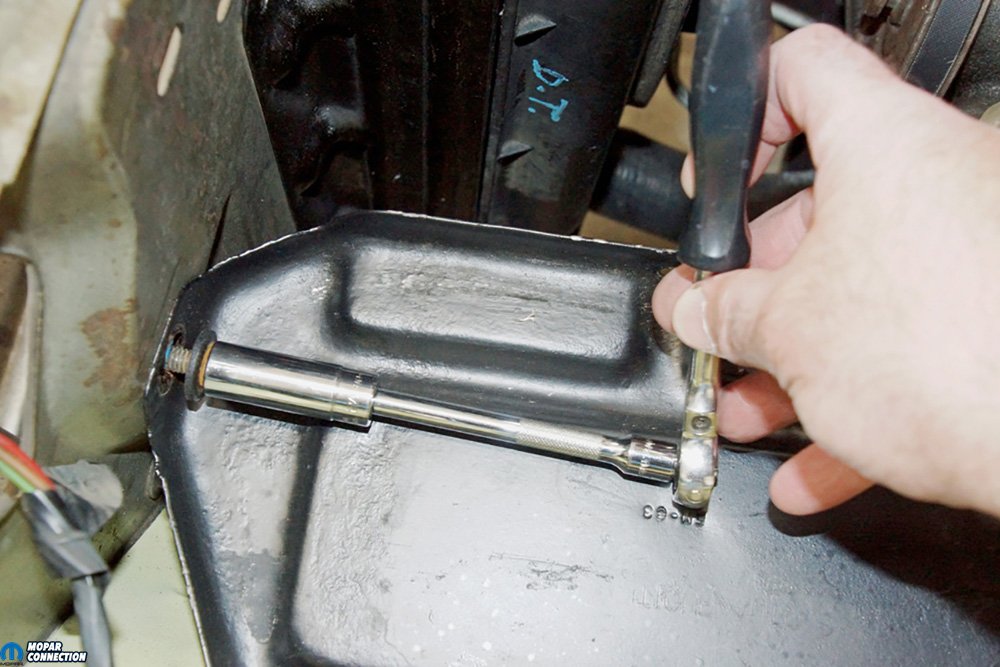
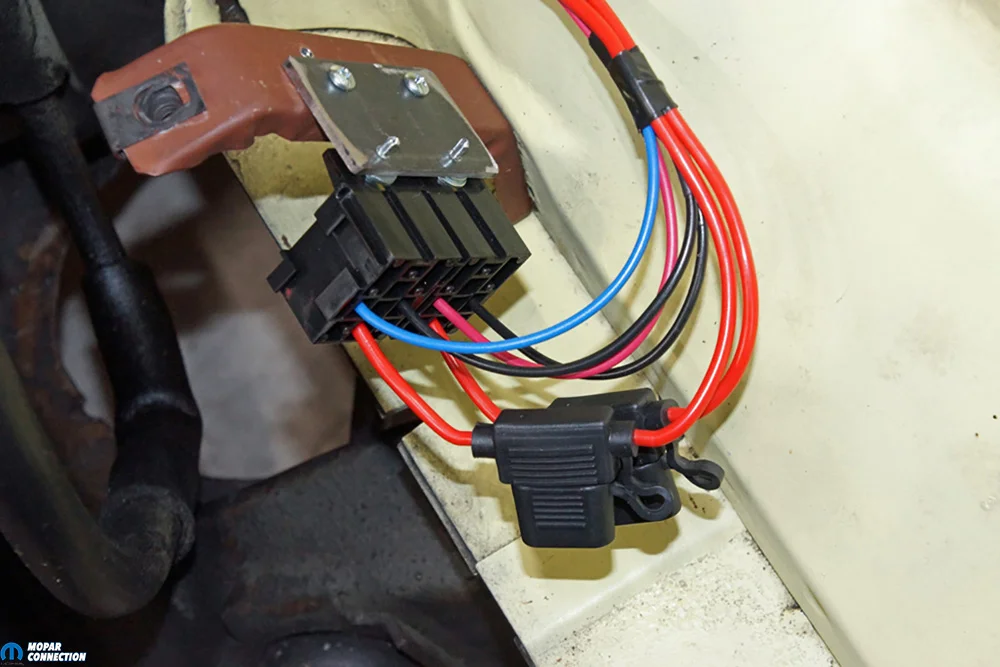
Above Left: The fused wires’ female ends were pushed into the pin 30 terminal of each relay socket bracket. We added a 15-amp fuse into each fuse holder and then capped each fuse with the attached fuse cover. Above Right: The pair of fused wires was run to the B+ terminal at the starter relay. Tying the wires together with a single eyelet terminal made it easier to install them to the relay stud.
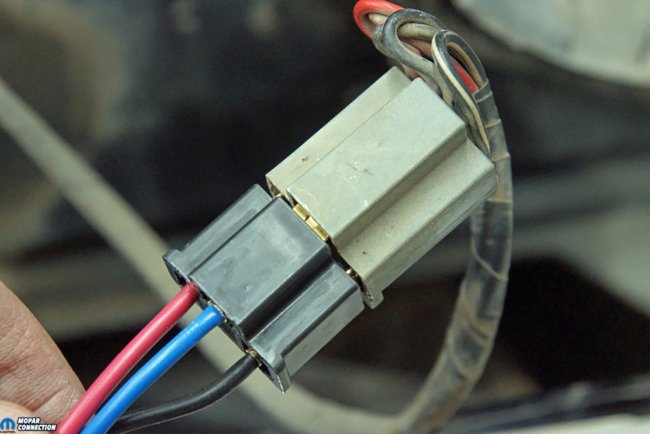
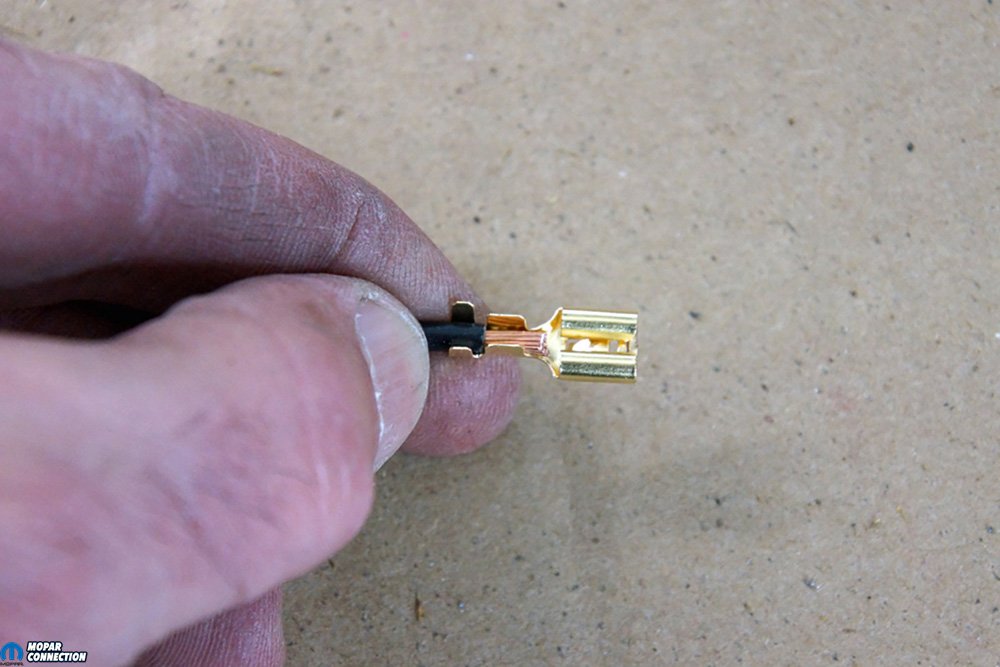
Above Left: The new connector was connected to the factory headlamp connector. Above Right: We assembled two fused wires (red) for the power side of each relay. We crimped female terminals on one end of each 12-gauge wire and tied both wires together at the other end with a single eyelet terminal.
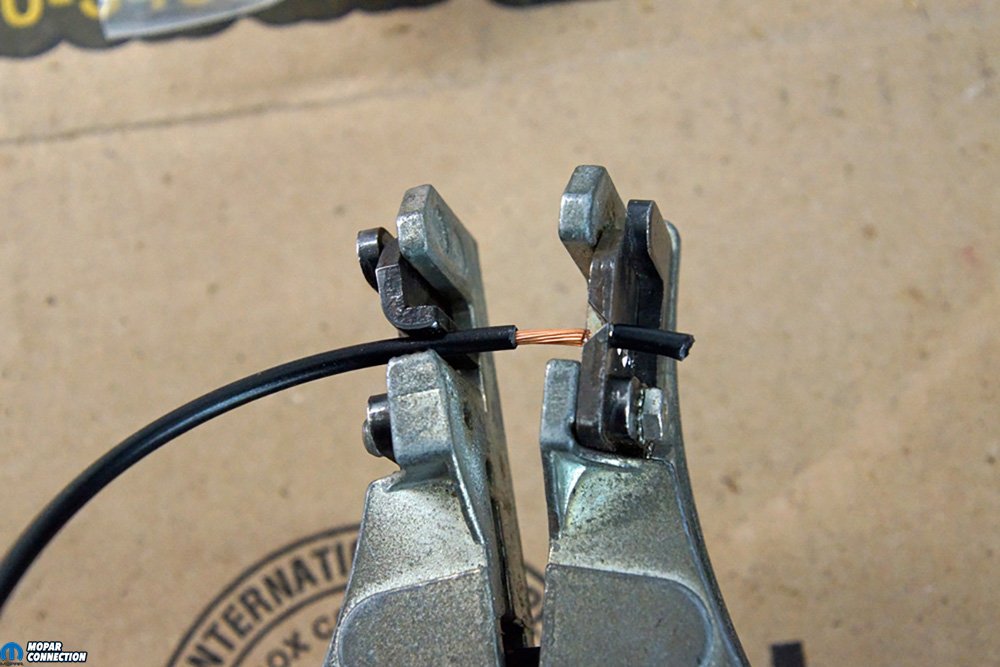
We started wiring the relays by focusing on each relay’s control side (pins 85 & 86). On one end of each 14-gauge wire (one blue, one red, two black), we crimped female Quick Splice Terminals (part no. 0748690704975 ($6.79 for 100)). The blue wire was attached to pin 86 of one relay socket (low-beam), and the red wire clicked into pin 86 of the second relay socket (high-beam). A black wire was slipped into pin 85 of each relay socket, and the pair of wires were connected to a single black wire and run with the blue and red wires to the driver side headlamp area.
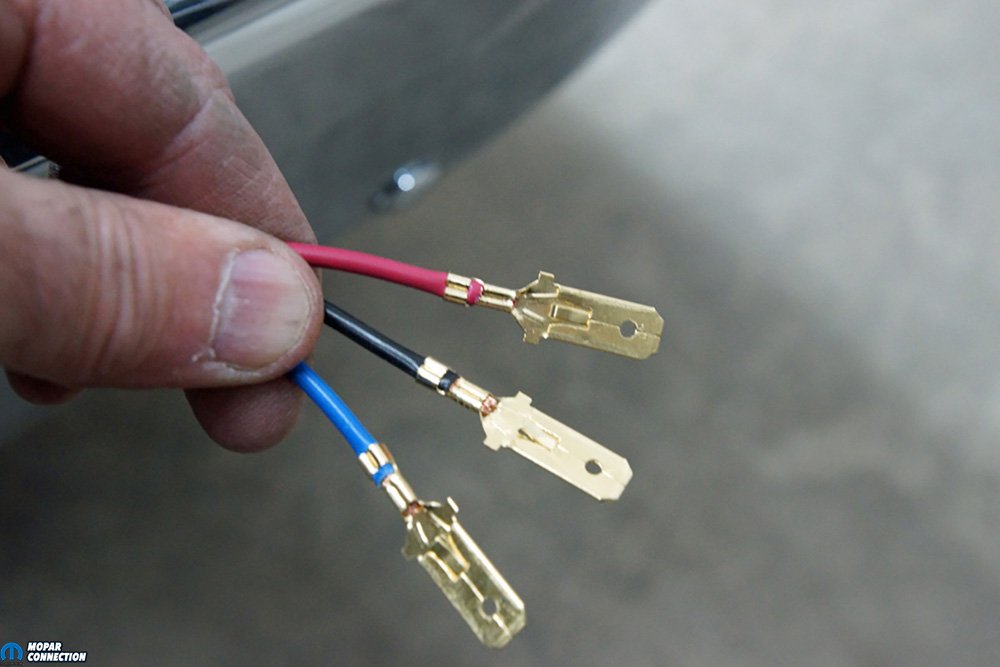
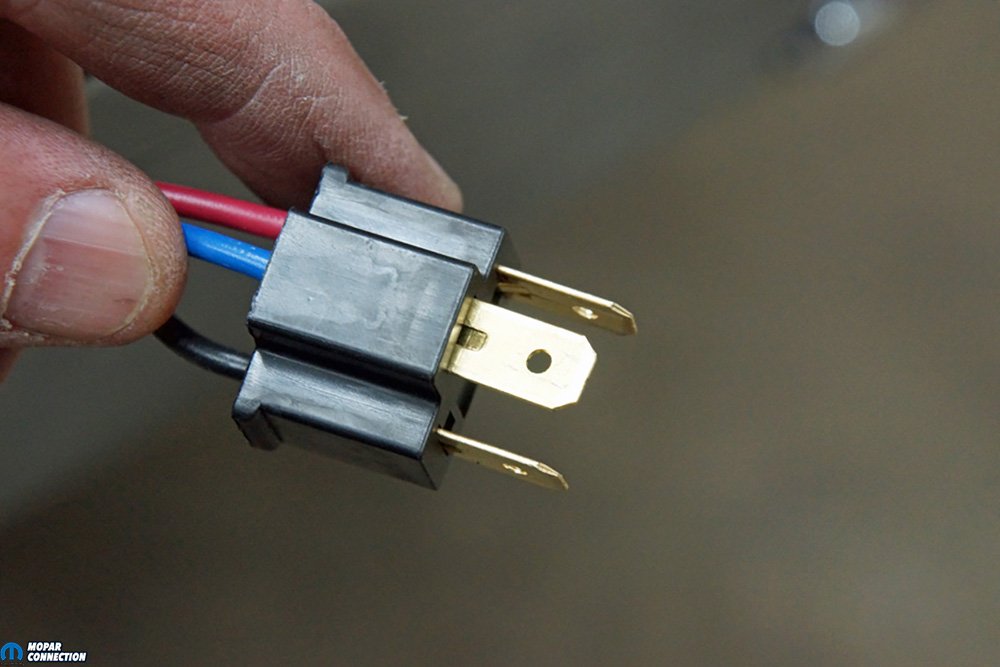
Each wire was terminated with a male spade from a Male H4 Headlight Plug and Terminal Kit (eBay ($6.20)). The spades were pushed into the kit’s plastic connector housing in an orientation that matched the factory headlamp pinout. The blue wire was pinned to fit the factory low-beam wire (black), and the red wire matched with the high-beam wire (red). The black wire coordinated with the factory black/white ground wire.
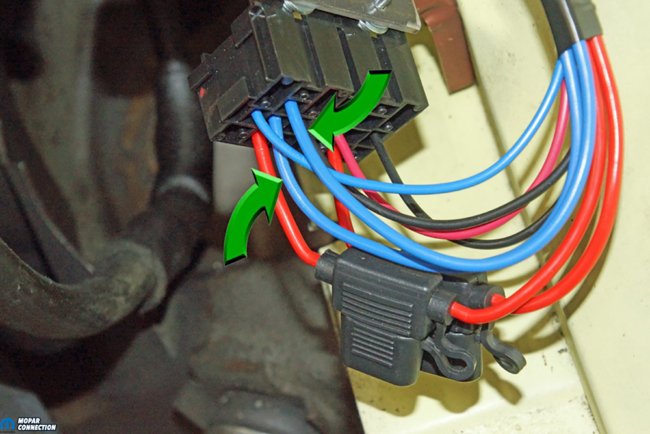

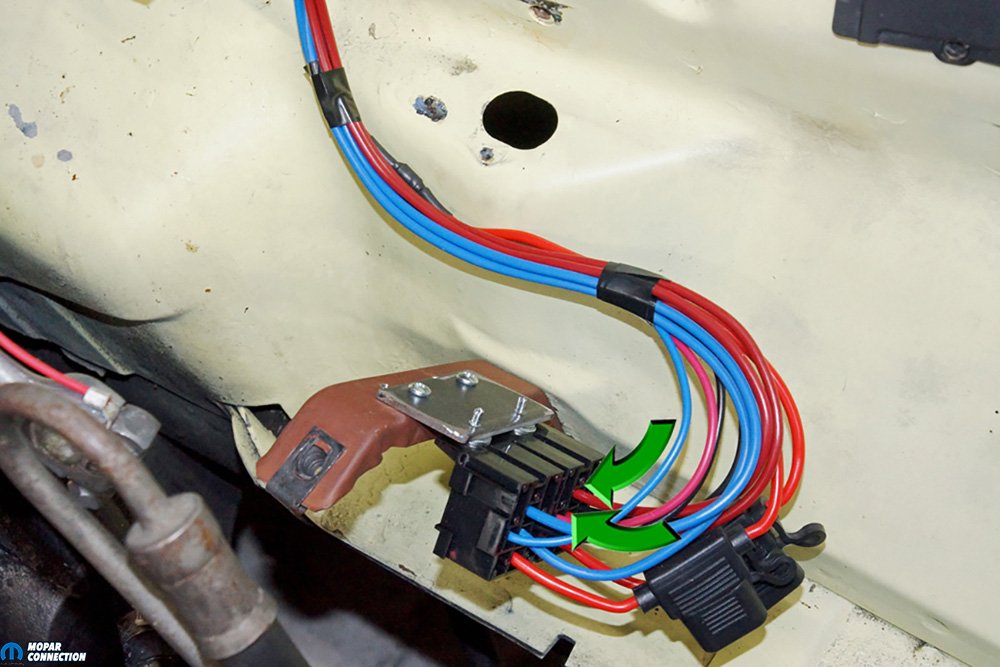
Above Left: We attached a 12-gauge wire (blue) to each 87 pin (green arrows) of one relay socket bracket. Most relays have 87 and 87a pins that operate separately from each other, but we used a dual-87 pin design, which allowed us to run two separate wires together (either off or on). Above Center: We ran the blue wires from the relay to each headlamp bucket. These wires would be connected to the low-beam spade of each headlamp. Above Right: We connected a 12-gauge wire (red) to each relay socket bracket at pin 87 (green arrows) of the second relay. We ran one wire to the driver side and the other to the passenger side headlamp bucket. These wires were for the high-beam headlamp sockets.
With all three wires secured in the connector, we joined the connector’s male spades to the factory connector’s female terminals. The factory passenger headlamp socket was left disconnected and would not be used with our relay conversion. We temporarily connected 12-volts to each battery cable, and when we pulled the headlamp switch, the low-beam relay energized, and the relay clicked. A tap of the floor-mounted, high-beam switch resulted in the low-beam relay de-energizing and the high-beam relay energizing.


Above Left: At the passenger side headlamp bucket, we had the three wires for the new headlamp connector. The factory passenger side connector was taped out of the way. We did not use it with our relay conversion, but it could be reused if we ever changed back to the headlamps’ factory wiring. Above Center: We continued the wire wrapping into the engine bay. It took some time, but keeping the wires from overlapping each other provided a nice clean look. Above Right: The harness wire wrap was completed. The taped wiring extended below where the battery tray would be when installed. The black headlamp wire was taped in the harness up to the battery tray area, where we pulled it from the rest of the harness (green arrow).
With the control side of the relays operating correctly, we moved to the power side (pins 30 and 87). Pin 30 on each relay was attached to an inline 12-gauge fuse holder (eBay ($6.99)), and both fused wires were run to the starter relay positive stud, where a single eyelet connected both wires to the stud. A 15-amp fuse was installed into each fuse holder.
For the low-beam wire that runs to the headlamps, we selected 12-gauge wires (blue). We chose the Bosch relays with dual 87 pins (part no. Bosch 332019150 ($8.70 each)). A benefit of two 87 pins was a 12-gauge wire (blue) run from the relay to a headlamp bulb and a second 12-gauge wire (blue) run to the other headlamp. For the high-beam lights, we performed the same task with a second relay, and a pair of 12-gauge wires (red) was run (one to each headlamp) from the dual 87 pins. Lastly, we ran a 12-gauge black wire to each headlamp. The two black wires were tied together and attached to a single 12-gauge black wire, which we discretely ran to the battery negative cable.
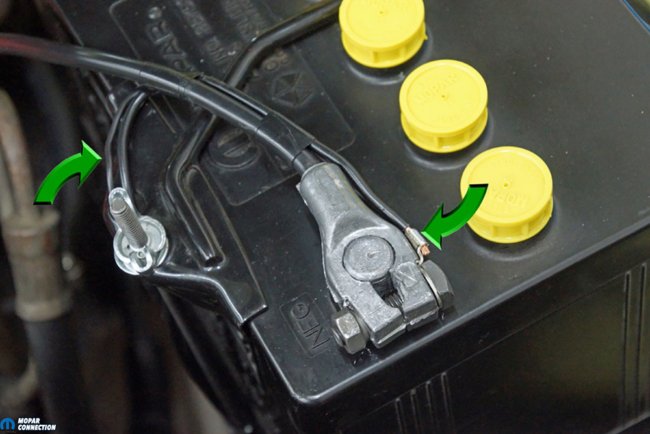
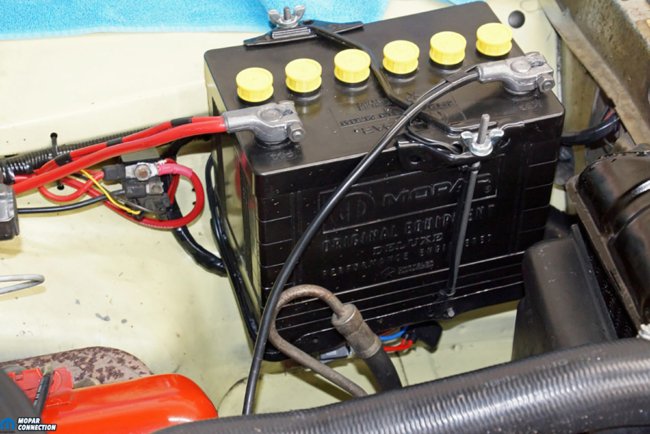
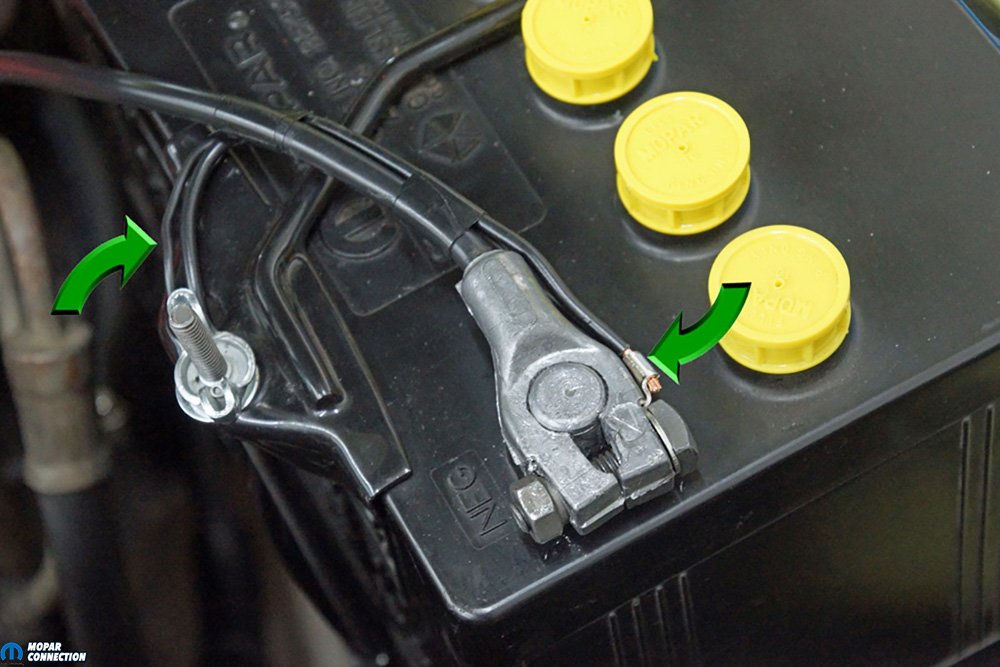
Above Left: The black wire (and a ground wire for the ignition) were routed around the battery on the tray and up the battery J-hook hold down to the negative battery cable. We terminated the wires at the battery negative. We did our best to conceal the wires. Above Right: After reinstalling the battery tray and battery, the relays were nearly hidden. At certain angles (such as this one), some of the wiring under the tray could be seen, but most onlookers will never notice it. The ground wire to the battery terminal was nicely hidden as well.
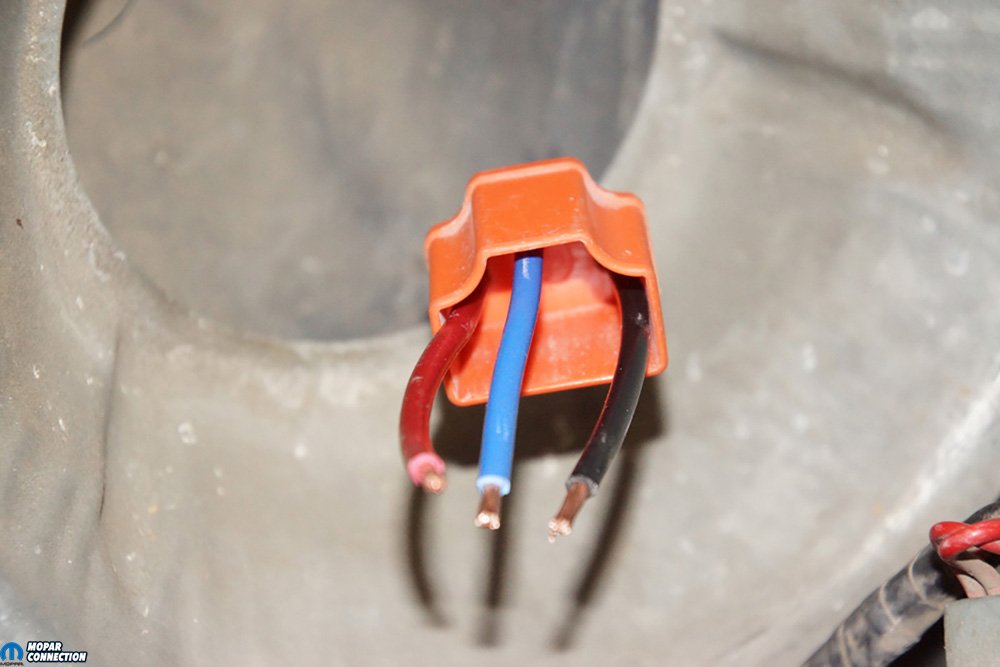
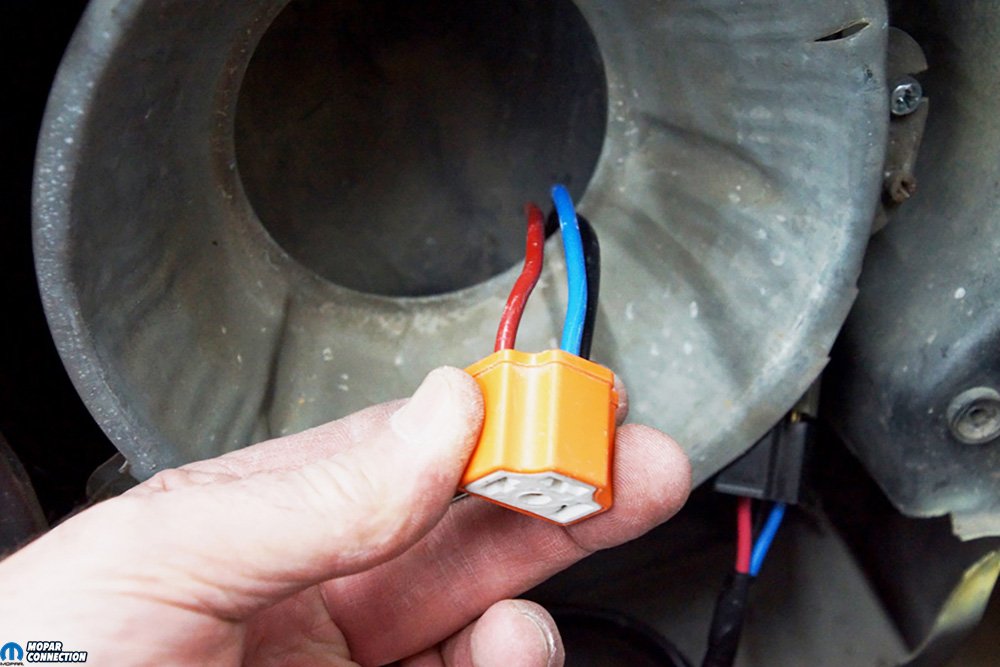
We trimmed the blue, red, and black wires at the passenger side headlamp bucket and connected the female terminals from our Orange H4 Ceramic Socket Adapter Connector (eBay ($10.04 each)). We slipped the low-beam, high-beam, and black wires into the ceramic socket, and we covered the socket with the supplied rubber cover. The same wire installation process was performed on the driver side headlamp.
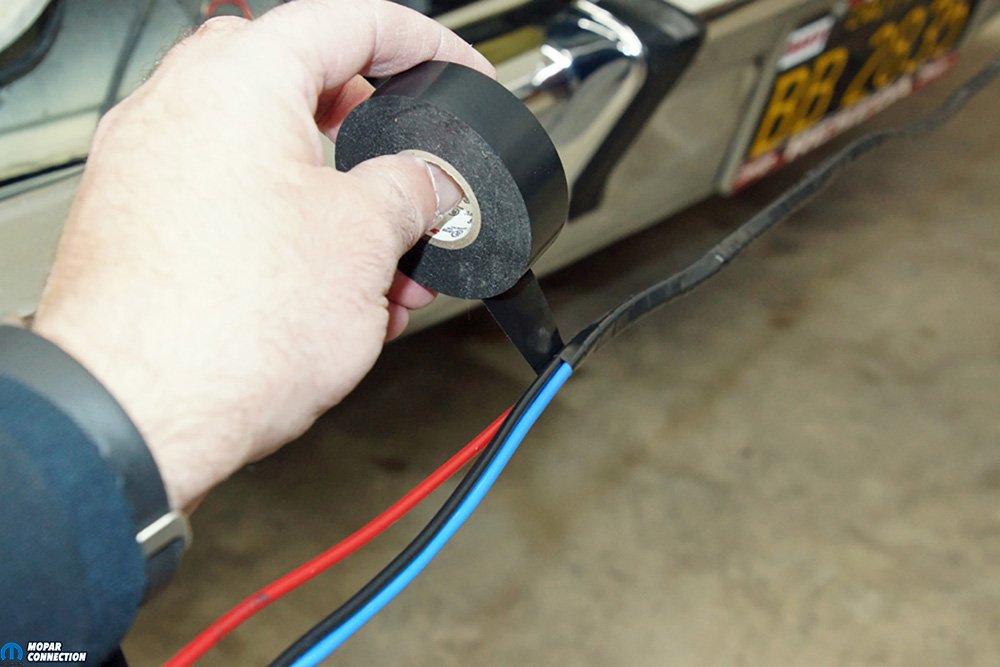
To make the wire installation appear stock, we taped all the wires with 3M electrical tape. We plugged in the used 6024 headlamps and secured them into the headlamp buckets. Once the battery tray and battery were reinstalled, we tested our work. The low- and high-beam headlamps operated flawlessly.

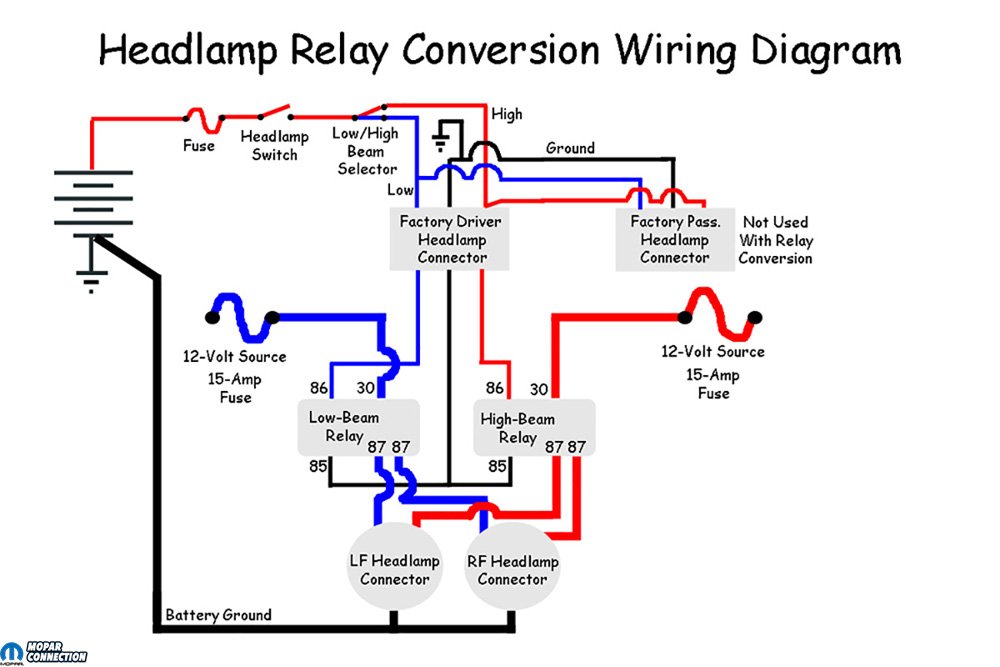
Above: The relay conversion required a plan. We made this schematic to help us with our wiring. To keep the wiring simple, we used blue for low-beam, red for high-beam, and black for ground. Consult your vehicle’s factory wiring for proper wire orientation.

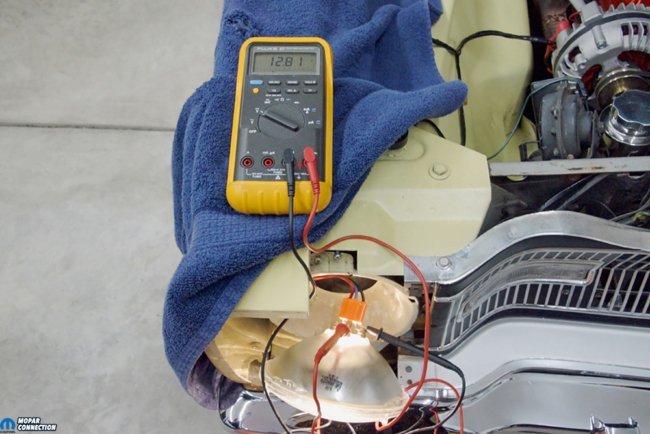
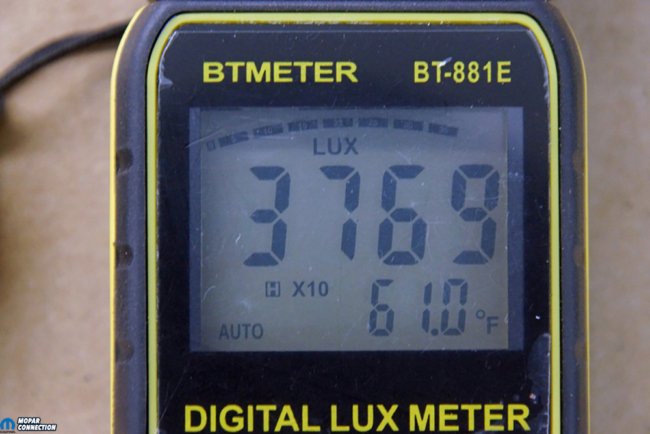
Above Left: The terminal ends were pushed into the ceramic headlamp connector, and the protective boot was slipped over the connector. The same procedure was utilized on the other headlamp connector. Above Center: We set the battery charger to 13 volts, and the low-beam voltage drop to the light was about .2 volts. In high-beam, the voltage drop across the circuit was also .2 volts. Most of the voltage drop occurred across each bulb. Above Right: Having a more considerable voltage drop across the 6024 headlamps provided a more significant potential. The lux meter provided proof of the better illumination, and the meter reads almost 3770 lux, which was an increase of about 1100 lux.
With the battery charger holding the battery voltage at 13-volts, we measured the low-beam available voltage. There was a 12.80-volt drop across each headlamp (only a 0.20-volt drop across our new wiring). We reevaluated the headlamp illumination with our lux meter, and the headlamps registered in at 3769 lux. The increased voltage to each headlamp increased the headlamp illumination by over 1000 lux. The lights were brighter, and with the new relays, we would no longer have to worry about the high amperage flowing through the headlamp switch or the excessive voltage drop in the factory wiring.
At the end of our installation, we tallied the parts for the update. The components added up to $77.86, so we missed the target by a few bucks. We were fortunate to have 18-feet of 12-gauge wire, 8-feet of 14-gauge wire, and a scrap piece of steel on hand. If we had not had these parts on hand, we would have eclipsed $100 in total.

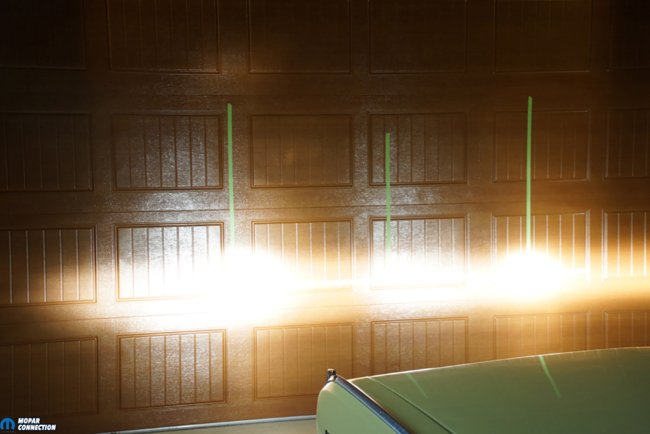
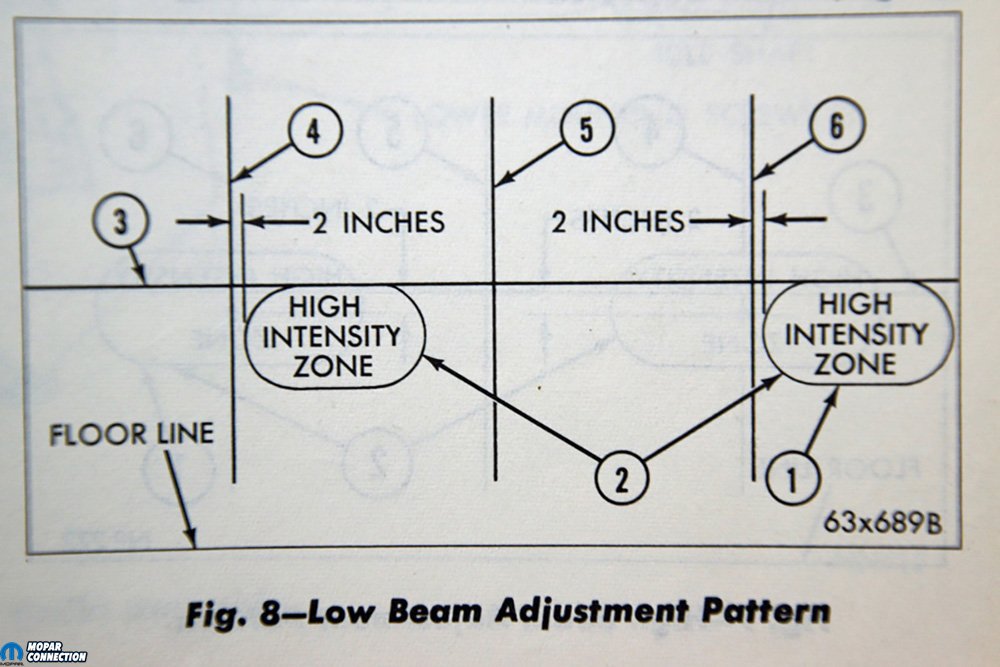
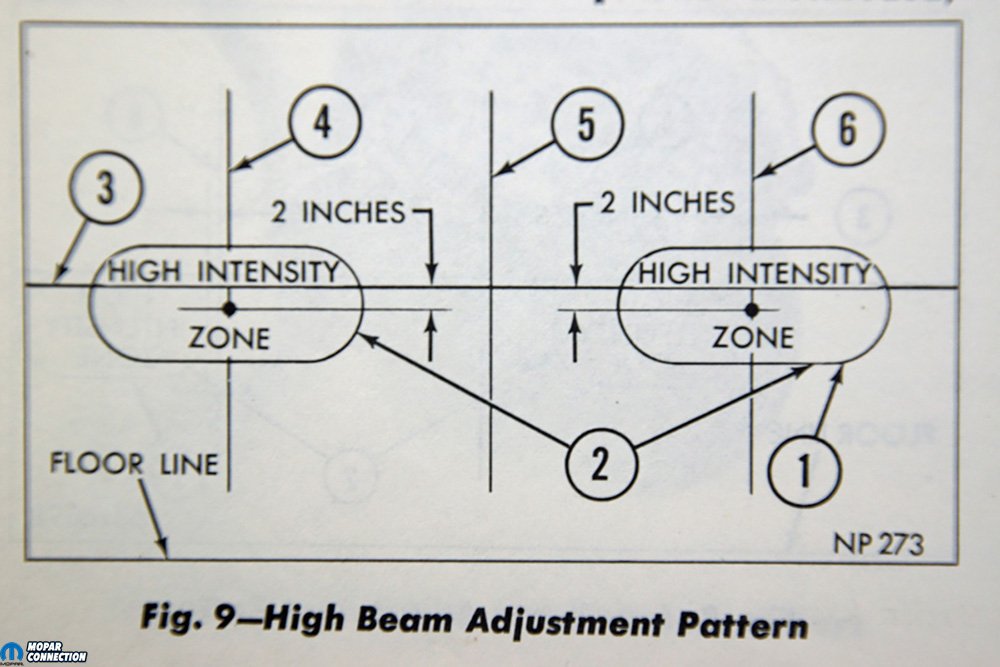
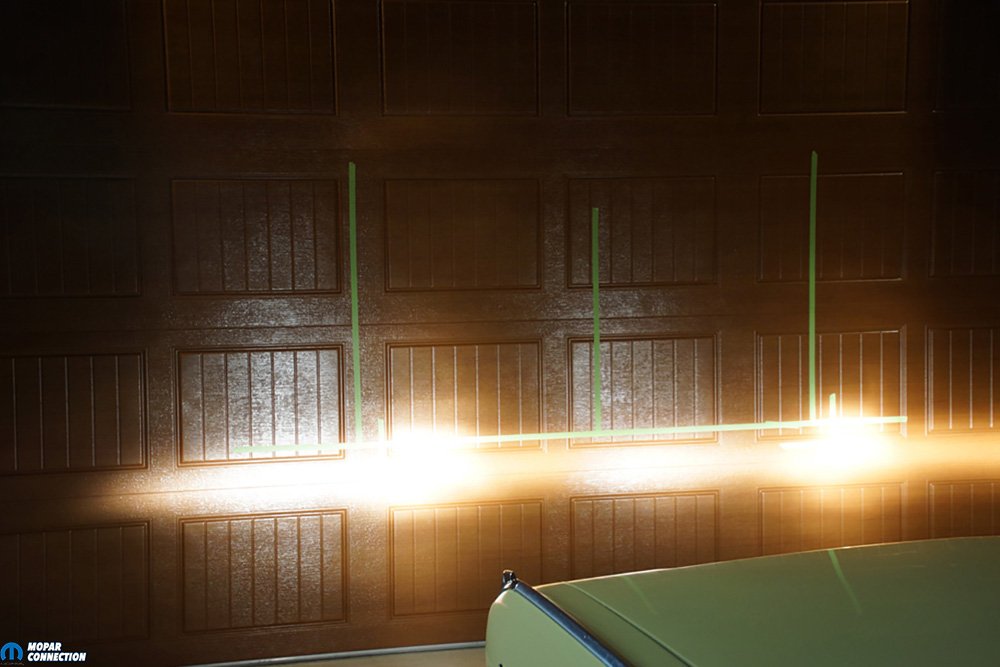
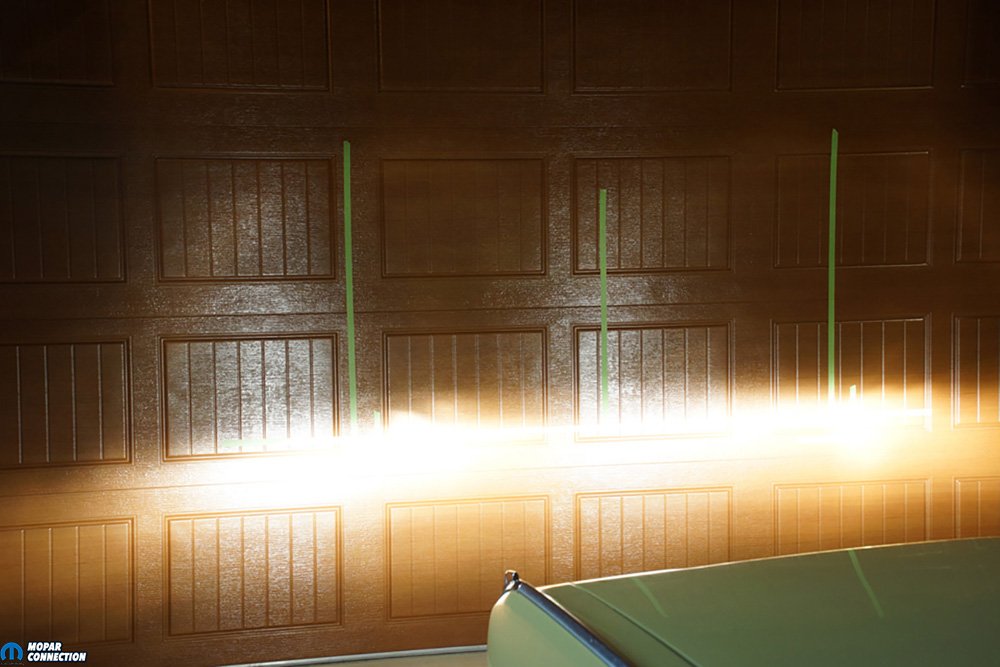
Above Left: The 6024 bulbs were aimed at the marked door, and we achieved a proper alignment. However, the shop manual procedure suggested aiming the headlamps at 25-feet. We could only get the Dart to 15ft. Above Right: The high-beam light pattern matched the aiming chart on the garage door. We were pleased with the new lighting brilliance and positioning of the beams.


Above Left: The Hella Vision Plus headlamps were installed. Immediately, we noticed how well the Hella headlamps distributed the light through a more significant area while in low-beam. Compared to the 6024 bulbs, the light was broader and filled in the entire area in front of the Dart. Above Right: The Hella headlamps had better light distribution in high-beam as well. Although the illumination of the bulbs in low- or high-beam was not significantly better than the 6024 bulbs, it was how well the Hella headlamps filled in the area from the shoulder to the centerline of the street that impressed us.
Now to break the bank. We thought this would be a great time to add a pair of updated headlamps to the Dodge. Koito makes the best 7-inch round headlamps. These bulbs will put the most significant amount of light on the road, provide the best light distribution, and have the best glass and metal materials, but they come with a $190 price tag.
These were too much for our budget, so we found Hella Vision Plus 12-volt low/high beam 55-watt halogen conversion bulbs (part no. 002395301 ($39.99 each)). The Hella Vision Plus lights will outperform all sealed beams offered today while remaining more budget-friendly. The bulbs’ illumination was slightly better than the old bulbs, but the Hella lights flooded the road and the shoulder far better than the 6024 bulbs.

Above: The Hella headlamps look great and provide plenty of light. The grille and bezels turned out nice as well. The relay conversion project turned out to be a great success.
Whether you decide to add higher quality bulbs or stay the course with the older halogen headlamps, it is time to perform the relay conversion. By updating and properly aiming the headlamps, the illumination and beam projection will be significantly better, which is a good thing for all who have seen the light.


WHY? LEDs are Plug and play and do not add miles of wiring and bunches of relays to your car. Seriously I have LEDs in my 72 Charger and i simply plugged them into the new lenses no cutting of wires and no instructions needed and my lights are 2x brighter than the outcome of this 20 year old work around.
Dennis,
Thanks for reading the magazine and providing a comment. The objective of the story was to provide a low-dollar approach to improve the headlamps on our classic rides. The addition of the relays removed the headlight switch from the power circuit and allowed the switch to be a control device only. We did not cut any of the factory wiring. By showing our readers how to wire a relay, they may take that knowledge and apply it to other components on their car (like wiring an electric fuel pump). A couple concerns about LEDs are 1: they can be very directional and do not flood the light to the shoulder of the road, 2: although the lights seem brighter based upon their lumens, the lux may actually be less than our setup, especially further down the road, 3: cost can be more than our readers want to spend, 4: and frankly, many LED bulbs or kits are poorly constructed and may not carry a DOT approval for use on the streets of the USA. Each state has its own regulations, and it is our responsibility to provide our readers with legal modifications they can make on their vehicle regardless of their location in the country. Keep enjoying your ’72 Charger.
Chris and team, thanks for making this how-to. You did not chop and bash anything to fit. And to gain 1100 lux.
When i did this to my 65 Barracuda years ago I found the wires up front were listed in the Chiltons wiring diagram to be 18 gauge but when stripped and measured they were closer to 20 gauge. I wired up the relays with 12 gauge and like you I used the left stock plug to trigger the relays and taped the right plug up. But I had to do one more mod to mine.
Going from a 6024 to a H6024 is a plug and play.
But I went with H4 bulbs and this is where it is not plug and play.
You must move two wires on the H4 plug or you will be using the High Beam filament as a path to ground. This may be why the LED conversion on Dennis’s Charger is so bright on low beam. All LED bulbs are pinned the same as H4.
Wish I could post a picture to explain.