


Since the purchase of our ’67 Dart GT in 2018, we have experienced a speedometer indicator that tremors and bounces, and there is a constant ticking noise at any vehicle speed. After inspecting the cable, we quickly diagnosed our problem as a faulty speedometer cable. The representatives from YearOne recommended a replacement speedometer cable (part no. FD92360).
While installing the speedometer cable is our focus, our coverage will extend to some of the typical speedometer and cable concerns that many Mopar enthusiasts experience. We will explain the repairs necessary for a non-moving or quivering indicator and an incorrect vehicle speed displayed on the speedometer.

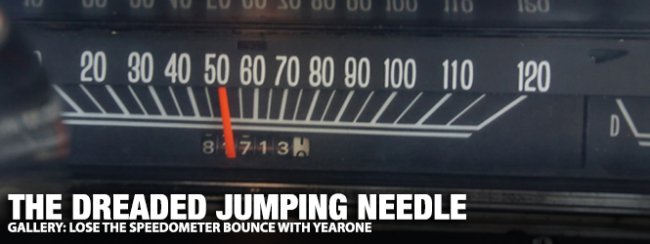
Above: Nobody enjoys a speedometer that has the indicator needle bouncing back and forth on the gauge face. It is impossible to determine the vehicle’s actual speed while traversing down the road because of the excessive needle movement.
One of the most mentioned complaints about vintage Detroit iron involves a speedometer that is way off from the vehicle’s actual speed. The usual reason for the inaccuracy is that the original tires, made from a bias-ply construction, were long ago exchanged for the superior radial-tire design. The radials selected were often oversized or did not perfectly match the diameter of the bias-ply tires, which led to a speedometer reading slower (or in some cases faster) than the actual vehicle speed. Similarly, if someone swapped the rear gears to improve the off-the-line performance or increase fuel economy, the speedometer reading would not match the vehicle speed.

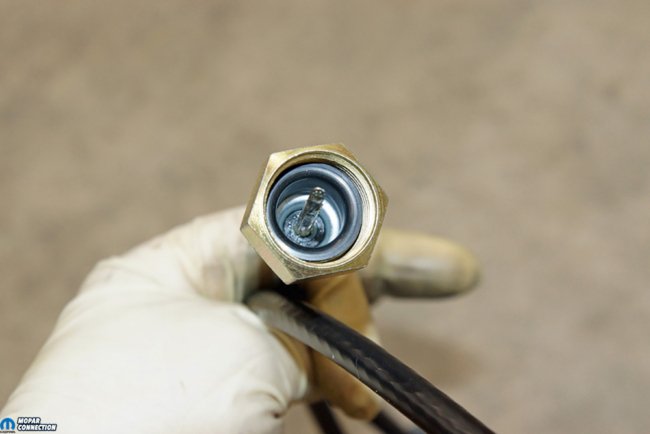
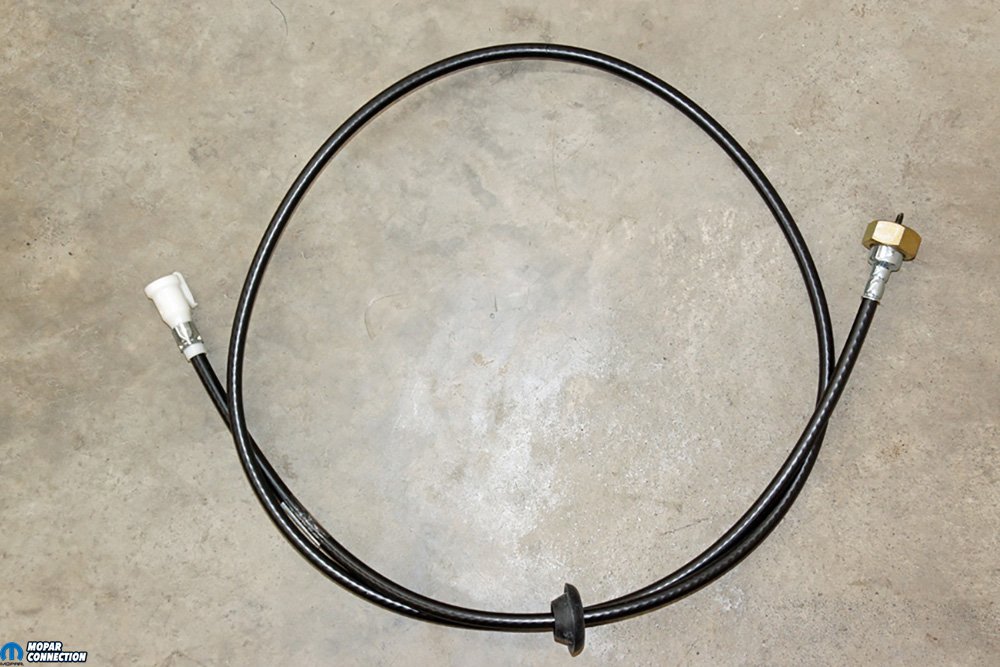
Above Left: The clip-on nylon ferrule is attached to the outer cable housing. The inner round cable has a squared end to engage the speedometer at the instrument cluster’s back. Above Right: At the transmission, the 5/8-18 female end threads onto the Torqueflite 904 (or 727) speedometer drive pinion adapter. Like the ferrule end, the inner cable at the thread-on female has a squared end that engages the speedometer drive pinion.
While modern vehicle speedometers are electronic output devices attached to a powertrain control module (PCM) via a Controller Area Network (CAN), our classic Mopars rely on a completely mechanical system for the speedometer correctness. Suppose someone changes the tire size of a late-model vehicle. The powertrain control module (PCM) can be reprogrammed (flashed) with new tire size information, and the speedometer, anti-lock braking system (ABS), and traction control will remain accurate.
The mechanical systems rely upon a speedometer drive pinion gear (installed in the transmission) to spin the speedometer cable, which attaches to the instrument cluster’s speedometer. By selecting the correct speedometer gear (available from YearOne) based upon the tire diameter and final gear ratio, the most accurate speedometer reading can be achieved in the 30-70 mph range.
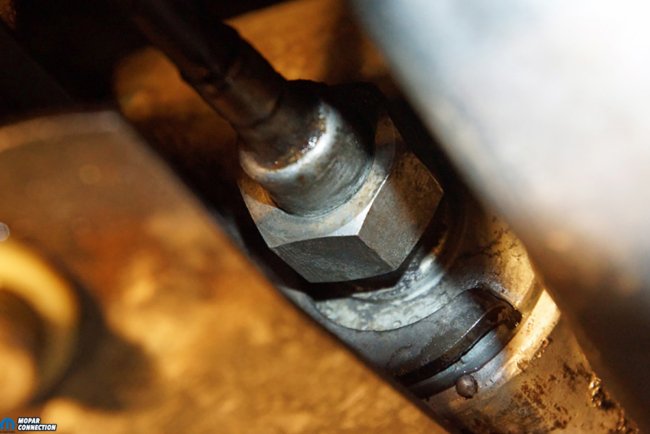

Above Left: Our Dart’s speedometer cable was adequately attached at the transmission. The seals in the cable and the adapter housing appeared to be operating correctly. There were no leaks. Above Right: We had to pull the automatic floor shift shaft support bracket from the transmission to gain access to the transmission end of the speedometer cable nut. After we backed off two nuts, the bracket slipped off the shaft.


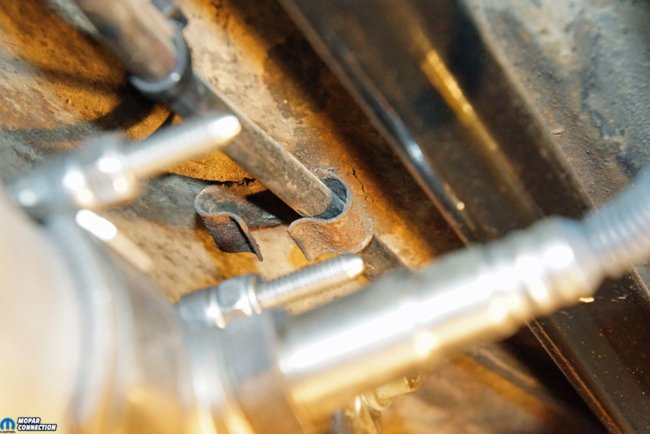
Above Left: The nut was tighter than finger tight, so we needed a 1-inch wrench to break the nut loose. The cable was pulled from the transmission. The squared cable end was in good shape. Above Right: The cable was routed around the transmission support and the driver-side torsion bar. The factory provided a clip attached to the floor pan to secure the cable.
Another concern with the speedometer is an indicator needle that flutters or waivers back and forth at a specific speed or all speeds. Several things could cause this problem. A cable core malfunction (fraying), a kinked cable due to improper routing, or a cable that is improperly installed into the instrument cluster’s speedometer often results in a flutter. Replacing the cable core, rerouting the cable, or ensuring the cable is seated correctly to the cluster’s speedometer will often resolve these concerns.
After reviewing the factory shop manual (FSM), the remedy for an inoperative or noisy speedometer (ticking, squealing, or whirling) is replacing the cable assembly. When a squeal occurs, it is often a result of damaged or worn bearings at the speedometer unit, which requires a professional to rebuild the assembly. Yet, if the ambient temperature is extremely low, the speedometer may develop a slight squeal, but it will resolve when the temperature rises.
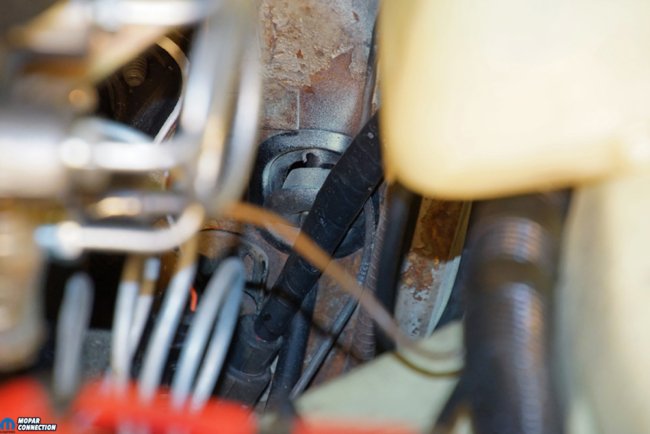
Above Left: An additional clip completed the proper routing of the speedometer cable from under the Dart to the engine bay. The exhaust passes close to the cable. The clips are required to secure the cable from any source of heat or damage. Above Right: The non-original cable on the Dart had a factory-appearing grommet fitted into the firewall. Although the grommet was not correctly installed, it appeared to be restricting exhaust fumes and water from entering the occupant cabin.
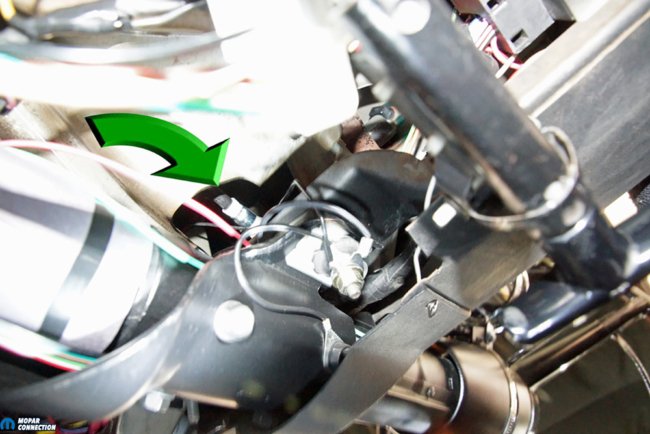

Above Left: We were able to feed the new cable through the firewall. The nylon ferrule slipped onto the speedometer fitting on the back of the instrument cluster (green arrow). Above Right: This factory shop manual (FSM) illustration shows the speedometer fitting we had to slip the cable over. The ferrule must be pushed onto the fitting until the nylon lock on the ferrule clicks into place. After the installation, the cable should be pulled away from the cluster to ensure the lock is engaged. If the cable pops off the cluster, try again until the cable remains attached.
Mopars with cruise control came with a two-piece speedometer cable, and some ’70s models also used a two-piece cable for the exhaust gas recirculation (EGR) maintenance counter. For either option, the factory routed the lower cable from the transmission to the speed control servo unit or the counter. A second cable ran from the servo unit or counter to the speedometer. After achieving a specific increment, the counter turned on the check EGR light on the instrument cluster. Whether for cruise control or the EGR counter, both cables needed to be checked if a speedometer concern existed.
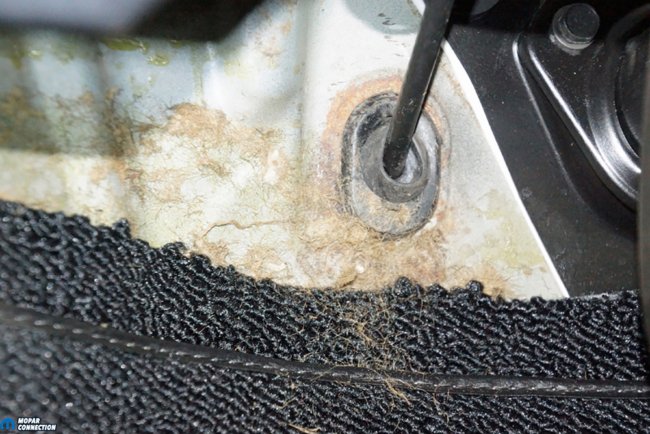

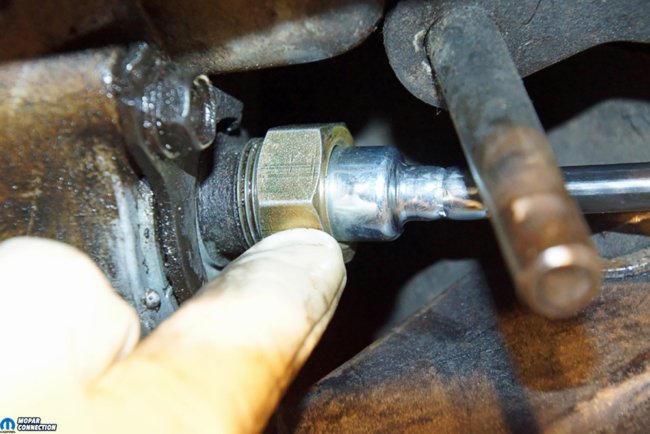
Above Left: The grommet on the cable fit nicely into the factory firewall seal. The grommet pulled through into the cabin area to seal the entire opening. Above Center: From the engine bay side of the seal, it is easy to see the grommet fits nicely into the factory firewall seal. The fit of the YearOne cable grommet is much better than the non-factory cable previously installed. Above Right: The cable threaded onto the transmission adapter perfectly. We tightened the cable nut finger tight while we correctly routed and secured the cable to the under the chassis clips. The cable would be snugged tighter with a 1-inch wrench
Suppose the speedometer operates without a bounce, but the speed indicated is not correct. In that case, one of several speedometer drive pinion gears can be selected to provide the most accurate vehicle speed. The gears range from 21 teeth to 45 teeth. The tire diameter and the final drive gear ratio are necessary to choose the correct drive pinion gear.
Our ’67 Dart had a replacement speedometer cable that had a female thread on each end, but our speedometer required a clip-on style end at the cluster. A previous owner had merely pushed the cable core into the back of the cluster. The cable was not adequately supported, which caused a ticking sound and a fluttering speedometer needle. The YearOne speedometer cable we selected came in the factory 60-inch length with a 5/8-18 female end and a nylon ferrule (clip-on) end on the other. The cable is for all ’65-‘76 A-bodies without cruise control (or an EGR counter). Lastly, the cable comes with the correct firewall grommet, which keeps water and engine fumes from entering the car’s occupant area.
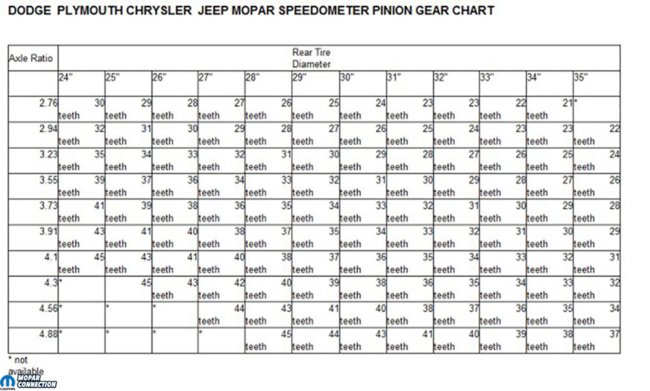

Above Left: When correcting a speedometer reading, a speedometer pinion gear chart is necessary. The chart uses the rear tire diameter and final drive gear ratio to determine which gear is needed. Above Right: While these are not all the pinion gears available, they represent how the gears appear. They each have a number molded into the gear that ranges from 21 to 45 teeth.
Detaching the speedometer cable required us to remove the automatic floor shifter support bracket from the transmission before unthreading the cable. We pulled the incorrectly installed cable end from the instrument cluster. After releasing the firewall grommet, we snaked the cable from under the dash. The instrument cluster end of the cable was pulled into the engine bay, and the entire cable was slipped out from under the Dart.
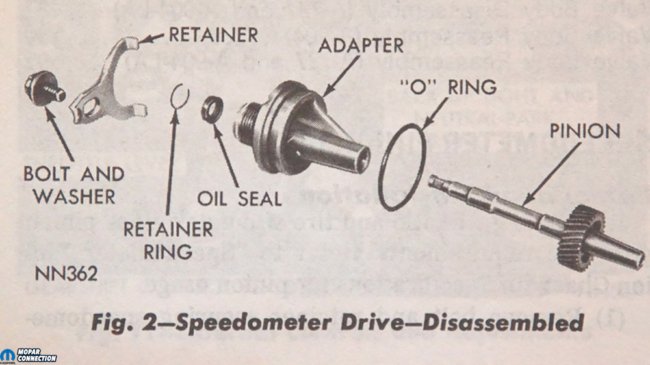
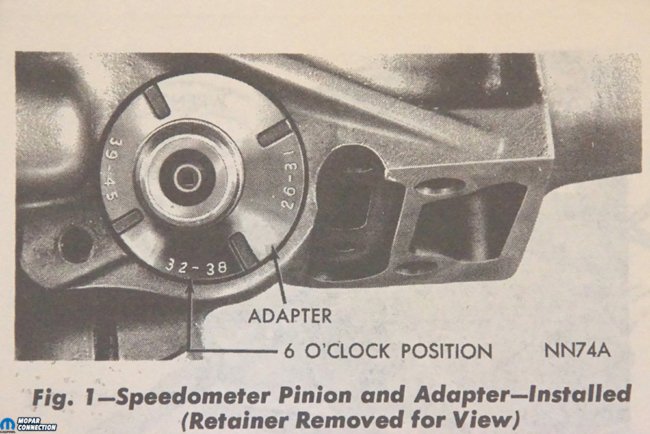
Above Left: An exploded-view from the FSM shows the pinion gear orientation in the adapter. The pinion gear shaft extends through the adapter and into the speedometer cable. Above Right: Depending upon which pinion gear is needed, the speedometer adapter must be clocked to fit the gear into the case. The gear selected must fall into the number range stamped on the adapter housing, and the range must be positioned at the 6 o’clock position. With the adapter adequately oriented and to ensure no rotation of the housing, the adapter retainer tangs (two) engage the adapter and a bolt secures the retainer to the transmission housing.
We reversed the removal procedure by pushing the cable up from beneath the chassis. Without (sharply) bending the cable, we carefully weaved it through the firewall and secured the cable end to the cluster. With the grommet pressed into the firewall, we connected the cable to the clips on the floor pan’s underside and threaded the cable end to the transmission. After the cable installation was complete, the YearOne speedometer operated flawlessly. We no longer experienced a flutter or noise. Although not a result of the speedometer cable replacement, we experienced a speedometer with less than a 1.5% inaccuracy from 30-70 mph.
There is no reason to drive your Mopar with a speedometer that is not operating correctly. For a couple hundred bucks you can easily fix your annoying and/or incorrect speedometer. When quality parts are needed, check out YearOne’s complete line of Dodge/Plymouth products to get your Mopar back up to speed in no time.


