


When we first started building Orange Crush some years back, racing was not part of the plan. Our initial goal was a good handling street car. After the car was completed and had some miles on it, we decided to attend an autocross. We were immediately hooked. We didn’t want to lose the drivability of the car on the road, but if we wanted to be competitive at all we needed to start upgrading some of our parts. Even though our Reilly Motorsports Alter-K-tion front suspension was built strong and did a wonderful job on the street, the demands of racing would require us to upgrade parts like shocks, springs, sway-bars and other items.
These other components would allow us to have more adjustability, stiffer cornering and other characteristics that would help the performance of the car tremendously. One of the major parts that many people don’t think of right away is power steering. After a few races we were fighting an over heated pump, leaking fluid, thrown belts and horrible steering feel. We soon learned why we needed to upgrade our pump before some of the other components. We turned to the experts at Flaming River Industries to help solve our power steering issues.
A few months ago we installed the Flaming River Industries’ battery disconnect switch in Orange Crush. The switch has been very handy and is a great safety precaution for any vehicle. While we were talking with John Jennings at Flaming River Industries about the battery switch article, we started asking some questions about their power steering pumps. John asked what suspension set up we had and told him that Orange Crush had the Alter-K-tion. John is very familiar with the Alter-K-tion setup as he works closely with Bill at Reilly Motorsports.
We explained how we started racing more and were having some power steering issues. Our factory pump didn’t last long and we upgraded to a slightly used dirt track power steering pump, but still had issues with leaking fluid and poor steering feel. John said,” We have multiple pumps with interchangeable flow valves and we can find one that will work for you, but first who’s power rack are you running?” We told him that we had no idea and it was whatever the AlterKtion came with. We described the rack and John told us that was the older unit Bill used but now he is using Flaming River’s Billet-Power rack. This was news to us but didn’t think that would make much of a difference. A power steering rack is a power steering rack right? Wrong, John explained that their Billet-Power rack is superior to many other racks.


We got a little excited and wanted to know more. John proceeded to go more in depth about the specs of both and how they would benefit us. “Although your rack is still working our Billet-Power rack will out perform it. Our rack has a full 6” of travel, quicker steering ratio at 2.27 turns from lock to lock, uses a 1″ diameter rack shaft and are built with all new parts, not refurbished,” John stated. We agreed that sounded great but we still had the issues with our pump cutting out and leaking.
“As you have found out, a rack only works as good as its pump. That’s why we have worked with KRC and created our Hi-Rev pump. The pump will work well on the street and be able to sustain high rpms when you are racing. We have also designed a remote billet reservoir for the pump to keep hot fluid away from the pump and for ease of installation.” John ended with, “The rack and pump are the heart of your suspension. Shock, springs, sway bars, etc can’t help you drive better if you are having steering issues. Our Billet-Power rack and Hi-Rev pump will work together seamlessly and give you the best feel and response, allowing you to fine tune the rest of the car.”
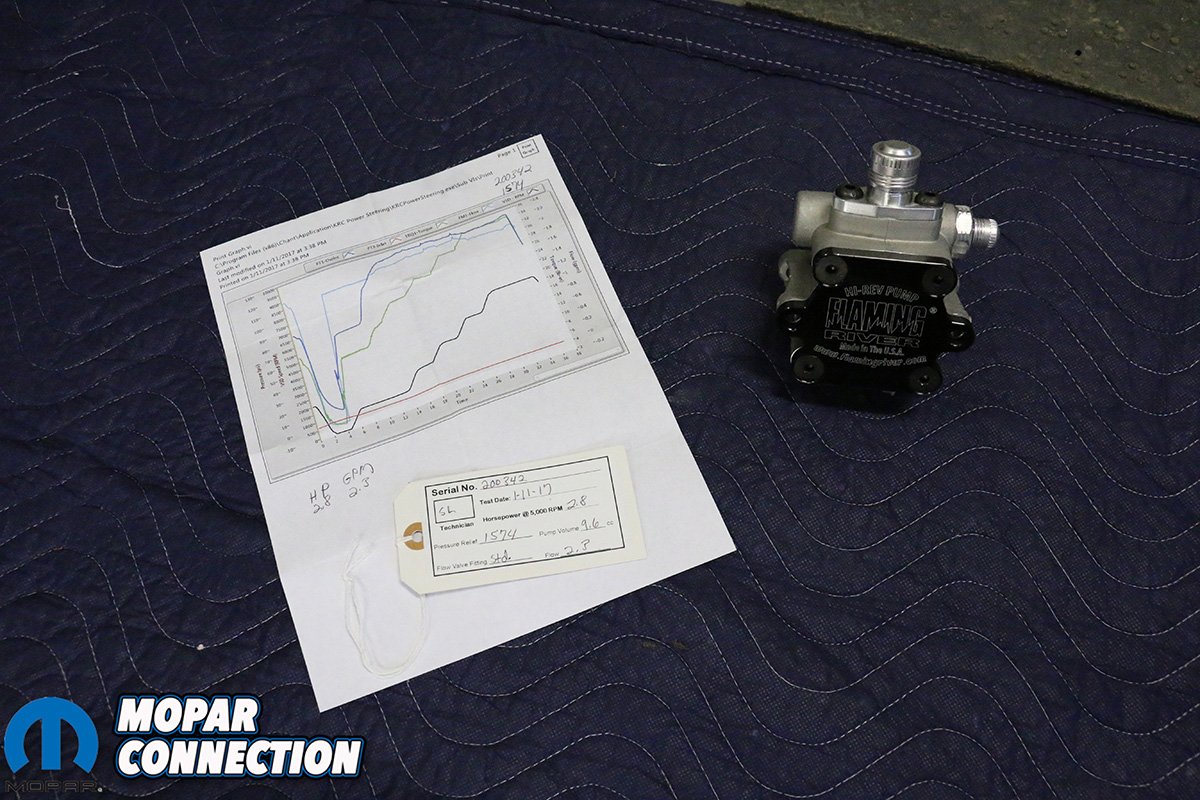
This sounded great, but still seemed too good to be true. John could hear the skepticism in our voice as we continued to talk. “I know this sounds like a sales pitch but we have hard data to back up every pump and rack, power and manual, that we ship out of the warehouse.” This was very intriguing, so John continued, “We test every pump and rack before it leaves the shop. We check every unit for leaks, correct pressures, rack travel and flow rates. They are both tagged, labeled and information is stored in our database in case we need to access it in the future.
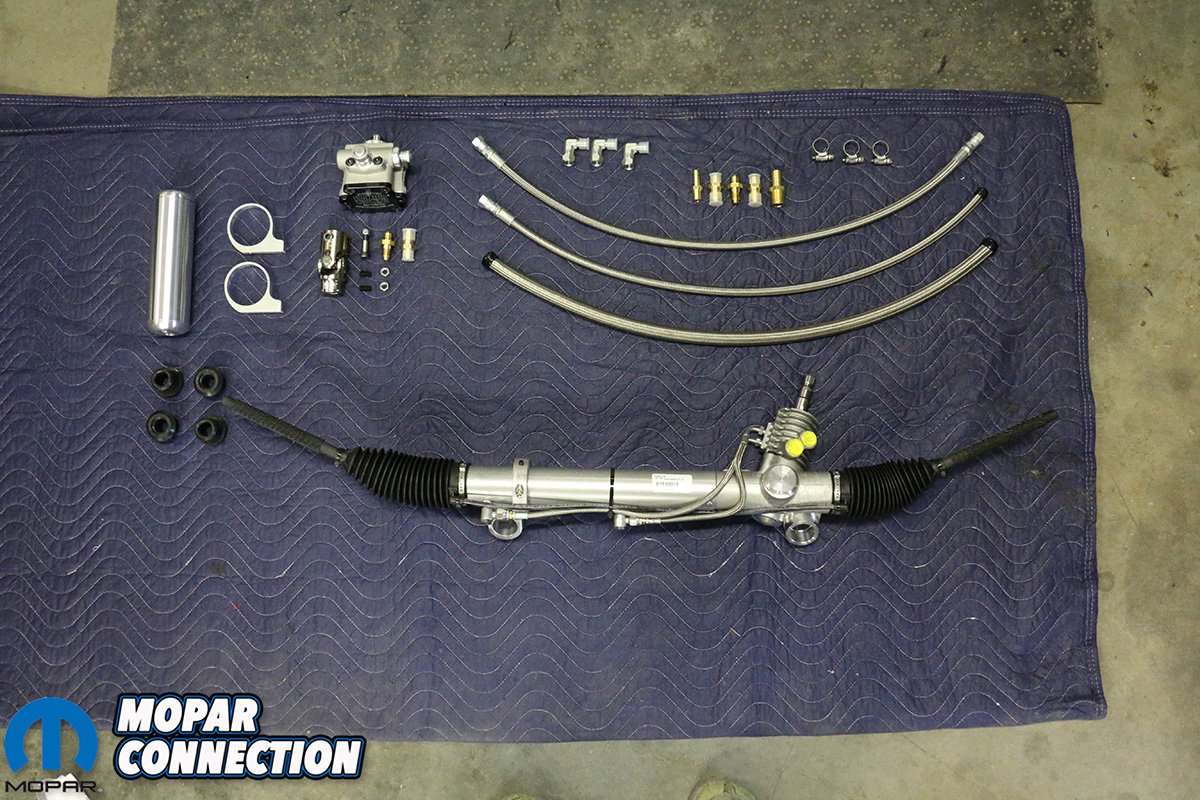
By testing both the pumps and racks it ensures that we are shipping properly performing parts.” What more could you ask for? Flaming River did their homework, designed a Billet-Power rack and a Hi-Rev pump that works together. Then document results of both units properly working before they ship. John didn’t need to say another word, we ordered our new Billet-Power rack, Hi-Rev pump, billet reservoir and universal stainless braided hose kit on the spot.


The next few days seemed like weeks as we waited for our parts to be delivered. We couldn’t wait to install them on Orange Crush. With a few races under our belt we knew how our current setup handled and couldn’t wait to feel the difference. The parts finally showed up on our doorstep and was time to get busy. As we unboxed our parts, we remembered why we choose Flaming River Industries.
You might be able to save a few dollars by sourcing from different companies, but Flaming River designs everything to be compatible. There was no worry about if something would cause an issue. Not to mention if you call them for technical help they know exactly what you have. We have been down the road of piecing parts together, making a ton of trips to auto part stores and loosing hours of work time by trying to find that $2 part or waiting for it in the mail. We had everything we needed for the installation and dove into the project one Saturday afternoon.


We started by removing the old rack and installing the Billet-Power rack. Then we would move onto the Hi-Rev pump and remote reservoir. No matter what rack and pinion setup you have, they all bolt in a similar fashion. You will have some sort of connection to your steering column, 2 tie rod ends and 2 rack mount bolts. Before we started working on the car we jacked the car up and placed the wheels on wood blocks we made. Not only did the blocks elevate the car for more working room but would also hold the wheels in place when we removed the rack. We started by disconnecting our steering column linkage first, then the tie rods and rack mount bolts. With a little maneuvering we dropped the rack right out.
We compared the old rack to our new Billet-Power rack. You can see that our old rack had seen better days. It was covered in miscellaneous fluids, dirt and grime. Looking past the cleanliness, you can see the difference in build quality. The old rack has a cast housing and hard lines where as Flaming River Industries uses stainless lines, billet machined housings, and conveniently placed return and pressure ports. They have also relocated the vent and pressure lines from across the top of the rack to the front for a lower profile which gave us more oil pan clearance.


Comparing the racks side by side you can tell the quality of the Flaming River unit over the stock rebuilt unit. We went ahead and mounted the rack back in the car. All the same bolts and tie rod ends worked with the new rack. The tie rod ends can be tricky to get installed back in the same exact location. As we mentioned earlier, our wood blocks kept our tires fairly straight and the new Billet-Power rack steering shaft was marked for absolute center. This allowed us to align the steering wheel straight and try to get the tie rod ends installed close to where they were. After everything was installed, we planned to take it to a shop for a proper alignment. As you probably know, if the tires are not properly aligned it could cause issues turning, increased tire wear and noise.
With the rack installed, it was time to move onto the pump and reservoir. As we mentioned earlier, we had already converted to a type II power steering pump and did away with the stock set up a while back. This made mounting the new pump a breeze. If you still have a stock pump you will need to get an aftermarket bracket that will allow you to use a type II pump. We used a KRC power steering bracket to mount our used dirt track pump and will reuse the same bracket for the new Flaming River Hi-Rev pump.


We wont bore you with the details of removing the old pump, so we will jump ahead to installing the new pump. The KRC bracket is actually made for magnum motors and utilizes a 3rd bolt hole that our LA block was not drilled for. We have been using the bracket with only the 2 timing cover bolts installed and this set up has worked fine. The KRC bracket kit comes with all the bolts and spacers you will need to mount the pump. You may have to shim the bracket or pump out to align with your pulleys. Be sure to drain you coolant before removing your timing chain cover bolts and wrap the threads of the new bolts to prevent any leaking.
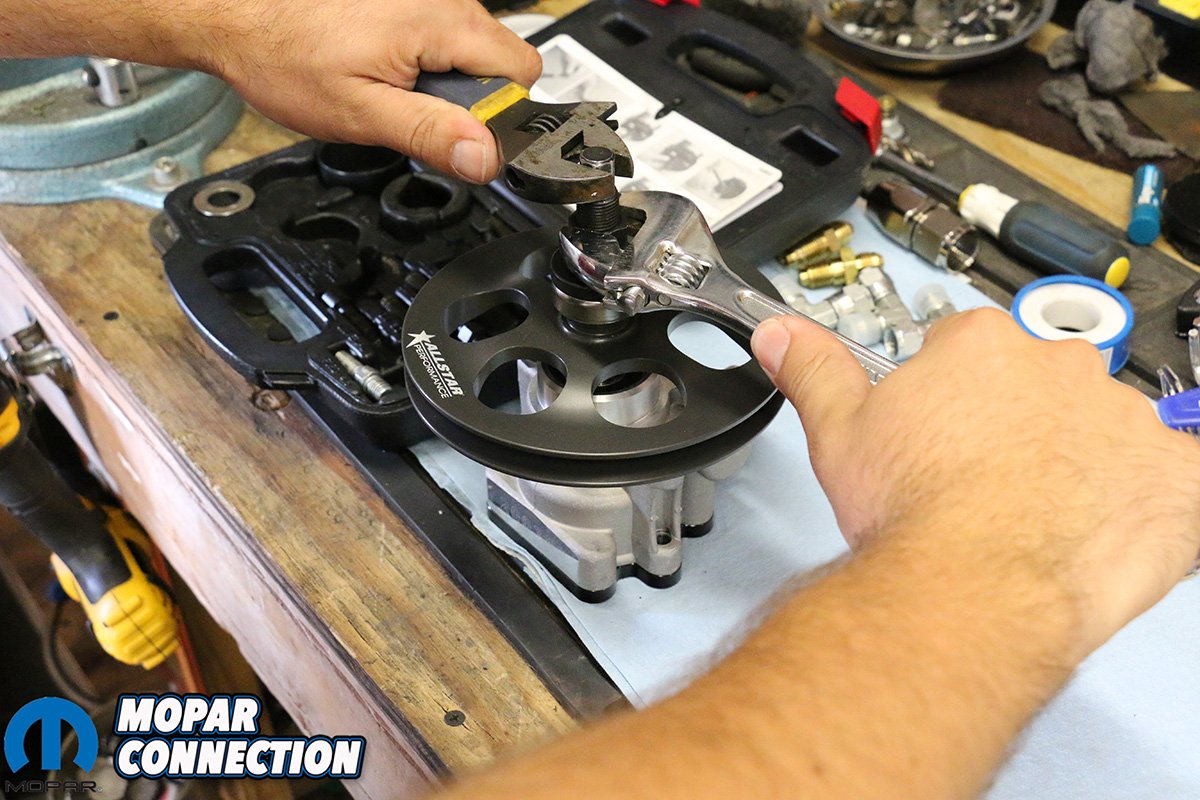
The pump comes from Flaming River Industries with all the fittings installed but no pulley. Since the pump is for universal installation, they leave the pulley selection up to you. Their pump takes a standard press on type II pump pulley. We called Flaming River Industries to figure out what size pulley we needed to get the correct pulley ratio. We had CVF Raicings 5.2” crank pulley and if we used a 6” pulley we would end up with a .86:1 pulley ratio. Although 1:1 is preferred, under driving the pump would be ok. We went ahead and ordered a 6” Allstar power steering v-belt pulley and rented a power steering pulley installer. Its critical that you use the proper tools when installing the pulley, if not it could be pressed on uneven, damage the pulley or worse the pump shaft itself. After we pressed the pulley all the way onto the pump we were ready to mount the pump.


To mount the Hi-Rev pump on the KRC bracket there are 2 hex head socket bolts used. You will have to rotate the pulley around to get the bolts through the pump and into the bracket. Before we tightened down pump, we put on our old belt and rotated the pump to tighten the belt. Once the belt was tight we secured the pump by tightening the bolts down. With the pump in position we could now figure out proper length for all of our plumbing without worry of interfering with anything around.
We started with mounting the remote billet reservoir. Our old pump had a reservoir bolted to the pump but now it will be away from the pump which helps with clearances around the motor and cooling of the fluid. When mounting the reservoir its important that it is mounted higher than the pump. If the pump is higher than the reservoir the pump will trap air inside and wont be able to bleed it out of the system. The best place we found for the reservoir was beside the radiator. This would allow it to be higher than the pump, easy to mount and minimize the amount of power steering line.


With the reservoir mounted all we had left to do is plumb our new stainless lines that were included in the stainless braided line kit. This can get confusing as we have 4 different parts that we need to plumb and need to have the correct flow. We have the pump, rack, remote reservoir and a power steering fluid cooler that all need to connect and circulate fluid correctly. The rack has 2 inlets where lines connect to it, ones pressure and ones return. The route of the fluid flows like this: Starts in the reservoir > feeds the pump > into the pressure side of the rack > out the return line from the rack > into the power steering cooler > out the other side of the cooler and into the small (feed) fitting in the reservoir. Now that you know how the fluid needs to flow, lets move onto installing each line.
The pressure line connects to the pressure line on the pump. This line is easy to spot as it has AN fittings on both ends. The line was a little long and could have it cut and new fitting put on the one end but we made it work. Its critical that either end of the pressure line has higher pressure fittings installed. Absolutely do not use hose clamps or anything similar. If you try to use some sort of hose clamp fitting the pump will blow the line off the rack or the pump and create a huge mess.


After the pressure line was installed, we worked our way backwards. There is a supplied 5/8 PTFE hose to connect the reservoir to the pump. There is a supplied straight barb fitting for the reservoir but with the positioning it was going to be a tough fit. We decided to us a -10an conversion fitting and then a 90 degree -10an to push-loc fitting. This position the outlet of the reservoir where we needed it to plumb our line from the pump. On the pump we needed to buy a straight -10an to push-loc fitting too connect to the 5/8″ PTFE hose. It takes some effort to get the hose slid onto the fitting, you want to make sure that it goes on all the way and to clamp it down with the provided hose clamps.
Now that the supply line for the pump is connected, we need to connect the return line to the reservoir. If you don’t have a power steering cooler this would normally connect to the return side of the rack. We are running a cooler and want to feed the cool fluid into the reservoir before its sent back to the pump. We had to use our existing rubber hose to connect our cooler to the reservoir. The opposite side of the cooler would connect to the return port on the rack. Using the provided stainless PTFE line we attached the -6an side to the fitting on the rack and slid the other end over the cooler inlet and tightened it down with a hose clamp.


At this point all the lines should be hooked up. Its always a good idea to go back through and make sure everything is properly routed allowing the fluid to flow correctly. If all looks good, double check all your fittings and make sure they are tight. Go ahead and fill the reservoir with power steering fluid. Most power steering fluid is compatible but make sure its clear. Flaming River Industries does not suggest using any red colored power steering fluid. Check the level as it will go down as some of the air bleeds out. Once the reservoir is filled, check all the hose connections for any leaks. If everything looks good then we can move onto bleeding the system.
Even thought the reservoir is full of fluid there is still air within the system. If the bleeding procedure is not followed poor steering feel, noise or premature wear of the components can follow. We followed this simple bleeding procedure to ensure proper function.
1. Turn ignition off
2. Raise the front wheels off the ground
3. Fill fluid level to 1” above the inner tube
4. With an assistant checking fluid level and condition, turn the steering wheel lock to lock at least 20 times. Note: On systems with long return lines or fluid coolers, turn the steering wheel lock to lock at least 40 times.
5. While turning the wheels check fluid level constantly
6. Continue adding fluid as needed or until bubbles stop rising in the reservoir. Note: Be sure to not let the fluid level fall below the inner tube or the system will suck in air. You will then need to start the procedure over.
7. Once the bubbles stop and you have turned the wheels lock to lock minimal amount of times, re-install the cap and start the engine.
8. Keep the engine running for at least 2 minutes
9. Return the car to the ground and while at idle turn the wheels lock to lock listening any noises and feeling for inconsistent steering feel. Verify smooth power assistance, noiseless operation, proper fluid level, no system leaks and proper fluid condition (no bubbles, no foam or discoloration)
10. If all proper conditions apply, bleeding is complete
11. If any problem remain start bleeding procedure over or contact Flaming River Industries

With our system bled and no leaks we were ready for a test drive. Instantly we could feel a difference in the steering wheel from our old pump and rack. Turning out of our drive way was easier and almost ripped the steering wheel off due to the quicker ratio. As we mentioned the ratio is now 2.27 turns lock to lock, which still might sound a like a lot but when you’re driving the steering wheel is in the middle of the 2.27 turns and paired with our 13.5” steering wheel, it doesn’t take long at all to turn the wheel one full lock. It took a little time to get used to but we love it. The other great option that Flaming River’s Hi-Rev pump offers is adjustable flow valves to dial in perfect steering feel. The stock valve that came on the pump felt great and will remain for the time being.
The performance of the rack and pump really stood out to us when we hit the track. We decreased out times and had better control of the car overall. We didn’t have any overheating, belts stayed on, no leaking pump and no matter what rpm the steering feel stayed the same. We couldn’t be happier with the Billet-Power rack and Hi-Rev pump from Flaming River. If you are thinking of upgrading your classic Mopar to a rack and pinion set up or having issues with your current setup give Flaming River a call today. You don’t have to race to feel the benefits from their Billet-Power rack and Hi-Rev pump. We promise, you wont be disappointed.


Hello. Is there any chance that you could give me a part number or the application of your upper radiator hose on Orange Crush? I have a 71 Demon that I am building and I cannot find an upper hose that will work. The hose you have on your car looks perfect for mine also. Thank you for any info you can give me.