


Tuning a carbureted vehicle is a challenge for almost everyone. First, there is the “take it out of the box and slap it on” crowd. Then, the owner complains about the poor performance of the carburetor. Next, another group will “dial in” the idle mixture and the idle speed screws, and again, they will complain about the carburetor’s lack of power.


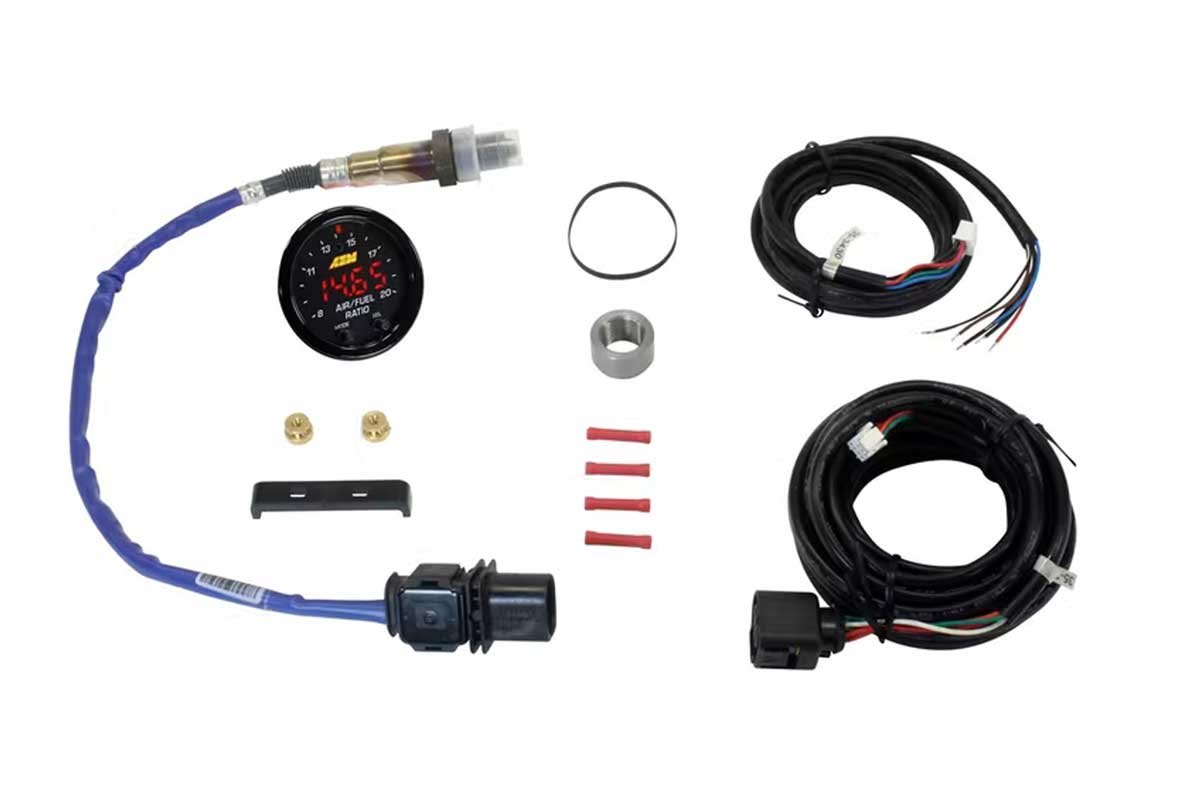
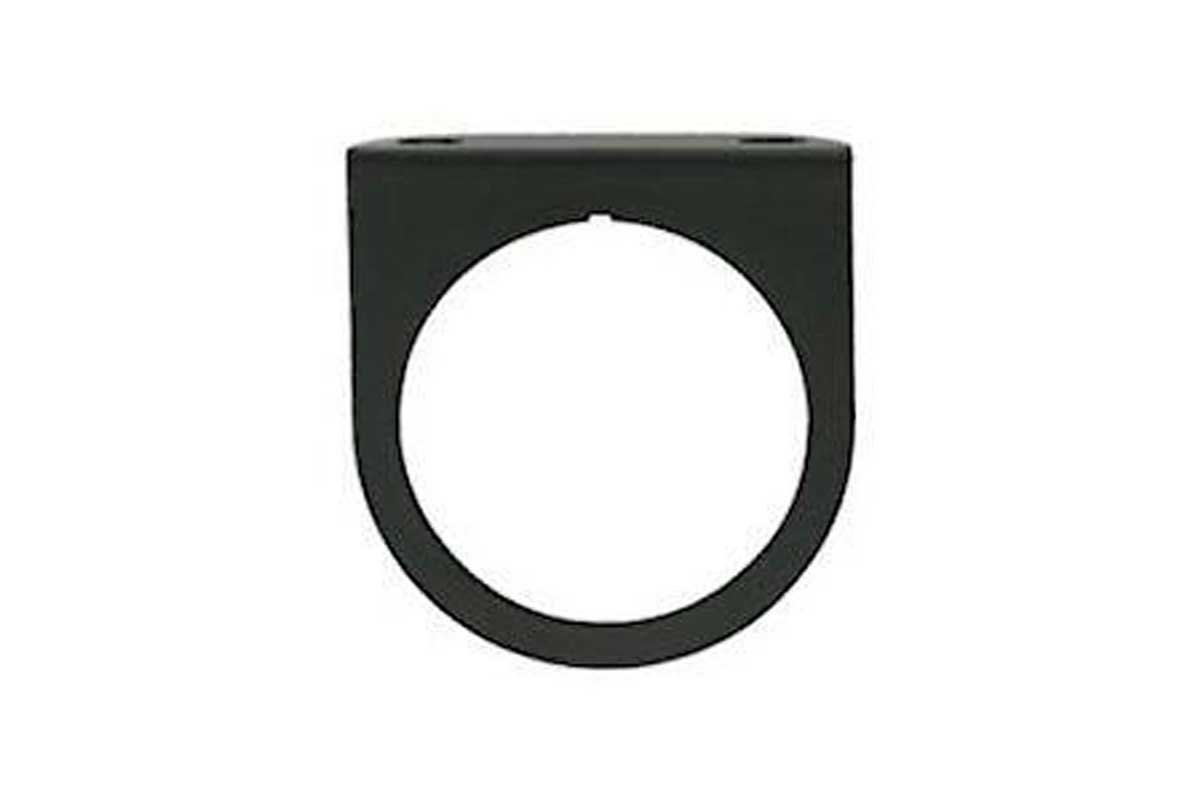
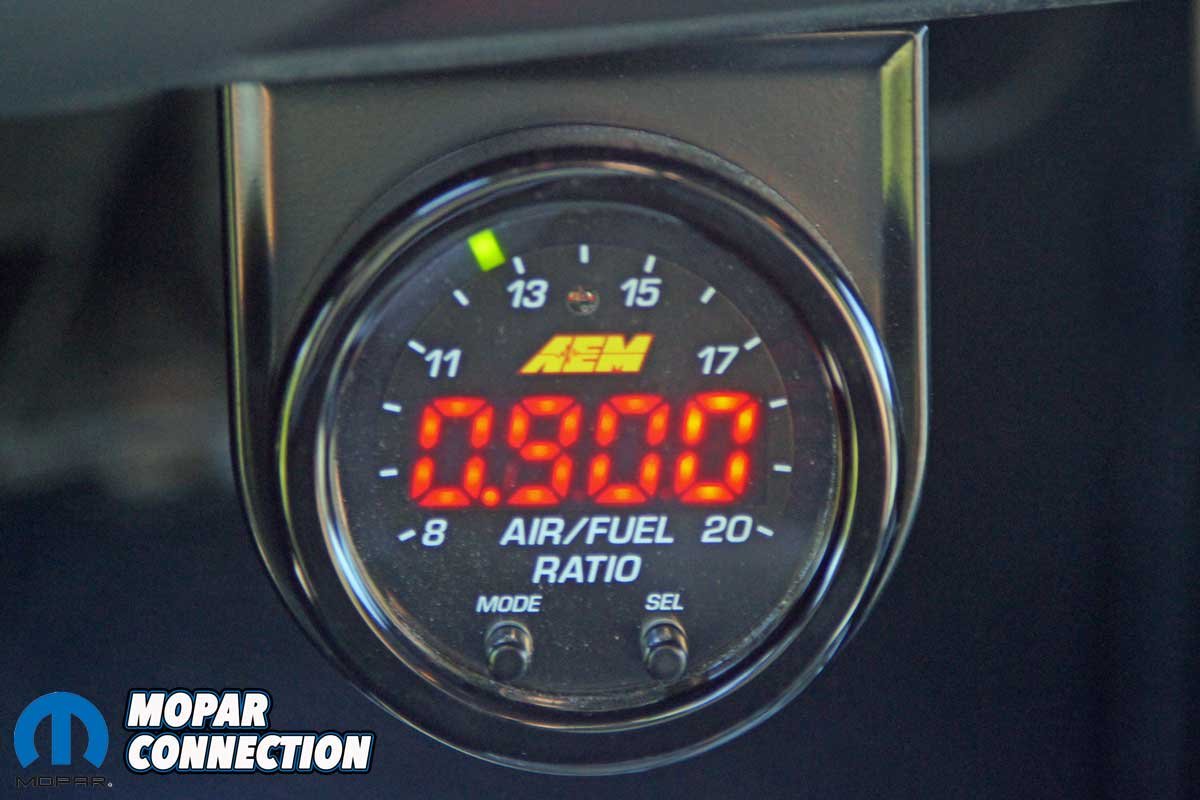
Left: AEM has developed a complete exhaust monitoring system. It includes two harnesses, a Controller Gauge, a weld-in bung, a Bosch UEGO, and installation hardware. Center: The gauge fits any 2 1/16-inch hole, and its shallow depth allows easy installation in tight under dash locations. Right: We picked up a single mounting bracket to house the AEM gauge.
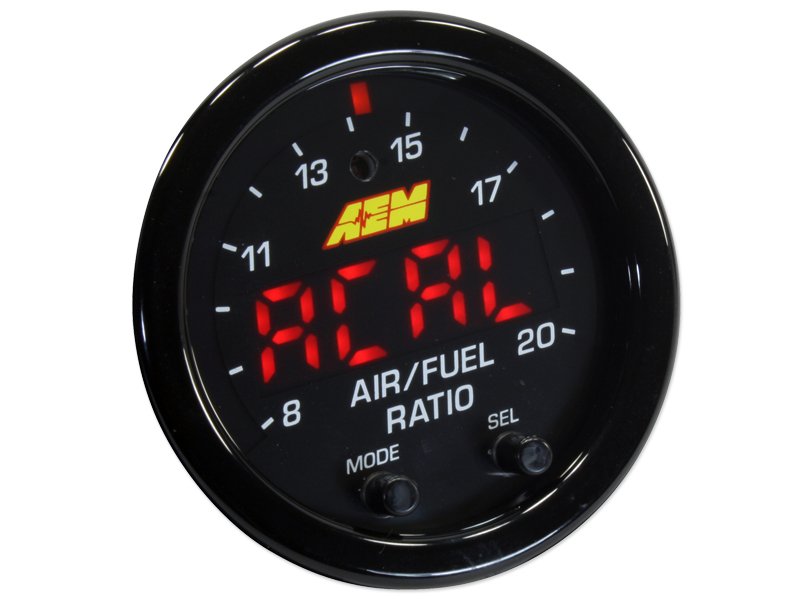
Yet, another group will “jet based on the plugs’ appearance.” Sadly, they rarely tune correctly or for anything other than wide-open-throttle. To take the mystery out of tuning a carburetor, we contacted the reps at AEM for an X-Series Wideband Universal Exhaust Gas Oxygen (UEGO) AFR Sensor Controller Gauge with X-Digital Technology (part no. 30-0300).


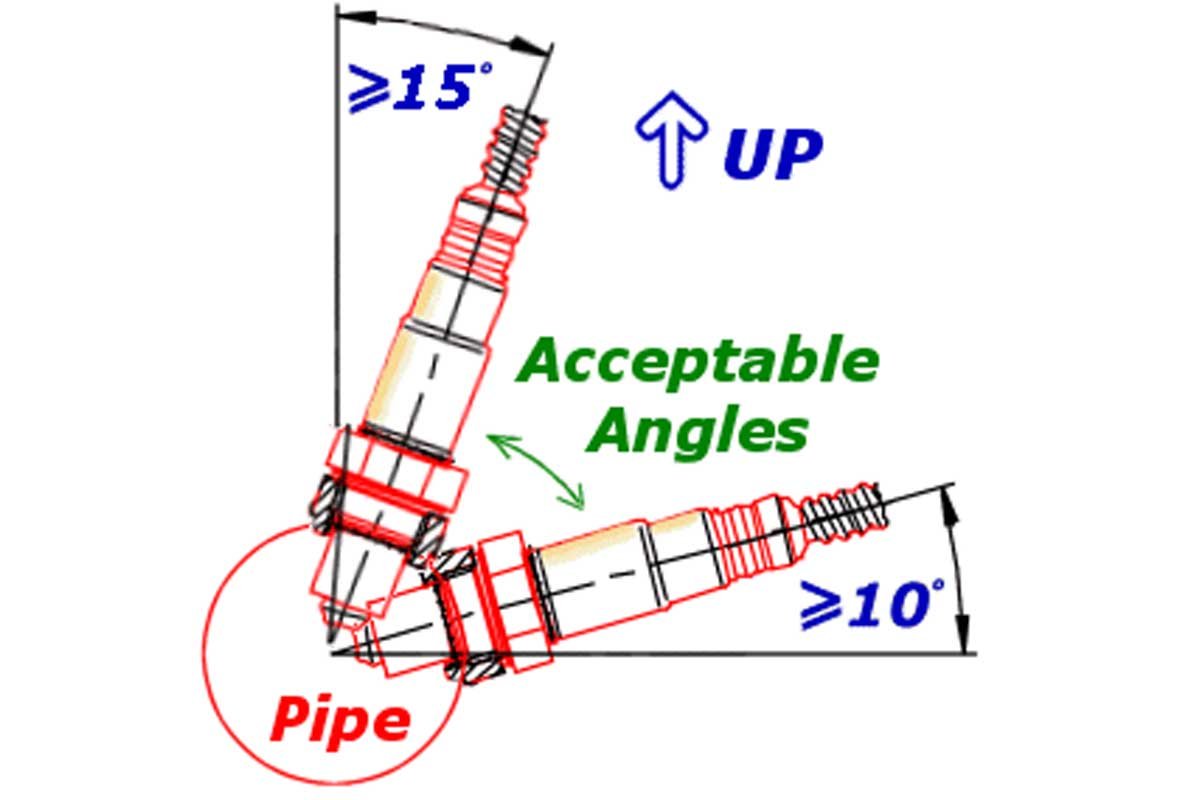
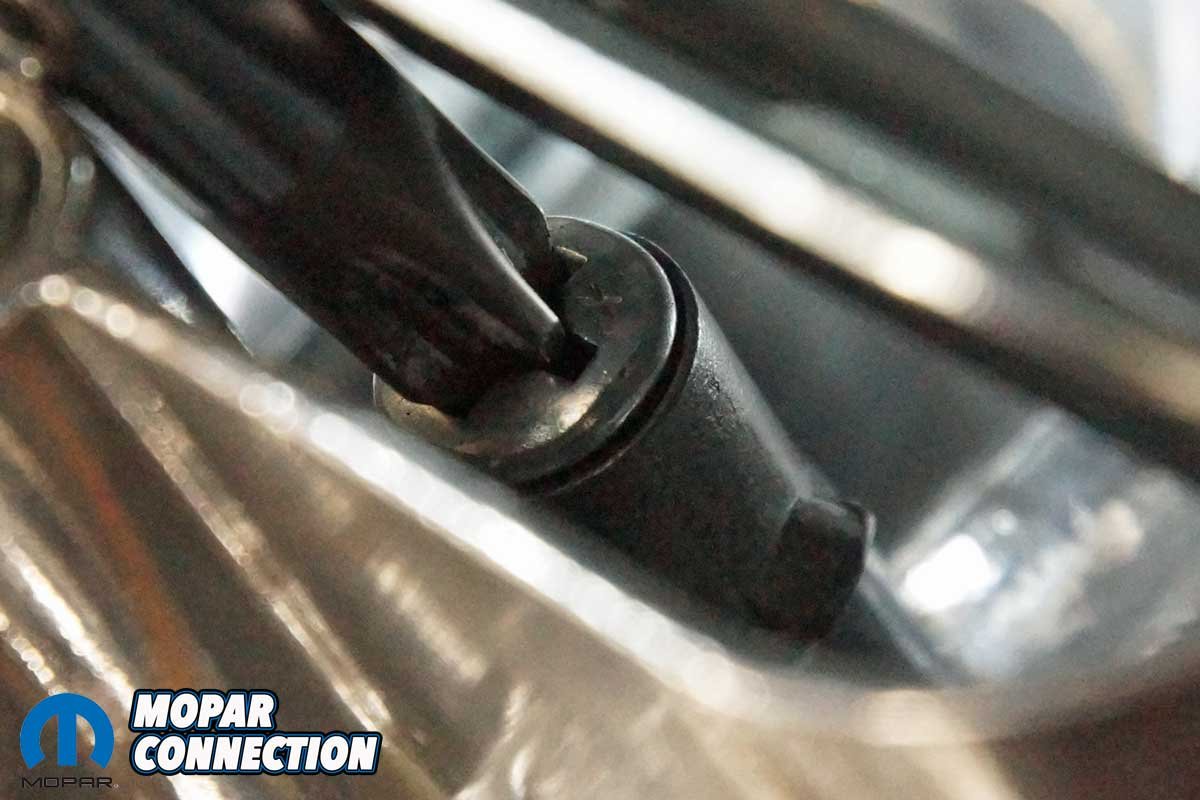
Left: We selected a Hooker Blackheart clamp-on O2 sensor bung for our Dart’s exhaust. Many enthusiasts do not have access to a welder, so it made sense. Center: If one chooses, the stainless steel bung can be welded to the pipe. Right: The Bosch UEGO must be installed at least 10° above level.
AEM’s X-Series wideband technology offers the Controller Gauge the ability to read and report values that other aftermarket controllers cannot. As a result, X-Series delivers more optimized engine tuning and a safer overall engine operating condition. The Controller’s high-speed digital implementation ensures no loss of signal fidelity and full-transient response. In addition, the Controller can identify the minor fluctuations in air/fuel ratio (AFR) or lambda and display the changes in real-time.


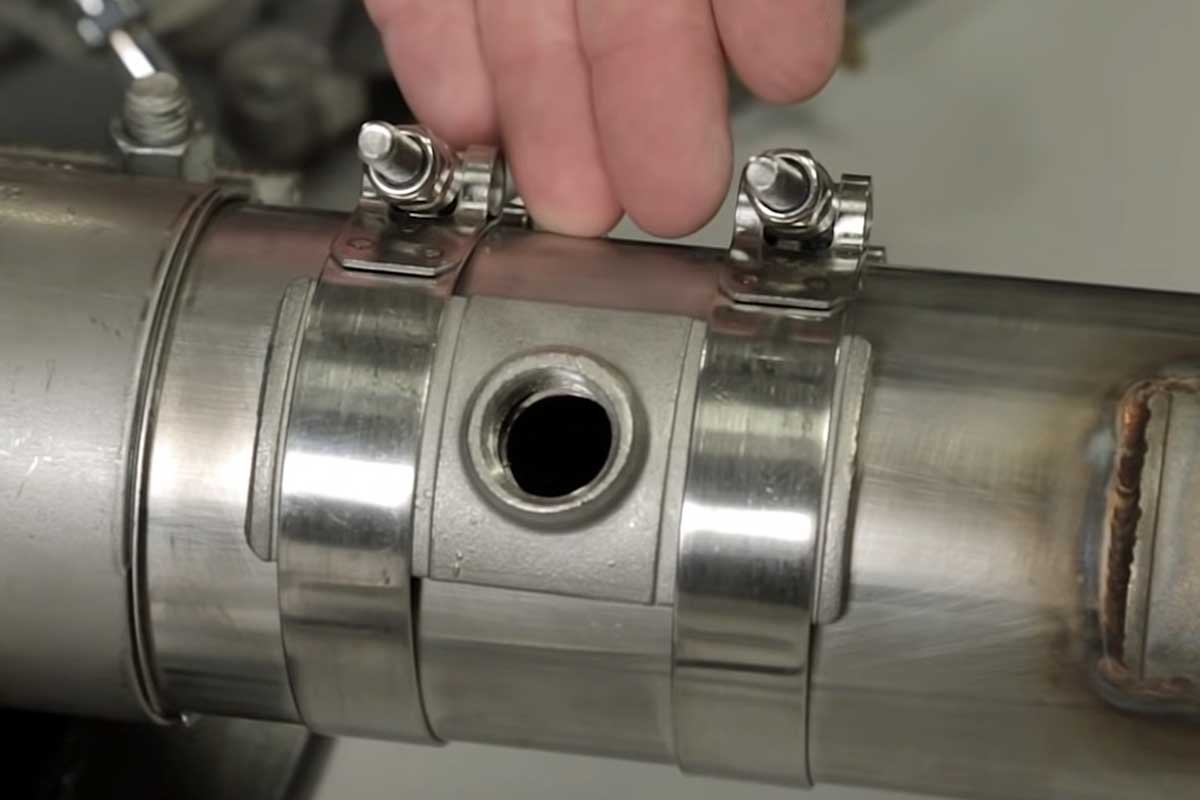
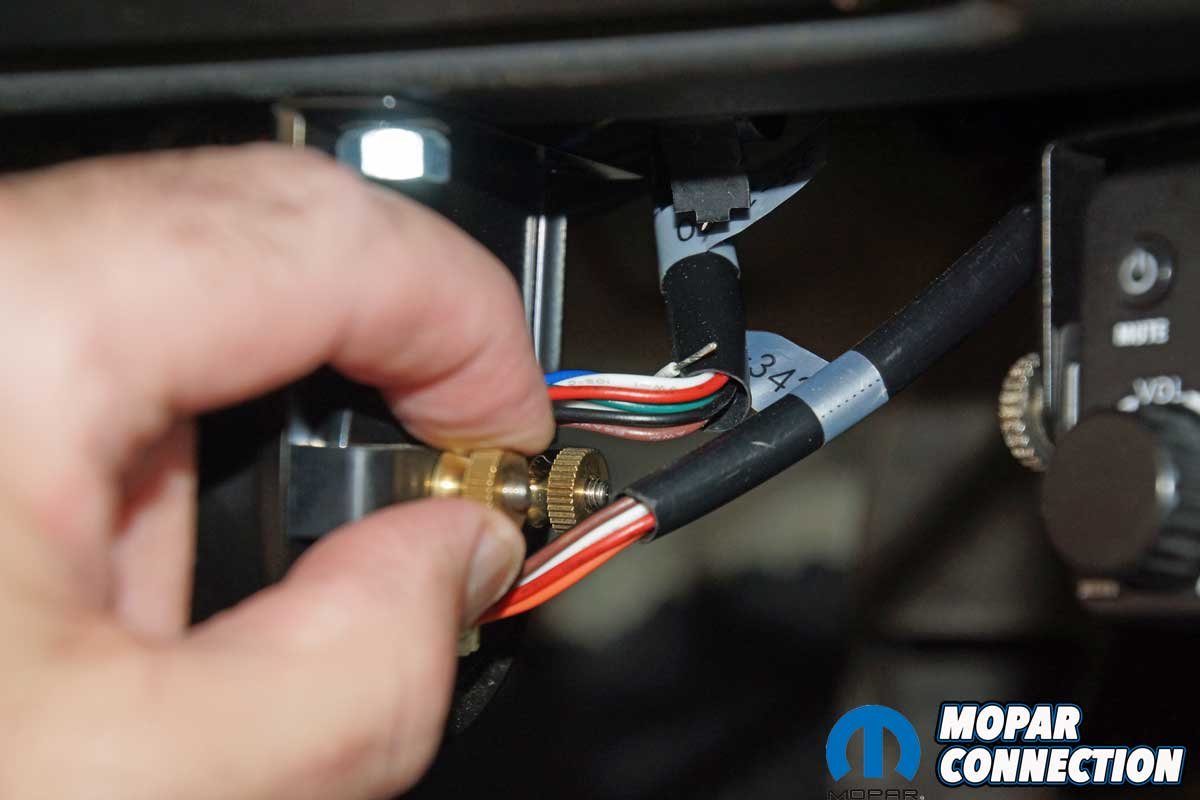
Left: The Hooker Blackheart clamp-on bung was easy to install. Next, we placed the Bosch UEGO after the merge point of the two head pipes. Center: We ran the wire harness from UEGO to the Controller Gauge mounted under the dash. Right: The Controller needed a switched 12-volt source, so we tapped into our add-on fuse box.
According to AEM, the X-Series Wideband UEGO AFR Controller Gauge was the fastest responding wideband AFR controller in an independent test vs. 17 competitors’ wideband AFR controllers. The AEM X-Series includes a Bosch 4.9 LSU wideband UEGO sensor with a factory-calibrated resistor, so it does not require free-air calibration. However, the AEM technology allows for free-air calibration as the sensor ages if the user desires.


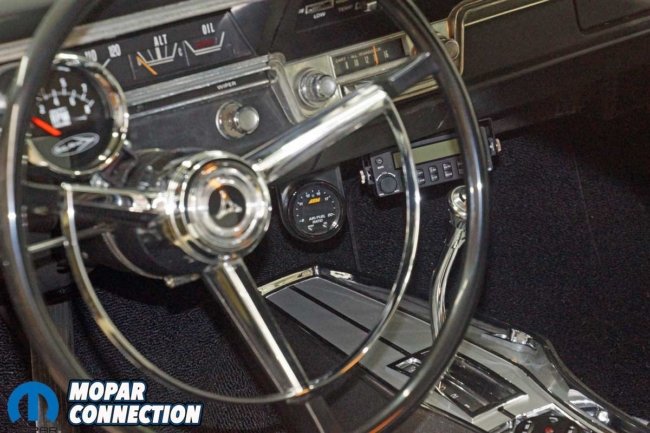
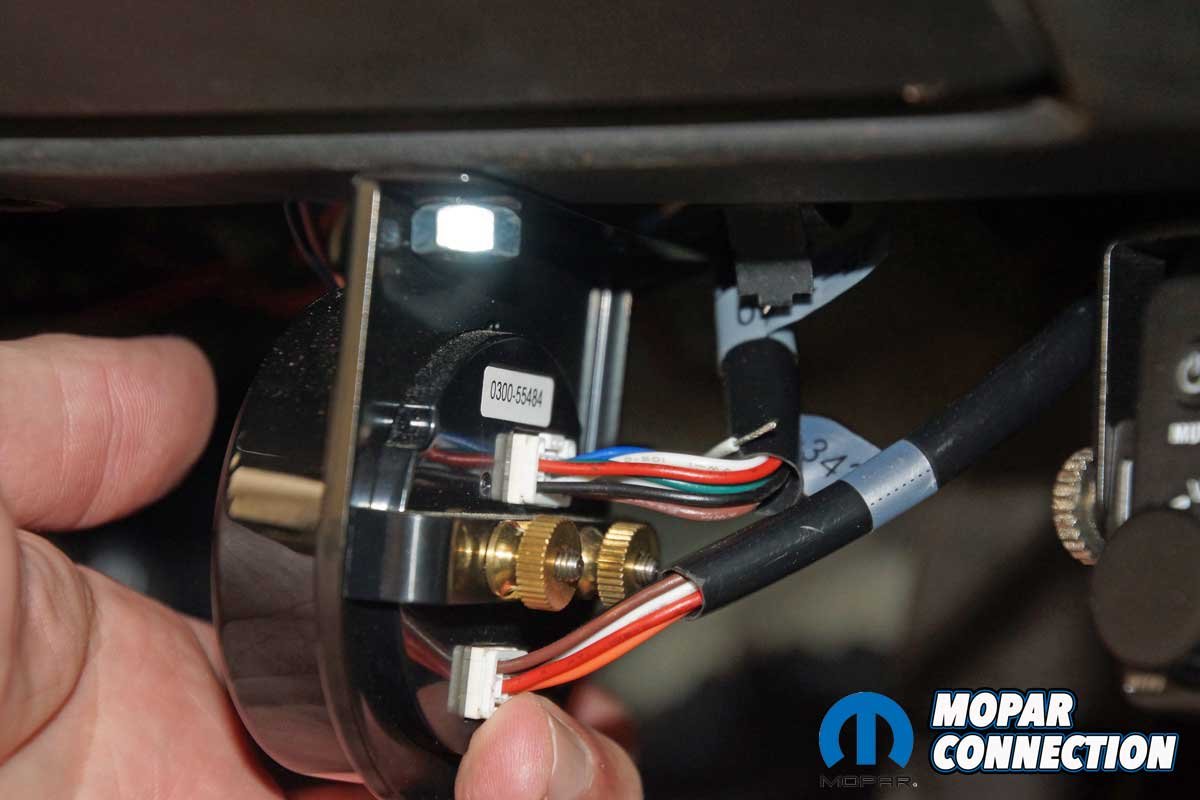
Left: We attached connector B from the UEGO to the gauge. The 8-pin connector is pre-pinned from AEM. It is simple plug-and-play. Connector A (at the top) required only a switched 12-volt and a ground to be attached. Center: We tightened the included plastic bracket to the mounting bracket with two fasteners. Right: The AEM gauge fits nicely under the dash.
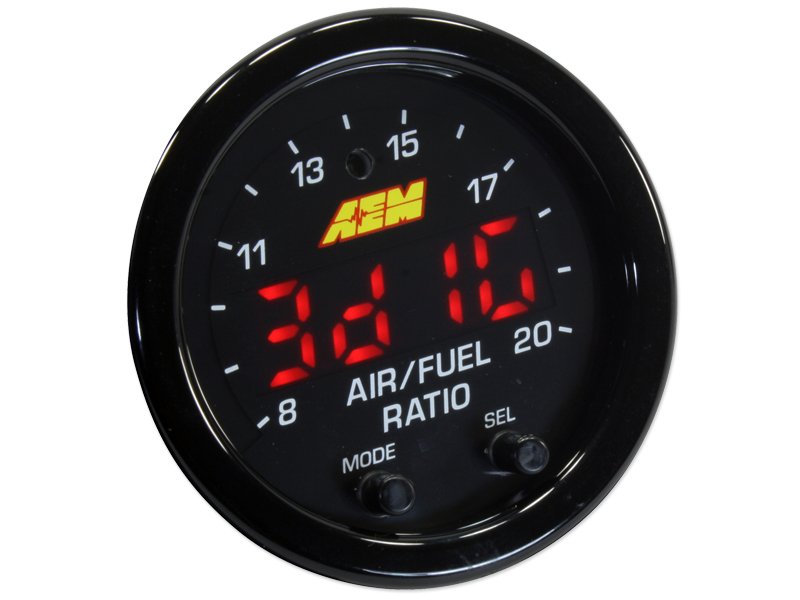
The X-Series is compatible with vehicle charging system voltages up to 16-volts. Also, the X-Series has a 0-5-volt range, an RS232 output for data logging and feedback control, AEMnet (CAN bus) for data logging, and daisy-chaining multiple controllers up to 16 cylinders. The gauge has a 52mm diameter and a depth of 0.825-inches, which requires a gauge cup depth of only 0.200-inches deep. User-configurable display via buttons on the gauge face allows AFR values, lambda, or O2%, and a 3- or 4-digit presentation for the user.

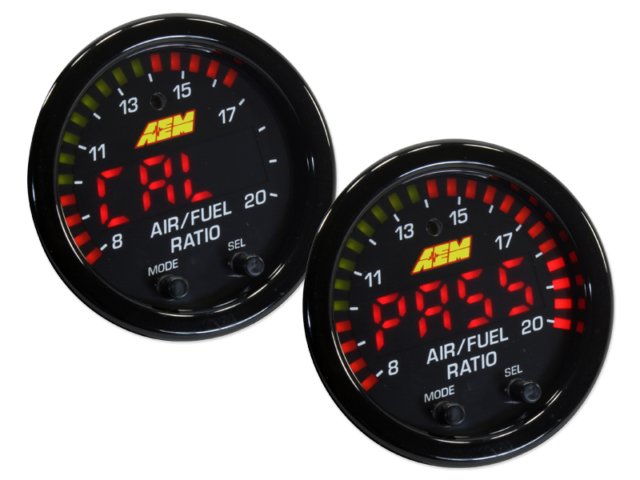
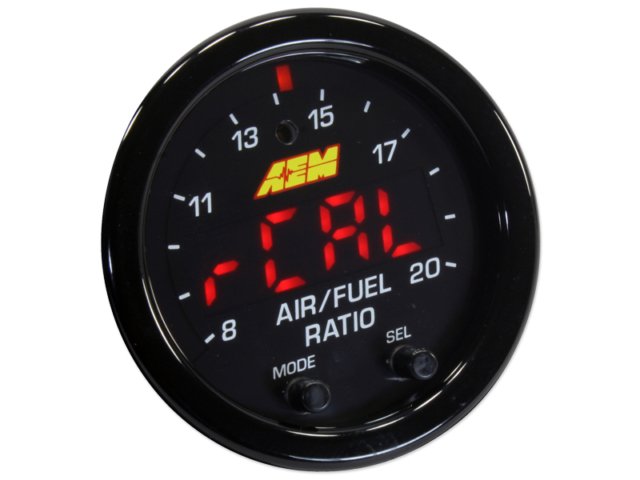
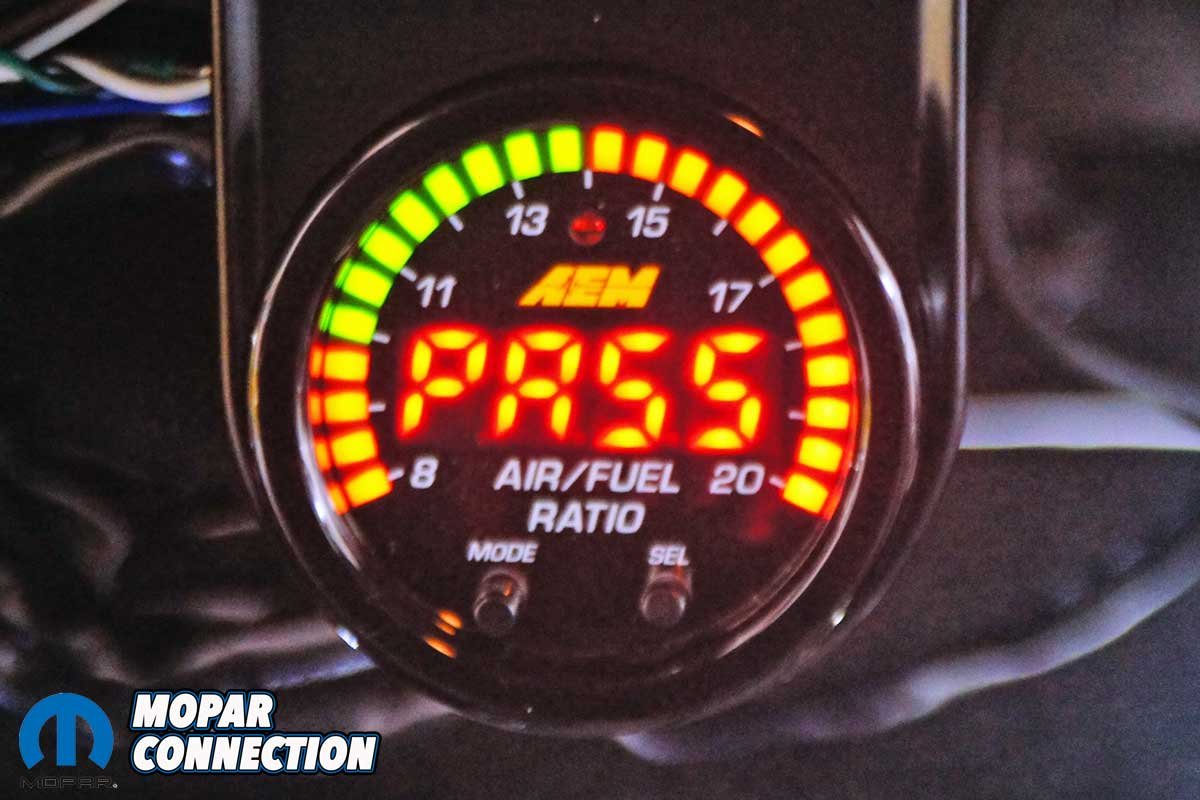
Left: By depressing the mode button and then the select button, we were able to set up the AEM gauge. The sensor can be air calibrated, but it is not required for a new sensor. Center: The calibration will display if it passed or failed. Right: A resistor calibration is the AEM Controller’s default mode. It is the recommended calibration method if calibration is necessary.
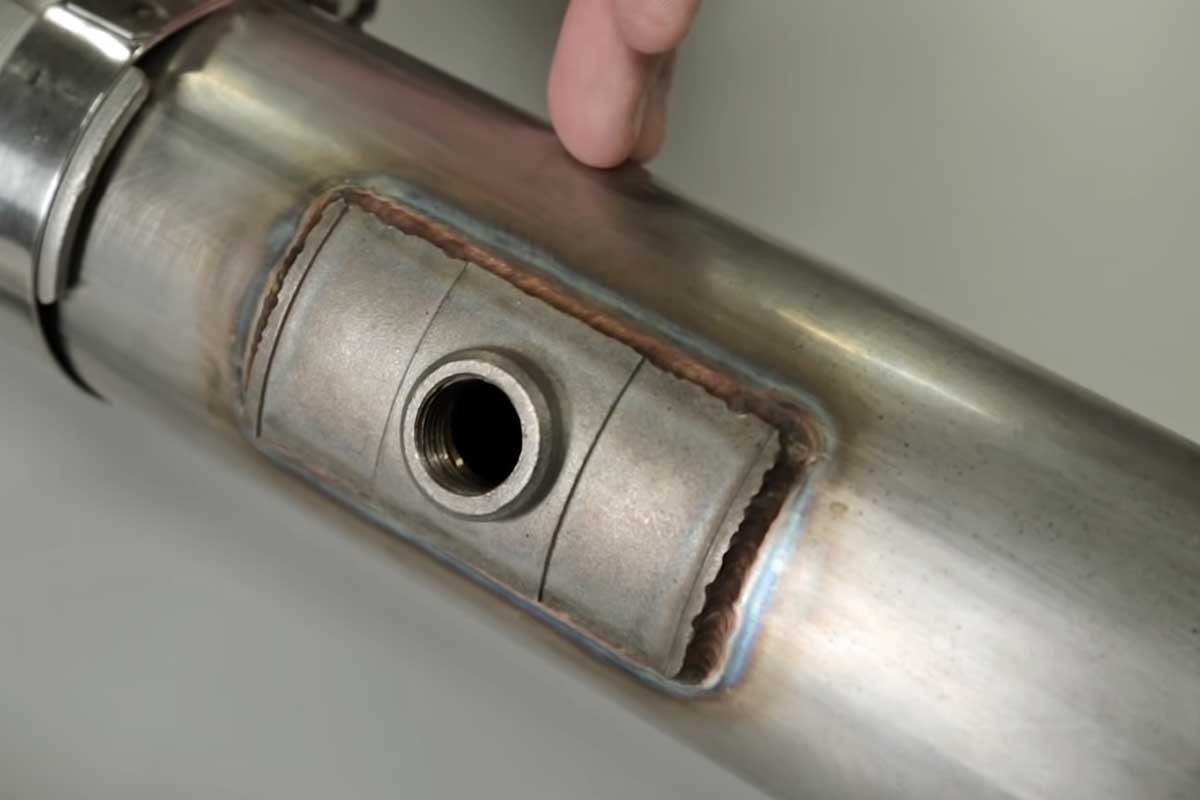
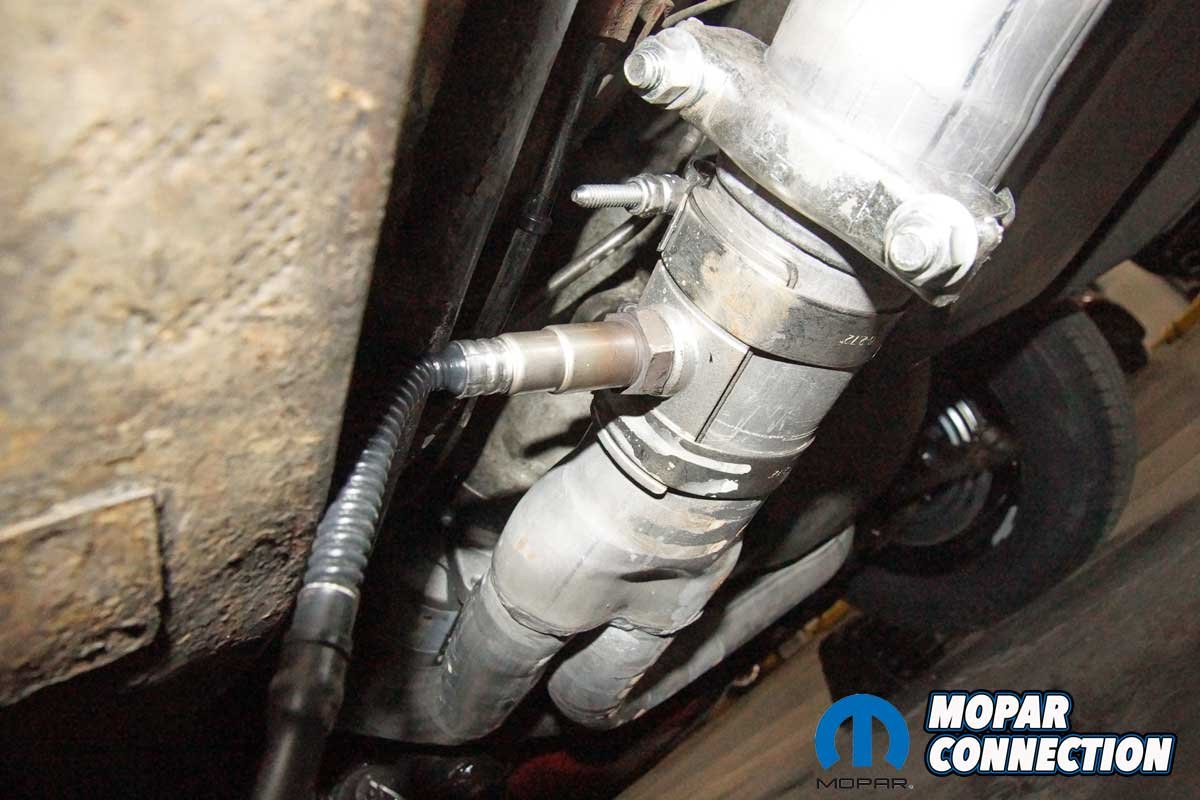
We needed a way to mount the UEGO sensor in the exhaust. So, we contacted the representatives at Hooker Blackheart for a clamp-on O2 sensor bung because not every enthusiast has access to or knows how to use a welder. We selected a 2 ¼-inch (2 ½- and 3-inch available) clamp-on style (part no. 71014303-RHKR). The kit included the clamp-on bung cast from 304 stainless steel, two stainless steel T-bolt clamps, and a heavy-duty sealing gasket.
Because our 273 equipped Dart had a single exhaust, we decided to install the Bosch UEGO sensor after the merge point of the two header pipes. We drilled a ¾-inch hole at a 10° angle above level (sensor pointing down into the exhaust) to mount the bung. The UEGO sensor must stay at the upper portion of the exhaust tube, so contamination will not result.


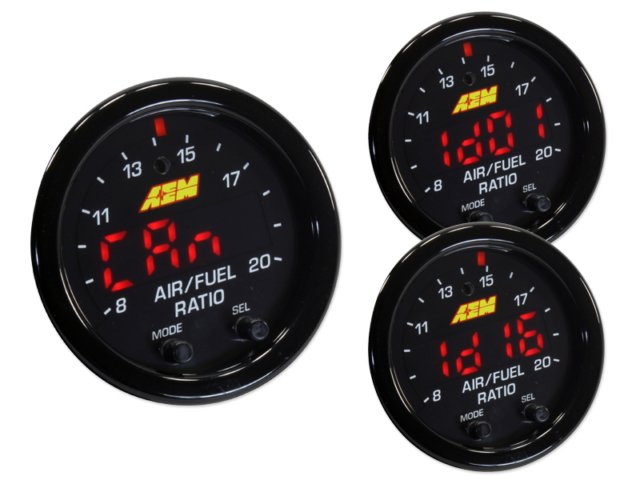
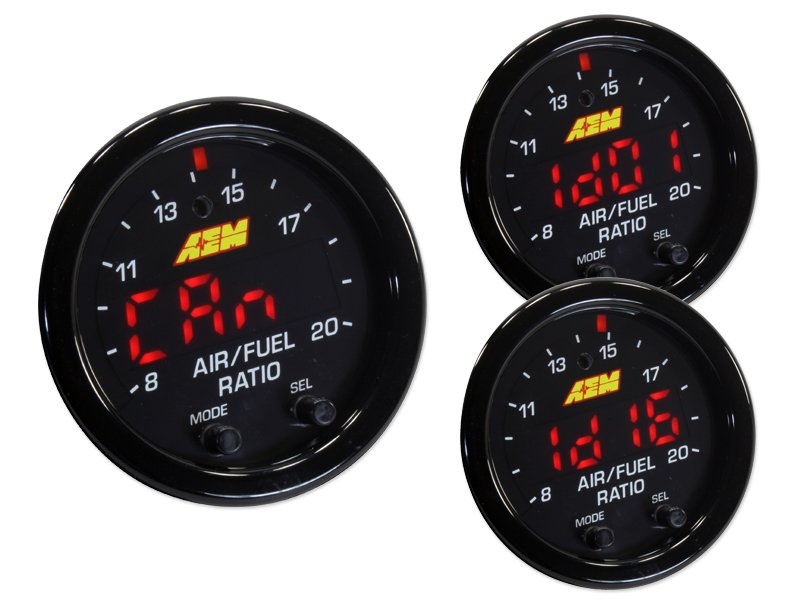
Left and Center: The AEM gauge can be set up for a three-digit (left) or a four-digit display. We selected the four-digit output. Right: If we had a Controller Area Network (CAN) equipped vehicle or AEMnet, we could have set the gauge for CAN and the message ID.
With the hole drilled, we slipped the supplied gasket over the hole. Next, the stainless-steel bung was placed over the gasket. Subsequently, t-bolt clamps were situated over the exhaust pipe and onto the bung. Once everything was lined up, we tightened the T-bolts. Our last step was threading the UEGO sensor into the bung and routing the wiring away from hot or sharp components.
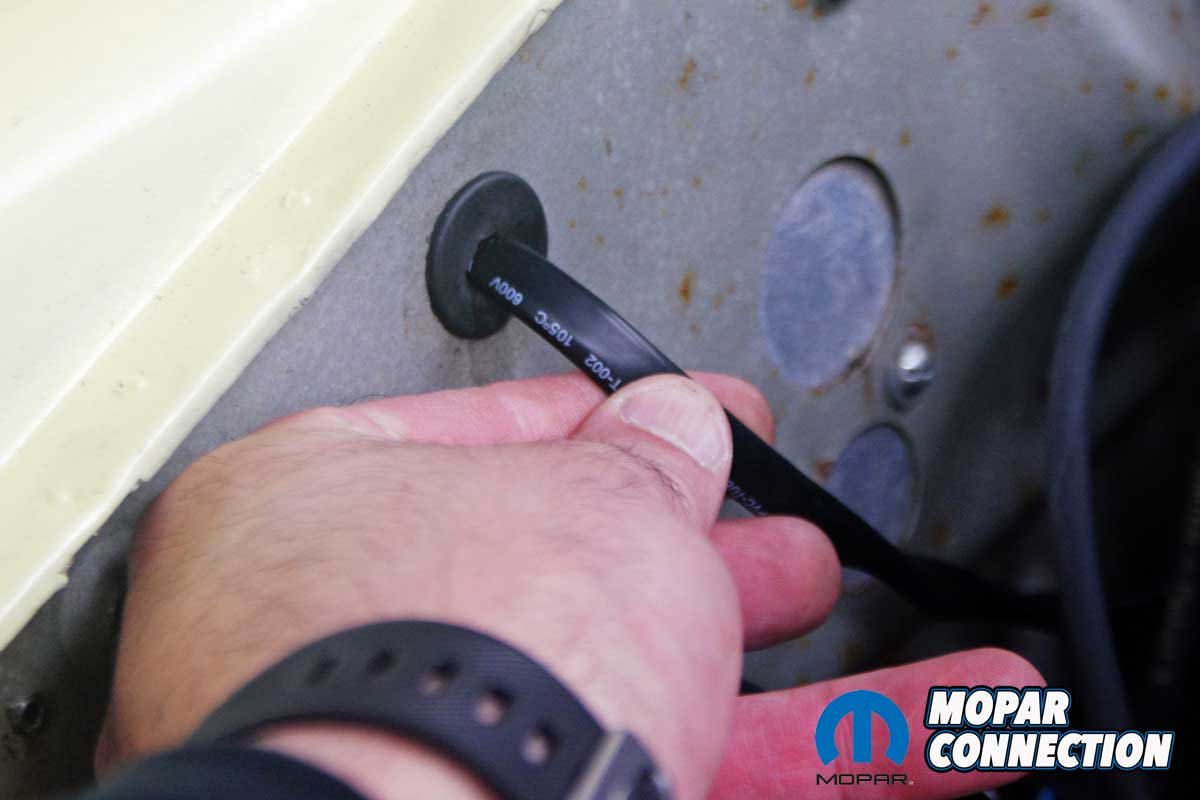
Two harnesses must be connected to the gauge. Connector A has ten pins, and connector B has eight pins. Because we only planned to use the gauge and not have the data reported to CAN, RS-232, or an analog output, we only needed to provide a switched 12-volt with a 5-amp fuse (pin 1) and a ground (pin 2) for connector A. The switched 12-volt source was found at our aftermarket fuse box. And the ground was established at a ground under the dash. Connector B attaches between the gauge and the UEGO sensor. We snapped the UEGO sensor harness to the connector B harness and routed the harness to the interior of the Dart.


Left: We performed a resistor calibration (rCAL), and our UEGO passed. Center: With our 273 warmed up, we had an idle (in gear) lambda reading that was too rich. Right: We adjusted the four corner idle screws and moved the lambda to a barely acceptable number for idle. We fixed the idle lambda with a few adjustments described in the text and later photos.
We picked up a 2 1/16-inch aluminum gauge panel to mount the gauge. We mounted the panel on the lower dash lip. The gauge was secured to the panel with the supplied hardware. Both connectors were attached to the back of the gauge.
According to the AEM instruction manual, there was no need for UEGO calibration, but we performed a resistor air calibration (rCAL). After the successful calibration, we turned the ignition key, and the 273 jumped to life. The gauge displayed 3d1G (three-digit display) and then HEAT, indicating that the UEGO heater circuit was activated. Once the UEGO was up to temperature, the gauge displayed the AFR.


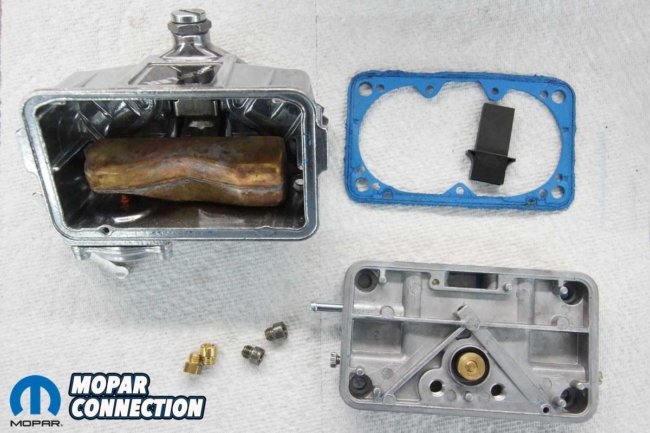
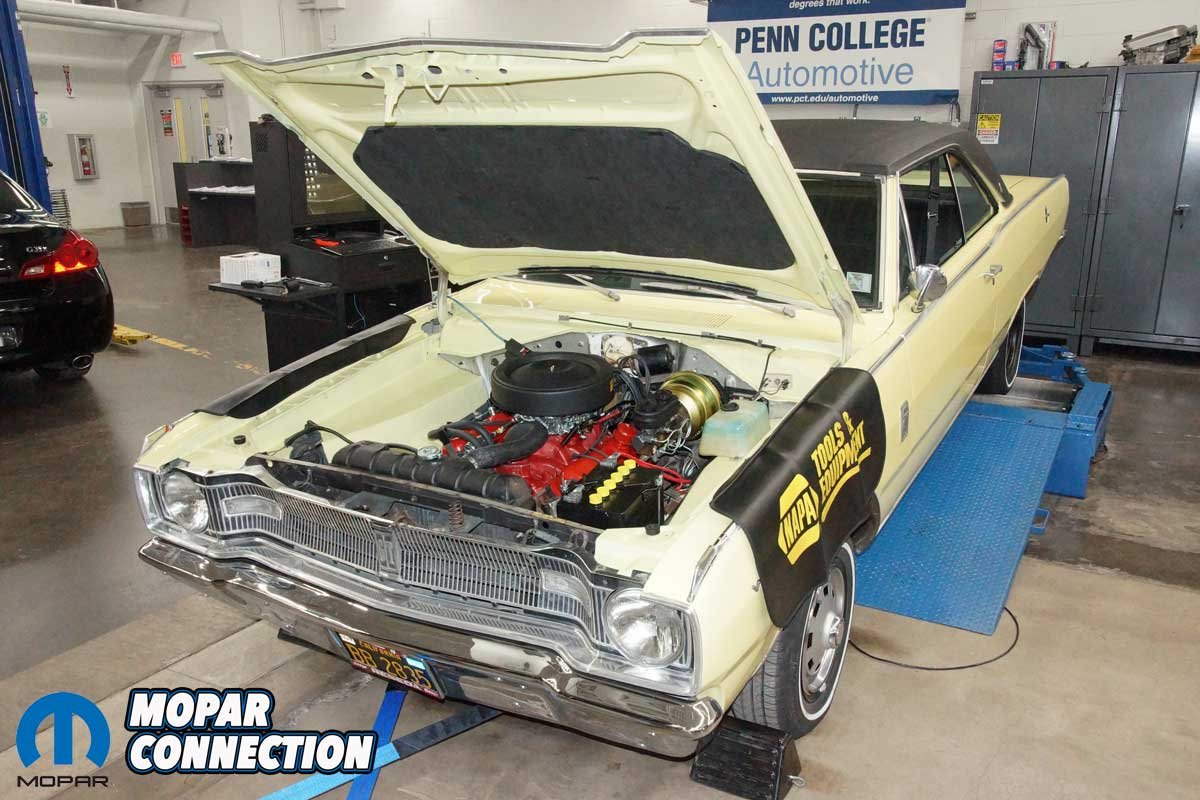
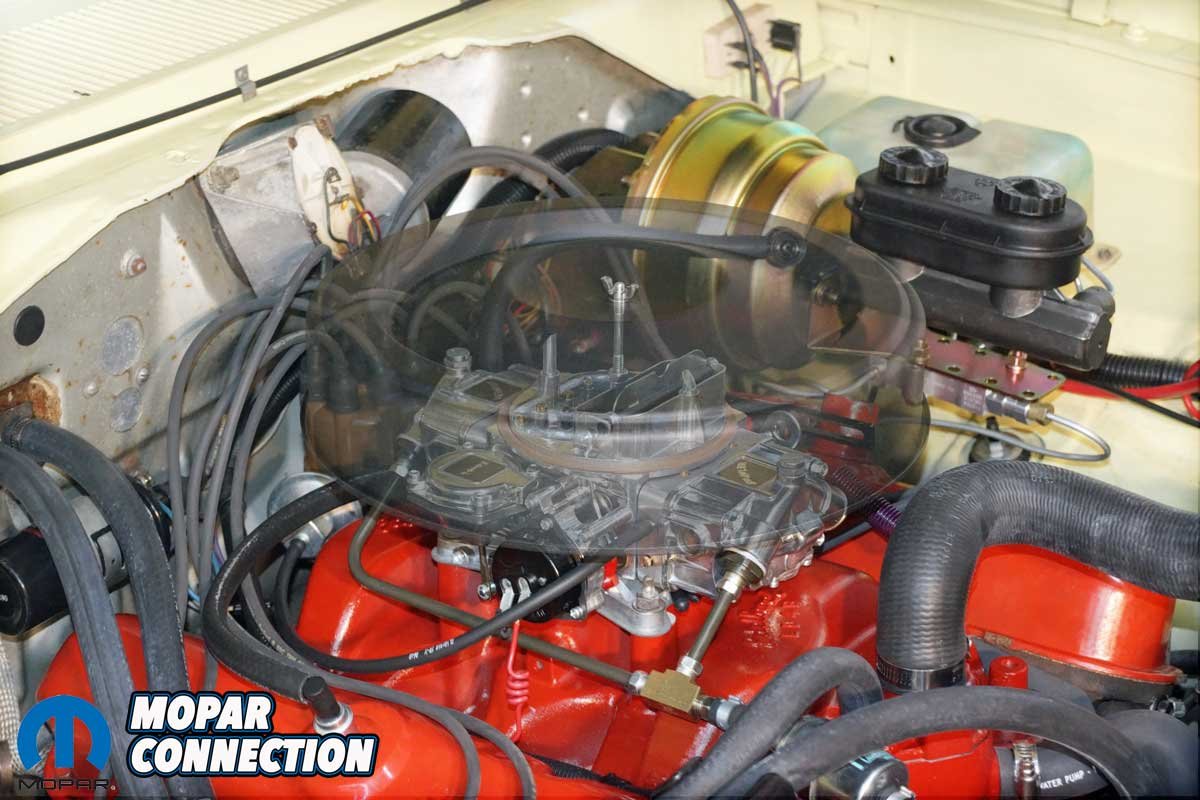
Left: Our 273 has a 570 CFM Brawler carburetor sitting atop an Edelbrock LD4B. A factory air filter housing covers the Brawler. Right: To evaluate the AEM gauge and dial in the carburetor, we visited Pennsylvania College of Technology to use the Mustang Chassis dyno. Between the dyno and driving on the street, we were able to tune the Brawler.
While AFR is a good measurement of the usage of the oxygen in the exhaust, the AEM (and most) monitoring devices measure in lambda and then multiply that value by a preset stoichiometric; with the AEM controller, that number is 14.65:1 (E0 fuel – no alcohol added). However, we use E10 gasoline (up to 10% alcohol added), which moves the stoichiometric to approximately 14.10:1.
Therefore, using lambda would be more accurate for tuning our 273 because a lambda reading of 1.000 will equal our E10 stoichiometric value of 14.10:1. However, lambda would still be 1.000 at stoichiometric even if the AFR moved based on alcohol percentage.


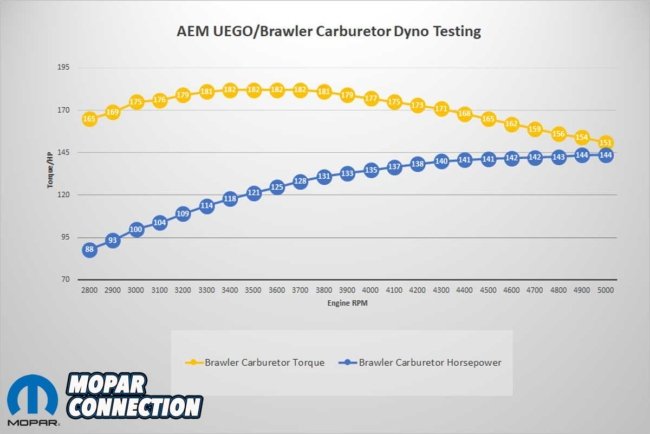
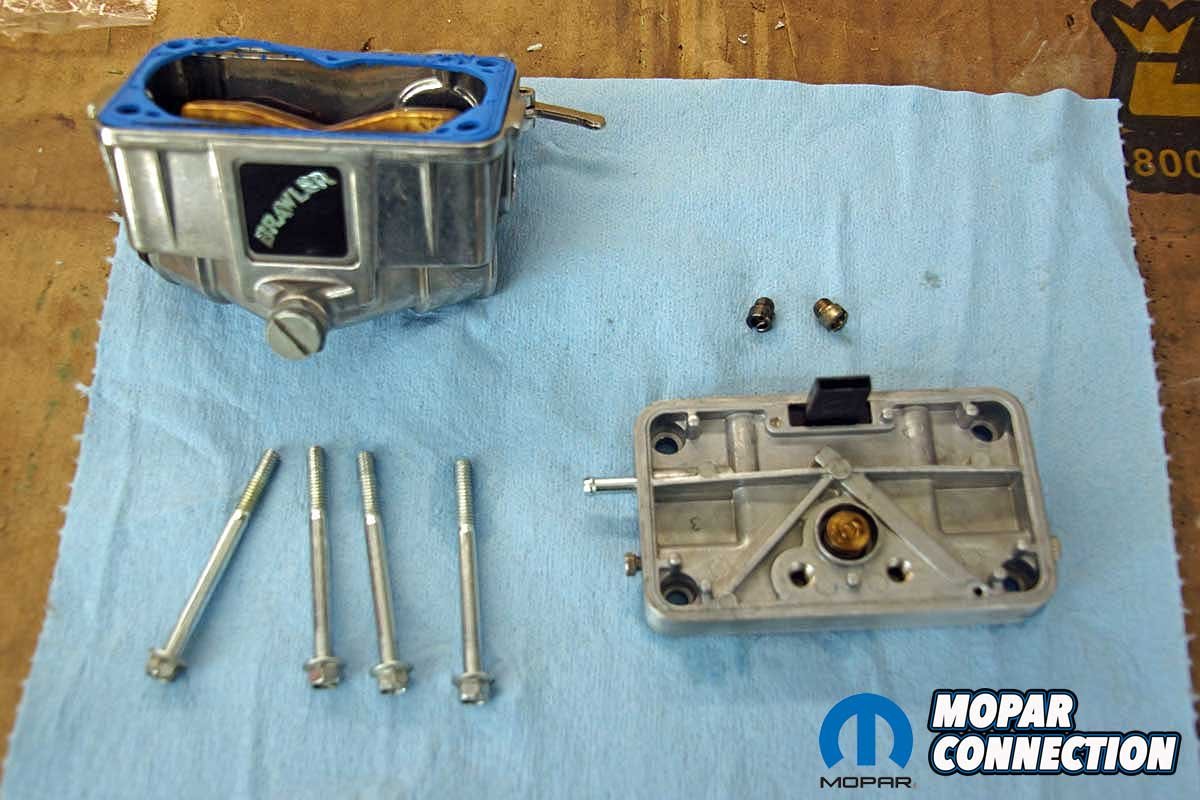
Left: Our first dyno run showed an extremely lean (for power) lambda reading. We disassembled the carburetor to install new primary and secondary jets (Only primary shown). Center: We eventually ended with 74s installed in the primaries and 80s in the secondaries. Right: With the jetting sorted out, the 273 happily pumped out 144 horsepower and 182 lb-ft of torque. The lambda readings fell into the best lean power range (cheat sheet provided in later captions).
We planned to use the AEM Controller Gauge to assist in tuning our 570 CFM Brawler carburetor for power and economy. Although power numbers are the main interest of many enthusiasts, our Dart will not see track time. So instead, we focused most of our time on street driveability.
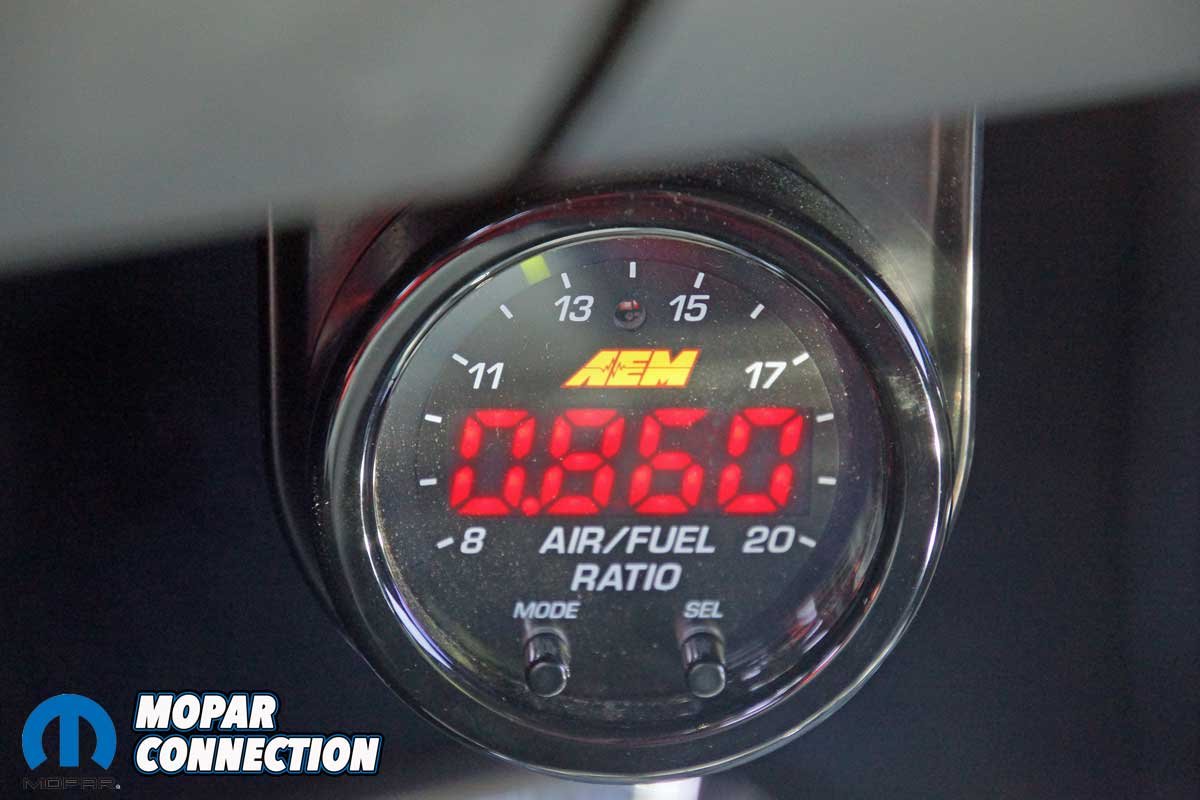
We took the Dart to Pennsylvania College of Technology to access its Mustang Chassis dyno to evaluate the performance. When we arrived at the college, the idle speed lambda reading was around 0.820. After a few adjustments to the four-corner idle circuits, we adjusted the lambda to 0.860, but each idle mixture screw ended up about 1/3 turn off its seat. We would address the lack of adjustment after the dyno runs.


Top Left: We swapped all four idle air bleeds to address our rich idle concern. Top Right: The larger air bleeds leaned out the idle and increased the response of the idle mixture screws. Bottom Left: We adjusted the idle mixture screws (with the transmission in gear) until we achieved the maximum engine vacuum. Bottom Right: The lambda readings fell into the best idle range for a carbureted engine.
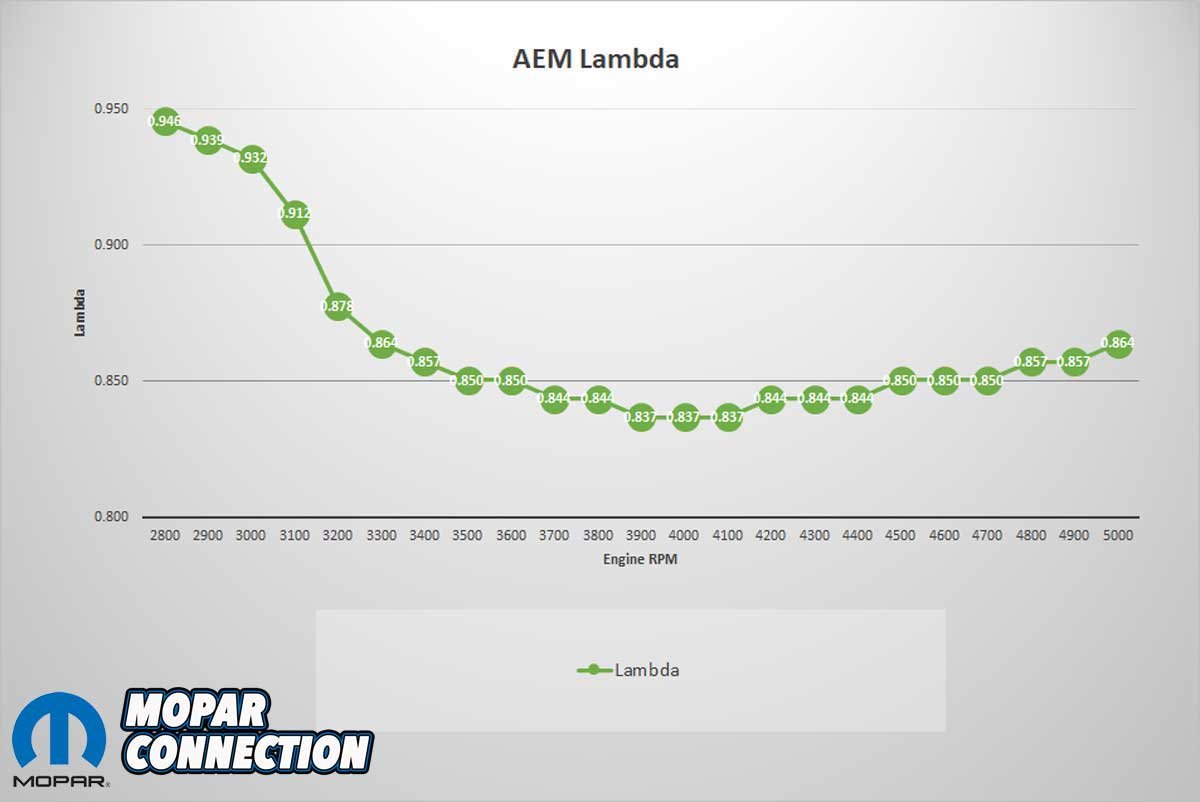
We preconditioned the Dart (tied down and warmed the engine and drivetrain) and made a wide-open throttle (WOT) run from 2800-5000 rpm. The AEM and the Mustang dyno UEGOs showed a lean condition (for power) through the entire power curve.
The lambda fell in the 0.965-0.975 range. We elected to change the carburetor jetting rather than continue to abuse the 273. We made jet changes on the primaries and the secondaries, and the AEM showed improvements in the fuel trim. After several runs and jetting changes, we finally narrowed in on our ultimate tune. We moved the primary jets from 66s to 74s and the secondary jets from 73s to 80s. The stock 0.030-inch accelerator discharge nozzle (squirter) remained in place.

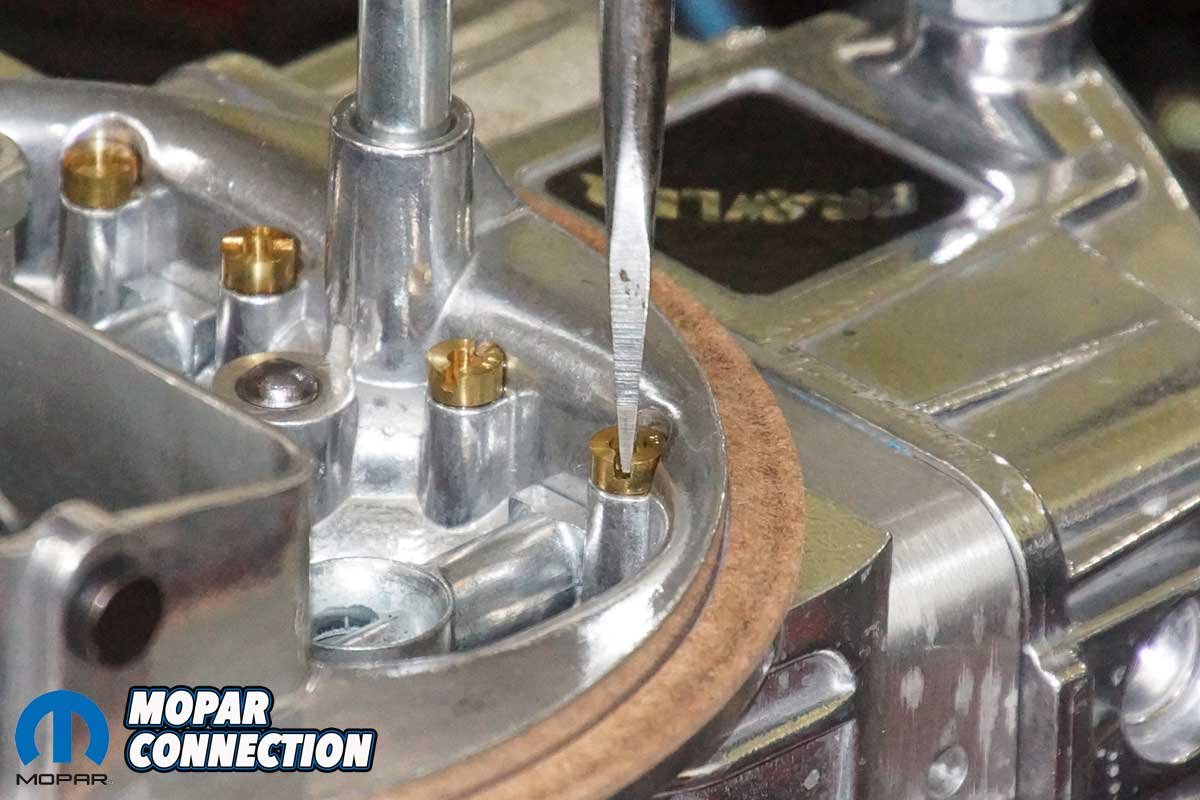
Left: To address a high-speed (2500-3500 rpm) rich condition, we again pulled the primary float bowl and installed leaner jets. Right: The high-speed lambda readings fell into the lean cruise range with the adjustment.
With the new jetting, the WOT lambda was between 0.837-0.878 from 3200-5000 rpm. The engine torque at the rear wheels was 182 lb-ft at 3600 rpm, and the horsepower was 144 at 4900 rpm. Pleased with the power, we focused on the idle mixture screws and economy.
After the dyno runs, we drove the Dart on a level street in 3rd gear. The idle was rich, but the light throttle cruise was lean (lambda 1.130-1.190). At 30-45 mph, we experienced lean misfires (surging). So we decided we would make idle air bleed (IAB) changes. We stepped the primary IABs from 73s to 76s and the secondary IABs from 73s to 77s. The adjustment leaned out the idle and allowed the idle mixture screws to be adjusted to about 1 ¼ turns out.


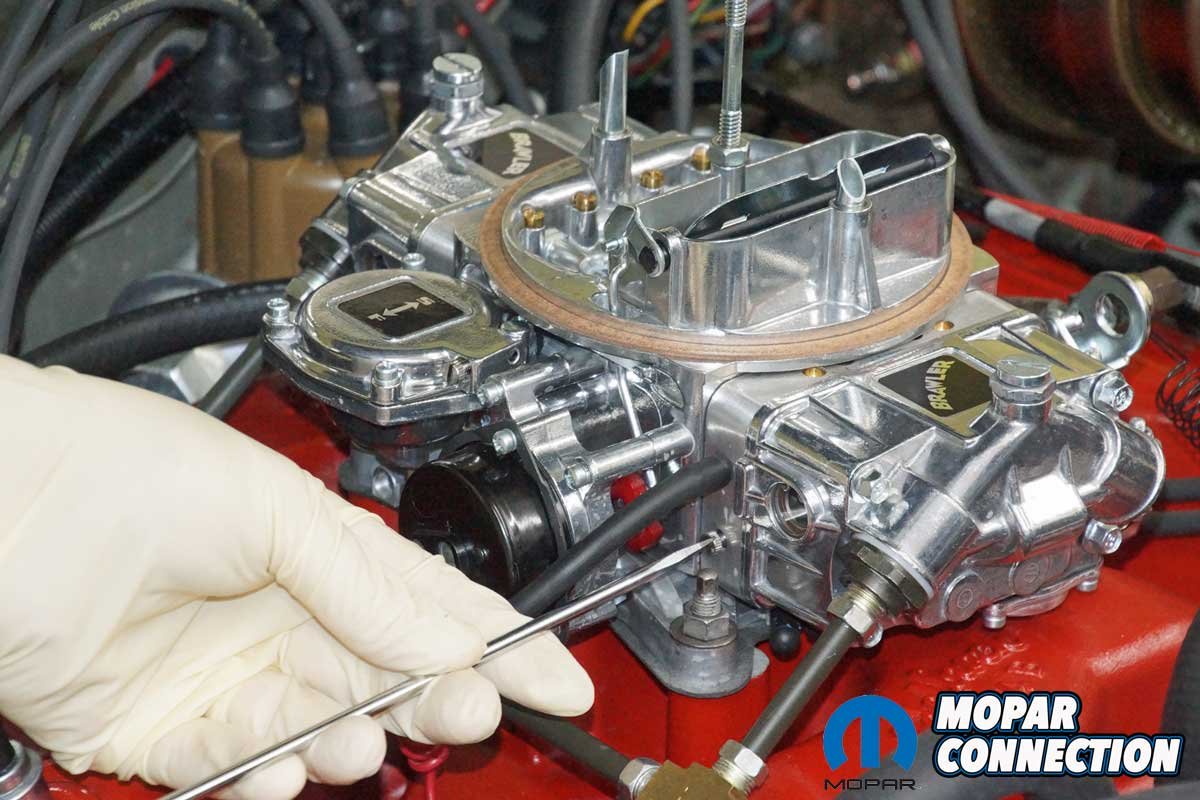
Left: We fine-tuned a slight off-idle hesitation with a larger accelerator discharge nozzle (squirter). Right: We also fine-tuned the vacuum secondary opening with a minor turn of the adjustment screw.
Again, cruising in 3rd gear on a flat road at 30-45 mph, we experienced lambda readings of 1.080-1.125. The surge was gone, and we experienced much improved driveability. However, the AEM gauge reported a mildly rich condition (0.960-0.975 lambda) at a high-speed cruise, between 2500-3500 rpm. We elected to swap the primary jets from 74s to 72s, and the lambda readings leaned out to readings of 1.060-1.110 at high-speed cruise.

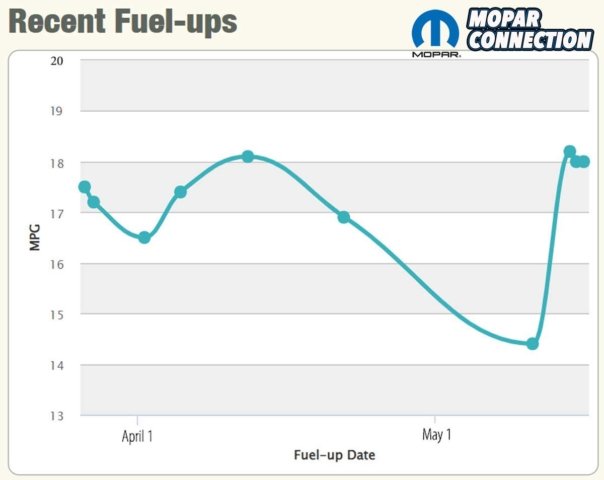
Left: Except for the carburetor and intake manifold, the 273 is factory stock. It performed admirably from 2800-5000 rpm. Center: We adjusted the fuel curve to an acceptable best lean power tune over the same rpm range. Right: Over the last two months, our city driving with the well-adjusted Brawler has provided several fill-ups that averaged over 18 mpg.
As we continued to evaluate the Dart in traffic, we noticed a slight off-idle stumble and verified the momentary lean condition on the AEM gauge. We swapped the 0.030-inch squirter for a 0.035-inch squirter to address the concern. The larger squirter made all the difference, and the off-idle hesitation disappeared.
Since the economy carburetor tuning sessions, the 273’s city fuel economy has averaged about 17-18 mpg. The small amount of highway driving has produced 20-22 mpg. We are confident in the miles per gallon factoring because we have tested the speedometer’s calibration.

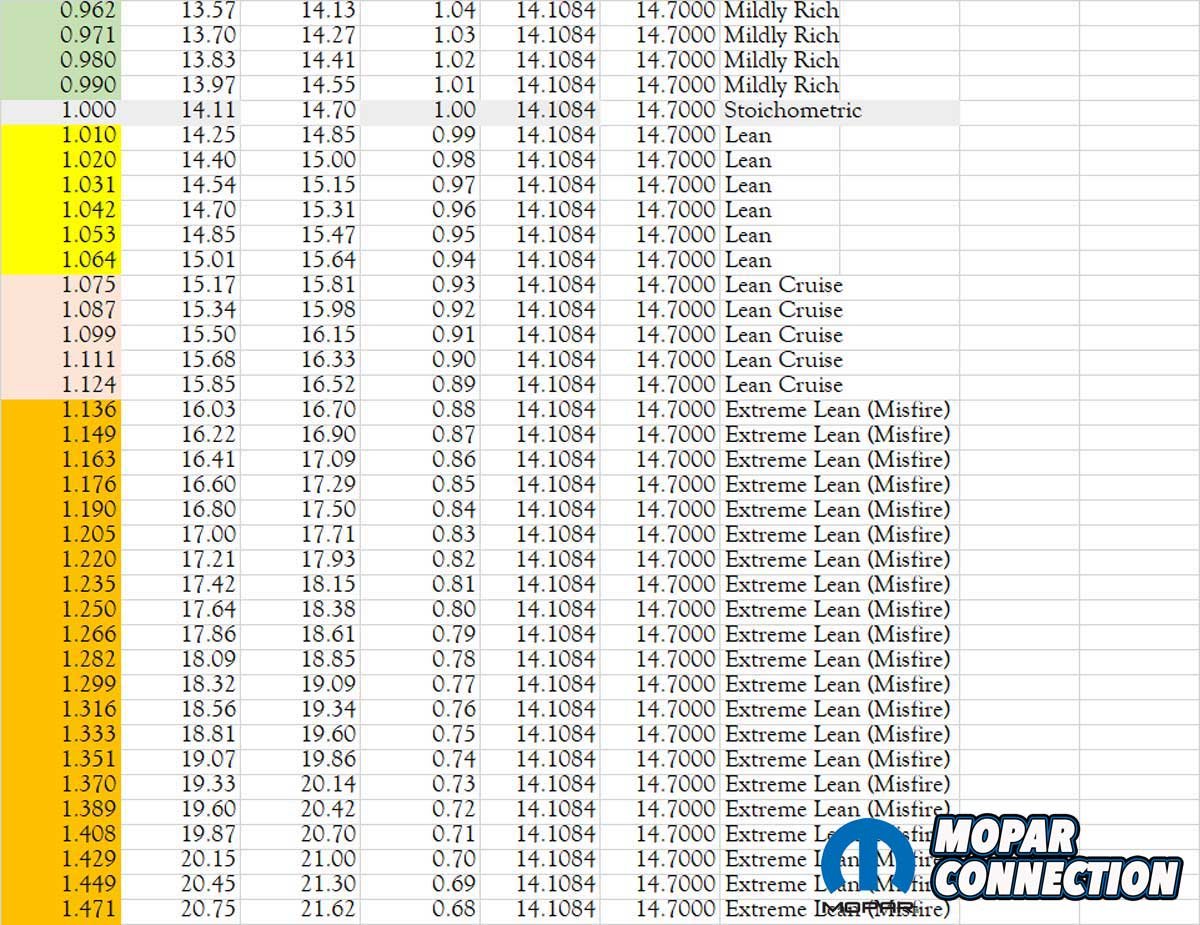
Above: The above chart provides a reasonably accurate relationship between lambda and E10 or E0 air-fuel ratios. The color codes and the conditions may need to be slightly tweaked for each engine, but it is a decent starting point.
The AEM UEGO Controller Gauge, the Hooker Blackheart O2 sensor bung, and the easy-to-tune Brawler carburetor have proven to be winners. Without the AEM Controller Gauge, we would have been guessing about the tune of the 273, but when using the lambda data provided by the AEM Bosch UEGO, we know precisely where our tune is regardless of the fuel used.
For more information about the components tested, enthusiasts can contact a representative from each company or check Holley online for all the latest products.


Mr. Holley knows everthin’ about Mopars