


If you’re not a subscriber to Mopar Connection’s YouTube channel, you might not be as familiar with our 1970 Plymouth Fury III convertible project that we named “Marsha.” This spitting image of the same ’70 Fury that Mike Brady drove on the second season of “The Brady Bunch” TV show, our Fury was rescued from a tabacco barn in North Carolina and brought back to life with just a few buck’s worth of parts and some serious elbow grease.
Unfortunately, what we thought was a pretty well-preserved droptop C-body was anything but. Marsha had lived a pretty rough life; having experienced what we deduced as being two pretty severe accidents: the first was the most visible and was actually the second, a stiff collision with a pole or pillar that caved in the back bumper, tweaking the brackets and the lower rear valance pretty seriously. The second accident was a very poorly repaired passenger-side quarter panel.
That panel was placed over portions of the factory quarter skin, screwed in place, brazed along the edges and heavily mudded over to flow the edges in a somewhat passable manner. When we took our Fury to Dave Chamberlain of All Classics Restoration he wasn’t as convinced that Marsha was the solid runner we thought it was. It took him just a few days to discover how much work she’d really require. We left Marsha with Dave, and he has proceeded to document every major step of sculpting this C-body back into ship shape.
Dave is no stranger to monster-sized builds like this but has been an absolute trooper when it’s coming to patching panels that aren’t easily replaced or having to make due with whatever scraps he can muster together. While C-bodies aren’t exactly his forte, Dave has made huge leaps forward in Marsha’s restoration and we’re immensely grateful for it. If you haven’t subscribed to his channel, you gotta do it now. He’s handling much more than Marsha, and you’ll be floored to see what he’s working on.
Project Marsha Introduction
Taken just a day or two after Mopar Connection Magazine dropped off our 1970 Plymouth Fury III convertible “Marsha” with Dave Chamberlain of All Classics Restoration, Dave takes his camera on a bit of a walk around this new project machine. Thankfully, we had the decency to leave a running car with Dave so he could fire her up and drive it in and out of his work bay when necessary.
To the untrained eye, Marsha looks pretty straight – save for the few rotted-out lower panels that we had already trimmed off –but Dave knew better. Unlike far more popular second-generation Chargers and first generation Challengers, major sheet metal companies aren’t stamping out new replacement steel for these C-bodies, so Dave evaluates what he’ll have to fabricate himself and what we’ll have to source out.
Marsha Quarter Panel Repairs Pt.1
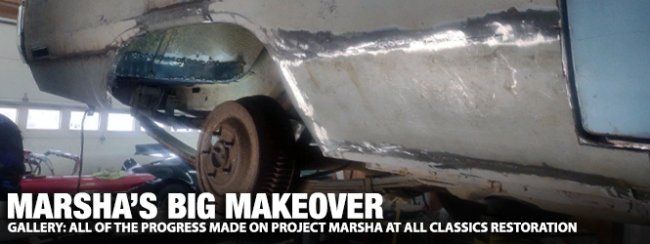
As mentioned, prior to bringing Marsha to All Classics Restoration, Mopar Connection had taken the liberty of cutting off the most rotten portions of the Fury’s quarter panels. In doing so, we also coated the exposed inner structure with POR15 to inhibit any further rust; convertibles are notorious for collecting moisture and debris in these portions of the lower quarters and Marsha was no different. The rot was considerable considering how much time it spent indoors.
Months earlier we had picked up some very less-than-desirable replacement quarter panels. These were complete panels, but we patch panels that began well below the shoulderline. These are so flawed and shoddily stamped that we literally won’t share where we found them – we’re literally doing you a favor. In this video Dave assess the first portion of the driver’s quarter and begins to patch up the lower quarter, beginning closest to the driver’s door.
Marsha Quarter Panel Repairs Pt.2
Continuing from the previous video, Dave spends a great deal of detail in showing how to get the radius of the panel’s curvature right without using any big dollar tools. Equally, he provides a step-by-step guide on burning this patch panel into the car, paying close attention to the complex corners around the wheel well lip. To that point, these patches didn’t have the detail feature of the outer wheel lip so Dave had to make that contour from scratch.
Since the factory quarter panel connects to the running board well beneath the driver’s door, Dave also shows how he “fakes it” by using a second patch piece to carry the larger replacement further forward and blends that together. It would be nice to have made it all in one go, but seeing as what Dave is having to work with, stitching a couple of patches together is the very least of his concerns. Some blending with the flap disc and a little body filler will hide it from sight.
Marsha Quarter Panel Repairs Pt.3
Finalizing the last two videos in this episode, Dave goes further in showing how to properly repair not only this portion of the quarter panel, but carrying that step into the door jamb. Again, this portion of the quarter panel is almost always trouble for convertibles, and that cancer can spread throughout the striker panel, down into the lower door jamb (like our Fury’s did) and throughout the bottom half of the quarter and rocker.
This video concludes each step of this process, and shows the need to create cardboard templates, and take big jobs down into smaller bites and segments. Many will see a project like this and feel immediately overwhelmed. Dave shows how to “eat the elephant” in little bites, one at a time. If you’re looking at your project vehicle in the same light, you’ll want to watch this one through; it might give you some motivation to get back into the garage.
Marsha Rear Quarter Repair
Alas, Marsha’s rotted-out quarter panel appears to be the gift that keeps on giving. With the lower rear missing, Dave also evaluates how the trunk extensions are equally corroded as are much of the lower rear wheel tubs – all of which requiring custom-made repair pieces since the aftermarket has nothing for these “Fuselage Era” C-bodies. Dave shows many of the car’s more complicated areas that require such attention.
Working from the inside-out, Dave begins by reattaching the inner wheel tubs to the trunk by fabricating a series of patches after replacing the most corroded portions. He then provides a detailed guide on hand-fabricating filler patches that blend the inner structures back together – all of this before tackling the most visible need: the external patch of the lower rear quarter. This cannot be addressed until the substructure holding it all together is finalized.
Marsha Front Fenders
Gratefully, Marsha’s front fenders were the least effected areas (besides the doors, of course) by rust and corrosion. For the unfamiliar, C-bodies are built very similarly to the early generation F-body GM cars (Camaro and Firebird); meaning they have a detachable front subframe with a unibody rear section. With the inner fenders removed (they easily unbolt) and off to the powder coater, Dave jumps on patching the lower fender where rust had begun to bubble up.
This video is the shortest of Dave’s tutorials on patching up Marsha, as the corrosion was constrained to just the outward skin. Using some remaining sheet metal cut from our lousy replacement quarter panels, he was able to easily contour the shape to fit, apply some spot welds, burn it into place and grind it smooth. If only the rest of the Plymouth could be as easy as this portion of the build…
Stripping Project Marsha 70 Fury
One of the most transformative episodes, Dave first walks through much of the hidden damage that Marsha sustained over the decades, including some serious impacts to the passenger’s quarter as well as the rear; all of which were sloppily and hastily repaired we reason around the late 1970’s or early 1980’s given the use of brazing and heavy layering of body filler. Dave’s eye for spotting damage stands out as he shows how misaligned the door striker is from one side to another.
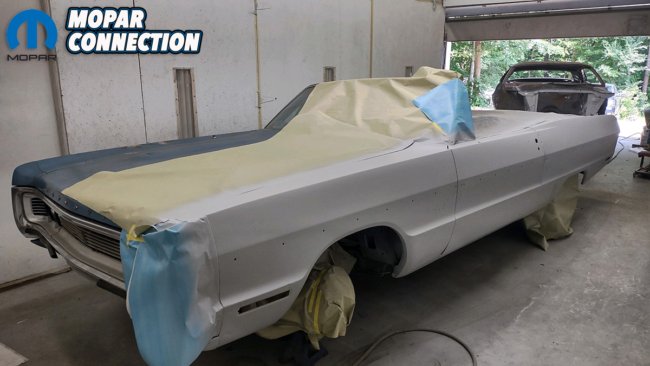
Moving to the driver’s side, Dave makes quick work of stripping off the cheapo paint job, bringing the car down to factory primer and begins working the entirety of the repaired quarter and realigned door panel. A quick masking later, and Dave applies a heavy epoxy filler primer and begins the long process of block sanding this land barge, getting the Plymouth’s long horizontal lines looking sharp and surprisingly close to final paint.
Project Marsha Gets New Floors
The latest episode from Dave focuses on the final step taken before bringing the Fury to 2023’s Holley MoParty. As mentioned previously, finding suitable replacement sheet metal for C-bodies is quite the task. Extensive searching found Classics 2 Current Fabrication’s website listing a surprising amount of patch panels for the floors (as well as that for the trunk, trunk extensions and much, much more – Dave promises a video dedicated to patching the trunk in coming weeks).
Cutting out the worst portions, fitting and patching the floors (both front and back) goes by quickly, as Dave illustrates the best steps necessary to drill out spot welds, clean and prep the cross brace surfaces, and burn in the new panels. Additionally, Dave took an added step and applied a liberal coat of Lizard Skin Sound Control Insulation that we picked up from Summit Racing. Since Marsha is gonna be far rowdier than stock, keeping the exhaust rumble to a minimum will be appreciated.
If you haven’t already, please give Dave Chamberlain of All Classics Restoration a like on any number of his videos and subscribe to his channel. More importantly, if you’ve got a car that you think Dave would be the right guy to get looking straight and coated in fresh paint, definitely reach out to him through the YouTube channel. He’d love to discuss what you have in mind and come up with a plan to get it done!


Why go to all the trouble of fabbing a repair panel just to mud over it? Less work and a pro job to butt weld.
Shade tree.
Even butt welds will need a certain amount of filler. This project isn’t an Amilia Island participant its get it solid and drive the wheels off it.
Shade tree!? I guess the fact ive been in business for 21 years and have a 3 year waiting list is a testament to shade trees everywhere.