


Even after spending all day Friday prepping the Comeback ‘Cuda for paint, we still went over the car with a fine toothed comb early Saturday morning. Clean, clean, and more cleaning. By rolling the car into the natural morning light any minor flaws were suddenly much easier to find. We went over the car looking for and marking any tiny flaws or pin holes in the primer. While we used some body glaze to repair the flaws, we completely went over every inch of the car with a grey scuff pad, air gun, and a microfiber rag. You need to pay special attention to door jambs, and lower panels of the car. We blew out the frame rails at least six times and each time making sure to get all tiny particles out and off of the car.
After we were happy with the overall body we took the car apart. We removed the hood, deck lid, upper and lower grille surrounds, and front and rear valances. Since we had a double booth, joined in the middle and with duplicate identical environments, we could make sure the entire car would all match. We positioned them lying flat or hanging, depending on where the panels would normally be on the car. This way the metallic would lay naturally according the position of the panel on the car. We then went over the body one more time to make sure any of the tiniest flaws were fixed before we rolled the body into the booth.


Above left: Even though there have been countless hours spent on getting the Comeback ‘Cuda ready for paint the final inspection and cleaning is paramount for getting a flawless paint job. The early morning natural light helps any imperfections show up. 600 grit paper and a paint stick help to smooth out a small ripple in the primer. Above center: Any imperfections are repaired now. During transportation a small chip occurred in the corner of the trunk lid. We repaired any pin holes and chips with filling body glaze or even regular filler depending on the size of the problem. After it dried we sanded with 400 – 600 grit paper. Since we will be shooting the entire car with sealer, these scratches will not show up in the final finish. Above right: Thanks to much needed help from our Mopar buddy, Chet Biggers. He went over every inch of the car with a grey scotch brite pad, an air hose, and a micro fiber rag. Having two sets of eyes is always better than one. He also used the air hose to blow out the frame rails and any inner panels. You can’t get the car clean enough before moving it into the booth.


Above left: As we continued to go over the car with a “fine tooth comb” any tiny imperfections were repaired with glaze. After disassembling the trunk, hood, front and rear valances, and grille surround we positioned them in the paint booth. The trunk lid will be painted in a horizontal position the same way it would be mounted on the car. This way the finish and metallic particles will lay down the same as if it was still mounted on the car. Above right: After disassembly we returned for final inspection of the car’s shell before we moved it into the booth. We have a spray can of Mar-hyde professional-grade grey primer to touch up sand-throughs and repairs. A light coat of a quality primer will work since we will be sealing the entire car. Never use a cheap spray can primer because it will lift when over coated with spray gun paint. After 5 hours of final prep, the car is ready to be rolled into the booth.
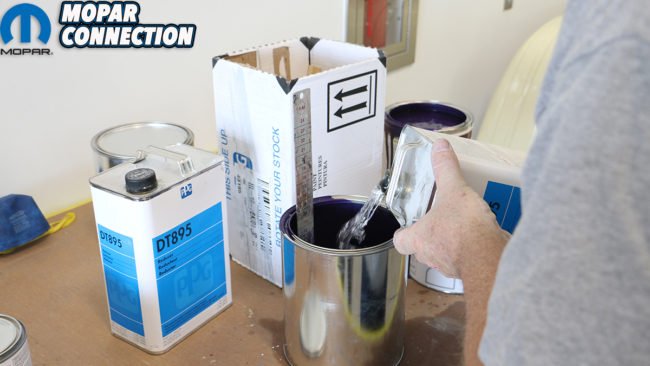
After turning on the downdraft booths and getting everything blown off and tack clothed, we mixed up the PPG sealer. We used one quart of black and one quart of white to get the color we wanted under the base coat. The sealer can influence the final color since the “In-violet” metallic is somewhat translucent. In fact, all paint, even solid colors, are affected by the color of the primer or sealer. Another reason why a uniform coat of sealer is needed to insure that the final finish doesn’t have any variance from panel to panel, or door to fender. Never use different color primer on different body parts. It will show up in the final finish.
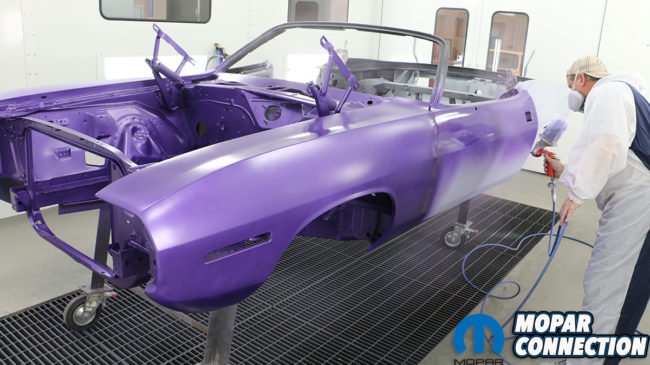
We chose to use the very best paint PPG produces on the Comeback ‘Cuda. Some people succumb to the temptation of using cheaper brands, but you want it to be the best it can be and to last for 20-plus years. We find that PPG has the closest match to the original formula. Yes, originally the paint was single stage metallic, but base coat clear coat is a must with metallic paints. We used two gallons of DBU base and two gallons of DCU 2002 clear un-reduced. Adding in the reducer and hardener, and we shot a total of three coats of base and two heavy coats of clear. Others may need three coats of clear if shot in lighter passes. We bought the DeVilbiss D-cup products for our gun. They are larger, sealed plastic bags that hold the paint; you never get any drips and can hold the gun at any angle. When shooting close to 6 gallons of paint, being able to mix up several cups of paint at once helps a long process go quicker.

Above: We used a quart of PPG DP50LF black mixed with a quart of DP50LF white. This gave us a close match to the original factory grey primer. It also makes a uniform base for the “In-Violet” base. The color of the sealer will influence the final color of the paint.


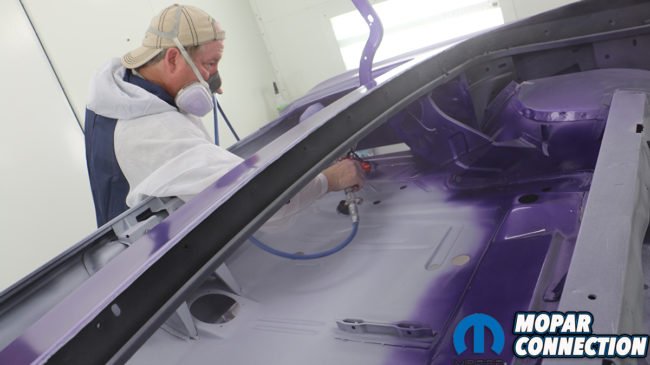
Above left: After turning on the down draft booth we blew the car off one more time. We followed that by using a tack cloth over the entire car. As we began shooting the sealer we noticed that this stuff really goes on great and lays down nice. That is important since we do not need to re-sand before shooting the base coat. Other sealers we have used in the past have gone on grainy and had to be sanded. Above center: Taking the time to shoot every part of the car especially the hard to get to places. By shooting through the open wheel wells you can hit the front of the door frame and the hinges from this side. We also made sure to hit the frame rails and inner fender panels. Above right: Punching holes in a cardboard box and then mounting the already black phosphate-plated bolts and nuts allowed us to paint them with body color and clear. Then after assembly any damage can easily be touched up with a brush. We used a touch up gun to minimize the paint used on small areas.
Shooting the base, especially the first coat, dictates what the rest of the paint job will look like. If you start out too thin you will get a “grainy” finish. Too thick and it will run. Too close and the metallic will “tiger stripe”. Some of the mistakes a beginner will make is not paying enough attention to the edges and the hard-to-reach places. Getting the gun adjusted correctly is vital. Always shoot a few spray-out patterns before starting on the car. We shot the parts of the car first and the body shell second. A good paint suit and respirator are needed to keep the painted surface clean and your lungs safe.
You need to have a plan for shooting the entire car before you start. Try to avoid a dry edge and always overlap to get a uniform, even pattern. When shooting a metallic paint, the gun needs to be farther away from the surface so that the metallic particles will come out uniformly. Since we are wanting to achieve the correct factory appearance, we sprayed a pattern of overspray on the dip primer-painted undercarriage. The trunk is especially difficult to shoot. If the Comeback ‘Cuda was a hardtop, we probably would have painted it first, let it cure and then masked it off. Even then it is difficult to get everything even without dry spots. Being a convertible, the trunk is much easier to access.

Above left: We used the best paint PPG has to offer for our base coat clear coat finish. In a full repaint you will need at least two gallons of Deltron “In-violet” unreduced. We also used 2 gallons of the DCU 2002 Clear coat. It is a high solid clear that is designed to be wet sanded. We could have used the Shopline base and saved a few bucks, but we wanted only the best of the best for the Comeback ‘Cuda. Above right: Always purchase a few extra empty cans from your paint supplier to help when mixing the paint. We took the two gallons of base and after stirring them thoroughly we pour half of each gallon in an empty can and then combine the remaining half gallons together. By repeating this several times, we insured that we had two gallons of the shame shade of base. The base and reducer were mixed in a one-to-one ratio to be sprayed. We used almost all of the four sprayable gallons of base. It is good to have some of the paint left over for touch ups.


Above left: Here you can see the DeVilbiss D-cups system we chose to use. It has a large capacity cup that includes a dripless bag and top. It also has an adapter so they can be used with other brand guns. After waiting for the correct amount of flash time for the sealer we lay on the first coat of the base. The hood and truck lid are sprayed horizontally and the grill surround in the background is hung vertically. All in the same configuration they will be on the car when assembled. The “shaker” trim ring is attached to the hood before paint. The nuts that attach the ring are painted originally so it has to be installed when the hood is painted. Above center: We chose to begin to shoot the body in the engine compartment. Much care getting in and out of the area is needed. Even a slight brush of the suit or hose can ruin the paint. Since Mopars were fully assembled when painted they are one of the hardest cars to paint correctly. Ford and Chevy had black engine bays and the fenders and hoods were off the car when painted. Above right: To recreate the factory process we have already painted the undercarriage with “dip primer” from Resto Rick. Now we shoot the color paint and create the over spray pattern the cars originally came with. Some restorations I have judged have the entire undercarriage painted body color. That an immediate 10 point deduction and that deduction has separated many cars from first to third or even worse.
Being careful to fully cover all the door edges, jams, hood hinges, trunk, and engine compartment, the first coat came out perfect. We were sure to allow the correct amount of flash time between coats so we didn’t get any “solvent pop”. This can show up as tiny bubbles or craters that are created by the solvent not being able to evaporate correctly. After three wet coats of base, we mixed the PPG clearcoat. Just as with the base, the first coat dictated the rest of the paint job. Get it too thin and the results will be “grainy”; too thick and it will run. Most beginners shoot the paint too thin.
The computer-controlled paint booths have a cure cycle. Most shop booths do not have this feature and therefore the paint must cure for 24-to-48 hours before reassembly. Here, we simply pushed a button to start the cure cycle. The booth was at 74 degrees during the painting process but heated up to 140 degrees in less than 5 minutes, baking the paint for an hour and a half. This really makes the paint “flow out” to create an awesome finish. Once the booth cooled down, the lights kicked back on to indicate the cycle was finished. Finally, the end of a very long day arrived. We began the paint process at 9am and went home 12 hours later. We chose to let the paint continue to cure for another 24 hours before attempting to move the parts.
Above left: The most difficult area to shoot is the trunk. With the sound deadener already on the quarter panels every inch of the trunk gets body color. Work from front to back so that you can get good coverage without touching the wet paint with your arm of a part of your suit. The truck rod sliders were installed and yes even greased before being shot with color. Above right: Having Chet there to keep us supplied with cups of reduced paint, helping me with the hose, and pointing out any areas that need additional attention was priceless. Once you get a plan of attack you can move around the car with seamless coats of base. And since this is metallic base you have to pay special attention to the pattern of the metallic. It must be even without any variance in color or reflection.


Above left: After three coats of base and two heavy coats of clear, and 9 hours of hard work the car is finally painted. With no thin areas and just a few small sags the clear went on great. With the quality of the booth we have no fear of dirt nibs or trash in the paint. Above right: It was so much fun to be able to actually “hammer on” the clear to all the horizontal areas of the parts and the car shell. Here is a close-up of the rear lower valance. Now the best part is this is before baking it out at 140 degrees for an hour and a half. The paint will continue to flow out and harden during the cure cycle.
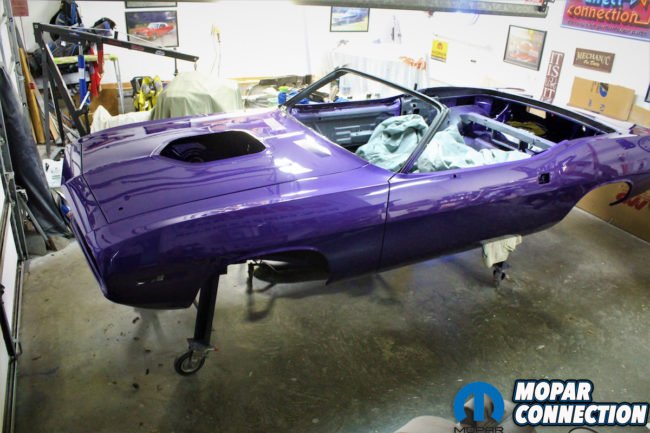
We wanted to paint the surfaces of the hood and trunk lid in the horizontal position, so the metallic would match the horizontal surfaces of the body. After 24 hours, we turned them over, masked them off, and used foam tape to get a soft edge. We painted the exterior of the parts while shooting the entire car, and the underside later because the match would work even if it might be the slightest bit off hue. After shooting with the same gun, in the same temperature controlled booth, with the same number of coats, the results were perfect. We then ran another baking cycle and 12 more hours of cure time. We carefully reassembled the car, loaded it up on the trailer, and carried it home. Again, with the help of several friends, we got the car safely off the trailer and back in the garage.
Now that the paint had cured, it was time to take a good paint job and turn it into a show car paint job. The process of color sanding and buffing the paint can be intimidating if you haven’t done it before. Even for someone who has done it many times, it is easy to sand through the clear into the base. If that happens, you have to re-sand and shoot base and clear again. Now is also the best time to sand and buff out the new paint as it has had enough time to cure but it will continue to get harder the longer you wait.


Above left: We let the paint cure for an additional 24 hours after baking before handling the hood and trunk lid. We then masked off the parts with paper and tape followed by foam soft edge tape. This way we could shoot the back side of both parts and not have a hard line to have to sand out. After they cured and dried overnight, we returned the next day and assembled the car. Loaded it on the trailer and got it back home. No damage and ready to be wet sanded and buffed. Above center: There are several tools needed to turn a good paint job into a show quality paint job. Even without any trash or dirt nibs in the paint, you still have to sand out all of the orange peel and any sags or runs. You will need sanding blocks, hard and soft, nib/run blocks, and a squeegee. You need a short throw palm sander with a “Hook-it” pad, 800 and 1500 discs, trizact 3000 pads, plus an interface pad. Wet/dry sand paper in 800, 1000, 1500, and 2000 grit for hand sanding. A variable speed buffer with “Hook-it” pad. Wool pad, white foam pad, blue foam pad, and black foam pad. And then you need the 3M “Perfect-it” compound system bottles. You also need a spray bottle with a few drops of dish soap in a full bottle of water. Finally you will need several soft clean rags. Above right: The “Perfect -it” compound system takes all the guessing out of buffing. Bottle “#1” is for use with the wool pad and as it says you use it first. Then the “#2” bottle is next and as the cap shows, you can use the white and black pads. Then you use the “#3” bottle of compound and as the cap shows the light blue pad.


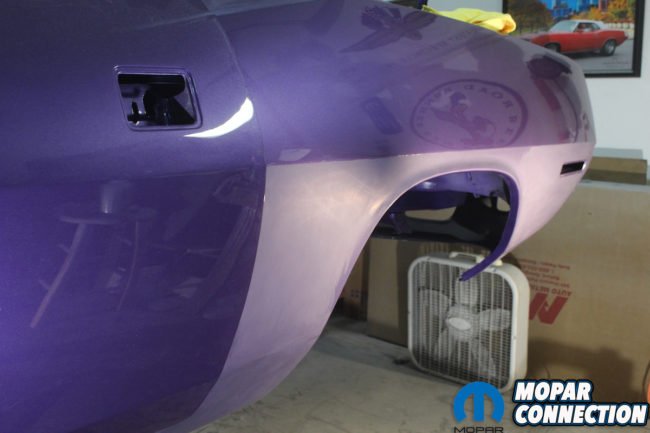
Above left: For the beginner to take the shinny fresh paint and sand it flat can be intimidating. But using sanding blocks and discs you can knock down the high spots and get a completely flat finish. Low spots will show up as shinny spots. Be very careful with edges and any seam when sanding or you will go through the clear. Above right: Here, we hand wet sanded the top of the quarter panel with 1500 paper using an abundance of soapy water. You will be able to see the clear in the water as it will show up white. We used a soft block with the 1500 paper wrapped around it. Above right: We continued to use tape on the body lines. Here the lower quarter has been hand sanded because of the wheel well lip. We used 1500 followed by 2000 paper. As you can see there aren’t any shinny spots on the sanded area. Everything is flat and ready to be buffed.
We used the 3M sanding film and finishing system. With a short throw palm sander and a “hook it” disc, we started with 800 grit discs, followed by 1500 grit discs. We used 1000 wet sanding paper to get out any runs, followed by 1500 and then 2000. After that, we used the Trizact 3000 pads wet. Then we used the #1 compound with a wool pad, followed by #2 compound and a black foam pad, followed by #3 compound and a light blue foam pad. After final assembly, we went back over the car with a black foam pad and swirl mark remover followed by hand polish from Zainos.
Here are several tips to help you with this process:
- Hand sand all the areas that are near the edges or in tight places.
- Always sand and buff the edges away from the panel.
- Keep areas clean from excess compound. It can stain if left on the surface too long.
- Each step in the buffing process needs to be completed to a deep shine.
- Use lower light from an incandescent bulb drop light and view the panel at an angle. This will show any fine scratches that need to be removed before progressing on to the next level.
- We purchased a cheap car cover and used it to keep the buffing compound dust off the rest of the car. It really helps keep the rest of the car clean.
- Clean your buffing pads after each use and then spin dry them on the buffer.
- Continue to use tape on the body lines even when using the finer grits of sanding discs or paper.

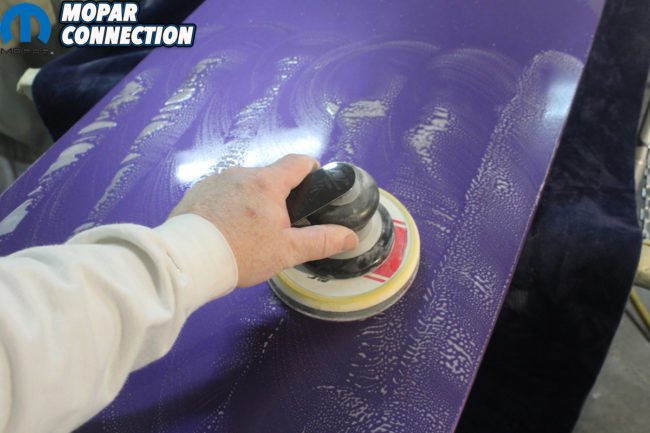
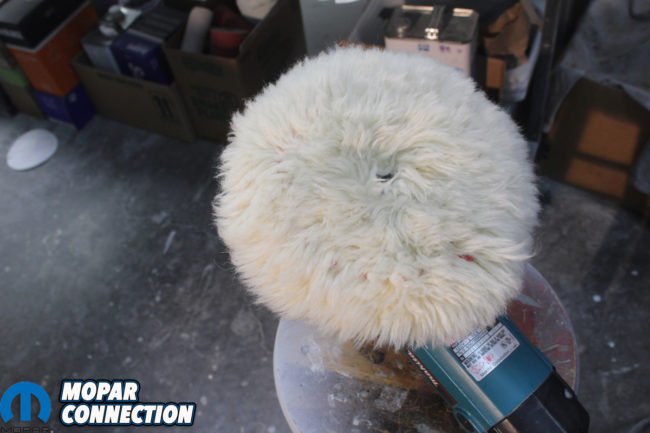
Above left: Here you can see the different grades of sandpaper, sanding discs, and a close up of a special block for sanding out runs. The paper is always used wet, the sanding discs are used dry, and the 3M Trizact 3000 pads are used last with water. Above center: The Trizact 3000 pads are used with the interface pad and water. After sanding with 2000 wet or 1500 sanding discs you use the Trizact 3000 pad. The results are amazing and makes the wool pad buffing so much easier. You use the pad on a slower speed and sand in one direction and then sand the opposite direction. Wipe the water off with a clean soft rag. Above right: Once you get everything sanded it is time to begin the buffing process. You start with the wool pad and compound #1. The pad must be kept clean by spurring it often while it is rotating at a high speed on the buffer. After you finish using each pad wash them with warm water and a little soap, re-mount them on the buffer and spin the excess water out.

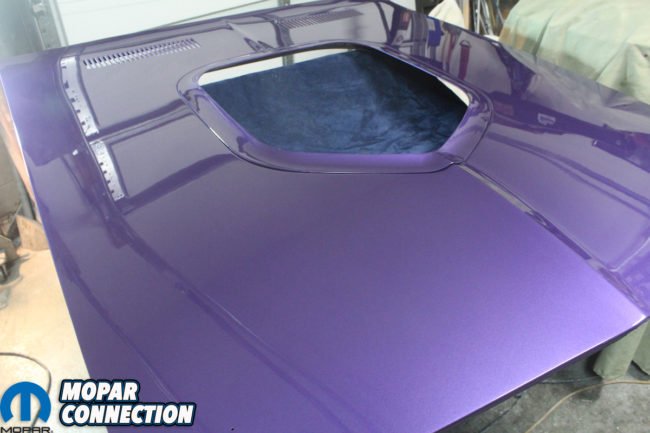
Above left: Use tape on edges and body lines to help prevent the buffer pad from catching an edge and buffing through the paint. Always clean any compound from other body panels to prevent staining. Above right: After using the three step 3M buffing system you can bring the finish back to a mirror like shine. These results here are before using any final hand glaze or show car polish. The lighting is low and you can still read the news paper in the finish. Wait until the Comeback ‘Cuda gets in the full sunshine.
After 75 hours of sanding and buffing, we can move on to the next steps. We still need to paint behind the grille with semi-flat black. Then paint the tail panel with organisol black, followed by undercoating the wheel wells. After that, we can begin the assembly of the under dash insulation; but we will cover all of that along with the step-by-step restoration of the operational parts like pedals, emergency brake and heater box in the next months. We already have most of the parts for the next steps from our sponsors, YearOne, Detroit Muscle Technologies, Resto Rick, and Classic Industries and we are more than excited to proceed.
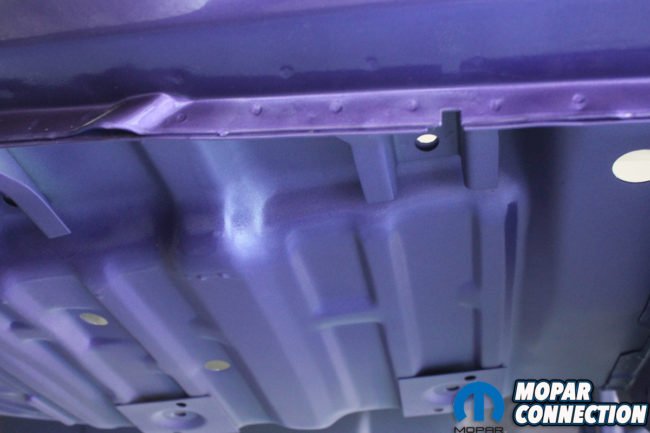


Top left: So many times, we see restorations where either the entire undercarriages are completely painted body color or there is way too much color on the floor pans, in an attempt to show factory style overspray. Remember the goal on the assembly line worker was to paint the body not the undercarriage and do it as quickly as possible. Top right: The front torque boxes and fender attachment bolts are all painted with body color. A few drips are evident, and the front frame rails are painted with color. As you go further under the car there is less and less color and more overspray. Notice the spot welds in the pinch weld area. AMD Installations reproduce these factory welds the best way possible by using the same equipment the factory did. You don’t get these with Mig or Tig welders. Bottom left: Speaking about Resto Rick dip primer and over spray, here you can see the overspray on the rear frame rail and floor boards. The outside and bottom of the frame rail had body color and the inside edge of the frame rail only had dip primer. The only way to duplicate the factory process is to shoot it the same way the factory did. No masking, just the naturally occurring overspray pattern from the gun. Bottom right: To stay true to the original appearance of the interior, we took a small brush and painted the yellow seam sealer black. The dip primer from Resto Rick was used in the interior and the naturally occurring over spray of color has been left.
Above: Metal reconstruction? Check. Body work? Check. Primer and block sanding? Check. Shooting color? Check. Wet sand and buff? Check. The paint job is by far the hardest and most important part of a total restoration. The final results prove all the time, effort, and money was worth it. Now on to reassembly.


 Mopar Connection Magazine – The ONLY Daily Mopar Magazine © 2022. All Rights Reserved. Mopar Connection Magazine is the ONLY daily Mopar Magazine bringing you the latest Mopar news, technology, breaking news, and Mopar related events and articles. Find out the latest information about Mopar, Mopar products and services, stay up to date on Mopar enthusiast news, dealership information and the latest Mopar social media buzz! Sign up for the Mopar Connection Magazine newsletter for the latest information about new products, services and industry chatter. Mopar Connection Magazine is the best and only source you need to be a Mopar industry insider!
 by
by