


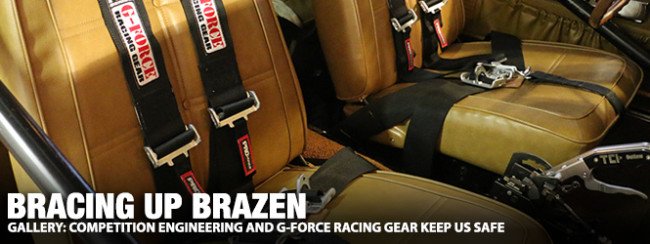
“Y’know these cars would twist real bad,” an old Mopar street rodder warned us a dozen years ago. “You’re gonna need to stiffen that body up.” And it was one of the first things we ever did on our project ’69 Dodge Charger “Brazen.” Despite its size, the Chrysler B-Bodies weren’t as rigid as their mass would convey. Rather, the uni-body platform, as the seasoned racer cautioned, had a tendency to distort, buckle and even twist when enough torsional force was applied. “Dandy” Dick Landy famously blew the rear glass from one of his Chargers, and that was something we didn’t want to emulate.
Over a dozen years ago, with the car sitting flat on the ground, we tied the subframes together with some thick 2-inch x 2-inch x .083-inch wall square tubing, along with a set of torque boxes and a six-point cage from Competition Engineering. Today, subframe connectors are available in round or box tubing, as well as flush-mounted channel lazer-cut to match the undulations of your B-Body’s floor pan. And although most are sold as being “weld-in” (which is what we did), there are some less invasive bolt-in subframe connector kits that require some minimal drilling.
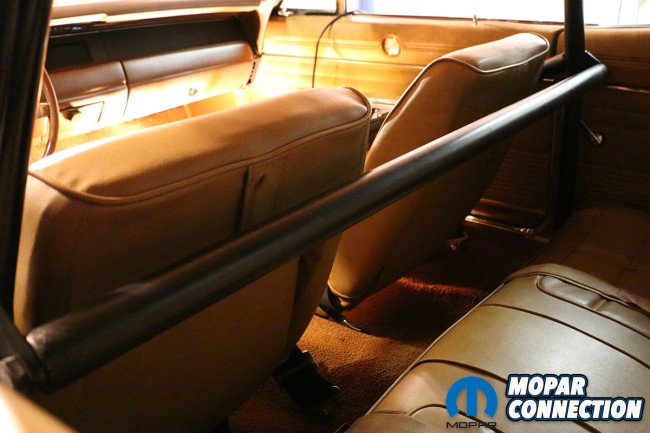

Above left: It’s been over a decade since we tied up Brazen’s chassis with a pair of subframes, torque boxes and a 6-point cage from Competition Engineering. Above right: Wanting to preserve some semblance of civility, we modified our cage’s crossbrace to be removable with the loosening of a pair of heavy Grade-8 bolts.

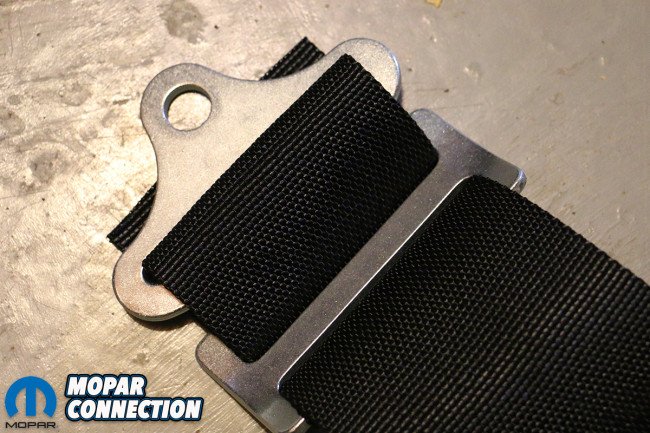
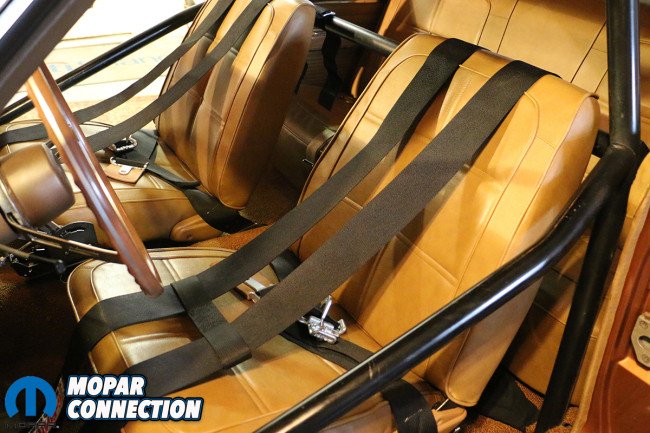
Above: Thankfully, the 2-inch mounting brackets fit perfectly into the factory Chrysler seatbelt positions, replacing our faded and rotted 47-year-old belts.
Torque Boxes are another bit of chassis stiffening trickery that will be a bit alien to those unfamiliar with uni-body cars. Designed to tie the subframes to a larger portion of the framerail, the only Mopars to come factory-equipped with torque boxes were convertible cars and most all high-performance-equipped Mopars. Since Brazen was originally a lowly 383 2-barrel, air conditioning-optioned cruiser, no such strengthening was included during assembly – and we didn’t feel bad as much as if we were welding on a true R/T.
The installation of our Competition Engineering 6-point cage did go a little “off script.” We wanted to achieve three things apart from the added protection and chassis stiffening, but also retain access to the backseat, somewhat easy entrance and exiting from the front seats and have the roll bar (somewhat) follow the trim between the door and quarter windows (if not hide behind it effectively with the windows up). Although Competition Engineering provided us with an 8-point kit, we forewent the two diagonal hoop supports, primarily because we wanted to retain rear seat leg room.

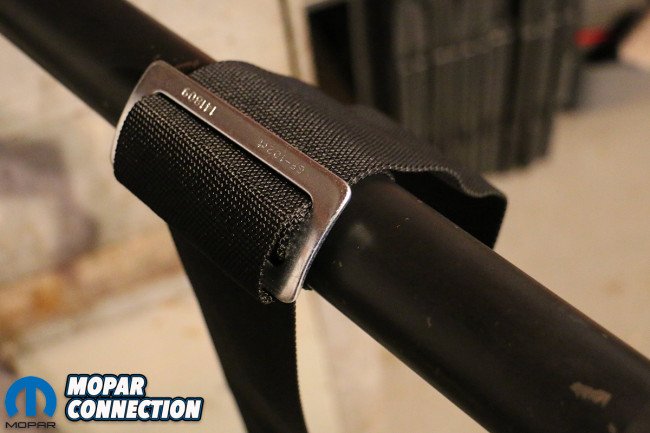
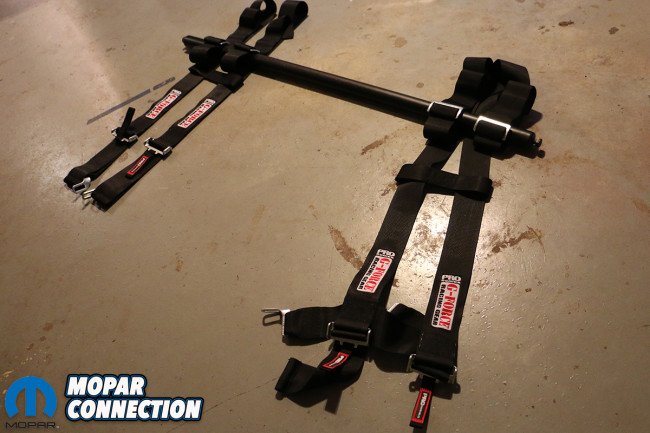
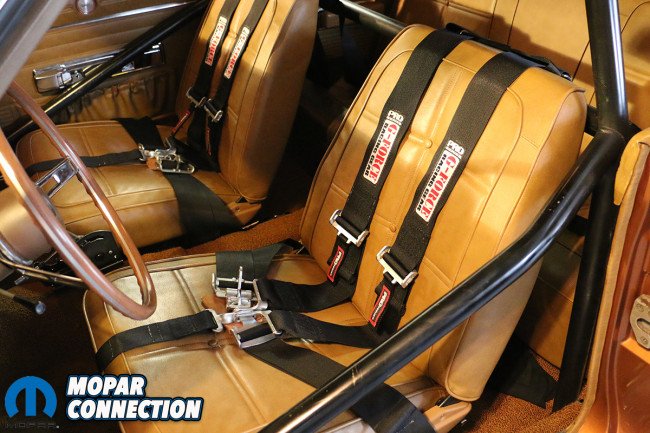
Top left: Our G-Force Racing Gear harness kit also included a pair of H-type shoulder harnesses and sub-straps. Top Right: Wanting to ward away any chance of tearing our Legendary Interior-recovered buckets, we opted to do away with the bolt-in brackets. Bottom left: G-Force harnesses loop and tighten around the crossbrace as easily as they do around the bolt-in bracket. Bottom right: With our cross brace removed, looming our harnesses was a cinch, as was the re-installation.
Our roll cage kit came made from mandrel-bent 1 3/4-inch OD x .134-inch wall mild steel (but is also available in 1 3/4-inch OD x .083-inch wall aircraft-quality AMS-T-6736 chrome moly tubing) with 6-inch x 6-inch x 1/8-inch thick steel mounting plates. We also opted for the bowed door braces that allowed for a lot more shoulder room (but do run closer to the door panel, requiring us to remove our Charger’s arm rests). The only other major deviation was the fabrication of a removable, bolt-in rear main hoop crossbrace. We fabbed up two 1/2-inch thick tabs relocating the crossbrace back 4-inches, allowing us to remove the bar easily and often. [This modification makes our normally NHRA and IHRA-approved cage very much un-SFI-approved. -Ed.]
After driving Brazen around far too long with its wimpy factory belts, which frankly, looked a little too old and rotted to be reasonably safe anymore, we opted to step up our game with a full set of G-Force Racing Gear 5-point H-Type Harness Sets from Summit Racing. These five-point harnesses feature a “latch & link” style buckle, meet all SFI 16.1 specifications, 2-inch bolt-in brackets, pull-down tensioning belts, QSR (Quick Safety Release) shoulder adjusters, and 3-inch wide belts (with a 2-inch wide sub-strap).


Above left: G-Force strongly recommends mindfully mounting the shoulder harnesses no more than 4-inches below the driver’s shoulder height. Our crossbrace came in just at 3-inches, squeaking just by. Above right: Also, be mindful about your mounting brackets. We absentmindedly mounted ours backwards at first.
Above: G-Force generously gives you a lot of slack (80-inches worth), requiring some sizing and trimming to fit. Take the time to properly measure and re-measure before trimming.
Although G-Force offers the very futuristic-looking camlock, we opted for the traditional “latch & link” not only for price but a little more of that nostalgic feel. G-Force recommends that the shoulder harnesses “should not be anchored more than 1-inch to 4-inches below [the driver’s] shoulder height. Mounting below may cause additional spinal compression [in the case of a severe impact or collision].” G-Force did OK us mounting our lap belts to the factory mounting points, saving us needing to fabricate a new position.
Although our shoulder harnesses came with bolt-in brackets, we opted to remove the brackets and loop the belts around the crossbrace, allowing us to not only remove the brace at will, but slide the shoulder harnesses off if needed. Because G-Force provides 80-inches of strap adjustment, we measured our most comfortable positions, allowed for 10-inches of slack, and trimmed the excess with a pair of sheers. We might’ve have been short-sighted if we ever take any of our bigger friends for a ride, so make sure to give yourself a little more slack than we did.

Above left: With our installation complete, we’re ready to hit the track (and tech inspection). Above right: Now, when it comes to maximum safety, G-Force strongly advocates the installation and use of the sub-strap, stating, “The sub-strap holds the harness buckle in place over the pelvis and helps prevent the driver from sliding down in the seat. The pelvis area can withstand 5,000lbs. of load before serious injury where the abdominal area can withstand only 800lbs. of load, so it is very important that the harness remains in the proper location.”
Lastly, many naysayers will complain that you’ll need to replace your harness every few years as SFI standards continually update and change. This may be so, but G-Force is looking out for its customers. Their “Re-Webbing Program” permits customers to submit their outdated G-Force Racing Gear harness sets, where “all hardware is thoroughly checked for wear and replaced if necessary. Then all webbing is removed, discarded and replaced with brand new G-Force Racing Gear webbing.”
Likewise, all appropriate SFI labels are attached and the rebuilt belt system is sent back to you. So rather than investing another $200 in a pair of harnesses every two years, G-Force literally cuts that cost in half allowing you to keep your current setup as well as stay up-to-date with the latest SFI regulations. That, and with Brazen’s chassis more solid than it ever could be from Ma Mopar, we’re ready to get this menace off of the street and put in some time on the chassis dyno and the track.


