


Paint and body done? Check. All metal lines installed? Check. Wiring installed and all engine compartment components? Check. Rear suspension with wheels and tires installed? Check. Engine, transmission, front suspension pre-assembled? Check. Inviting at least 8 of your most experienced car buds to come and help? Check. Food and refreshing drinks on hand? Check. Reliable smooth rolling engine hoist? Check. Homemade steel frame extensions built? Check. OK, let’s do this!
We have been working relentlessly for over 3 years to finally get to this day. Hundreds of hours, nights without sleep, all focused on the one day where everything changes. Planning each and every step of the process and praying all the time that it all goes as planned. Always expect a few glitches but a well thought out plan and the right tools go along way to a successful install.

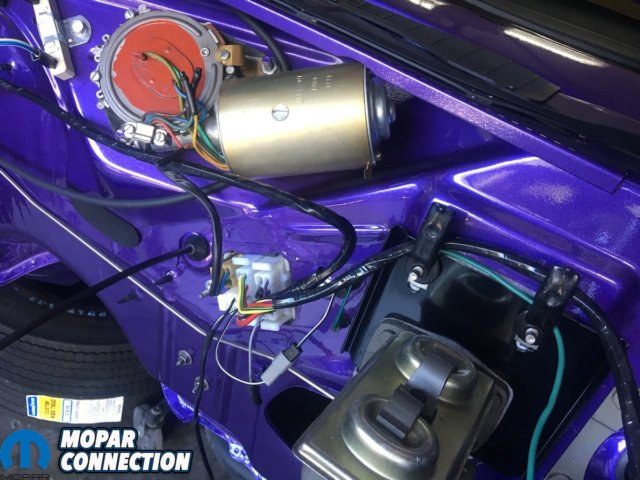
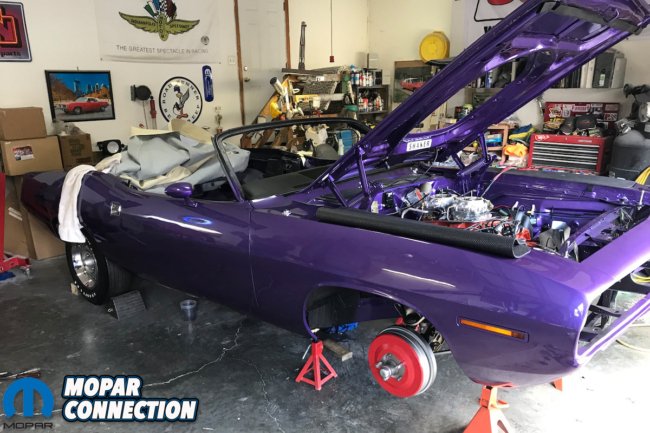
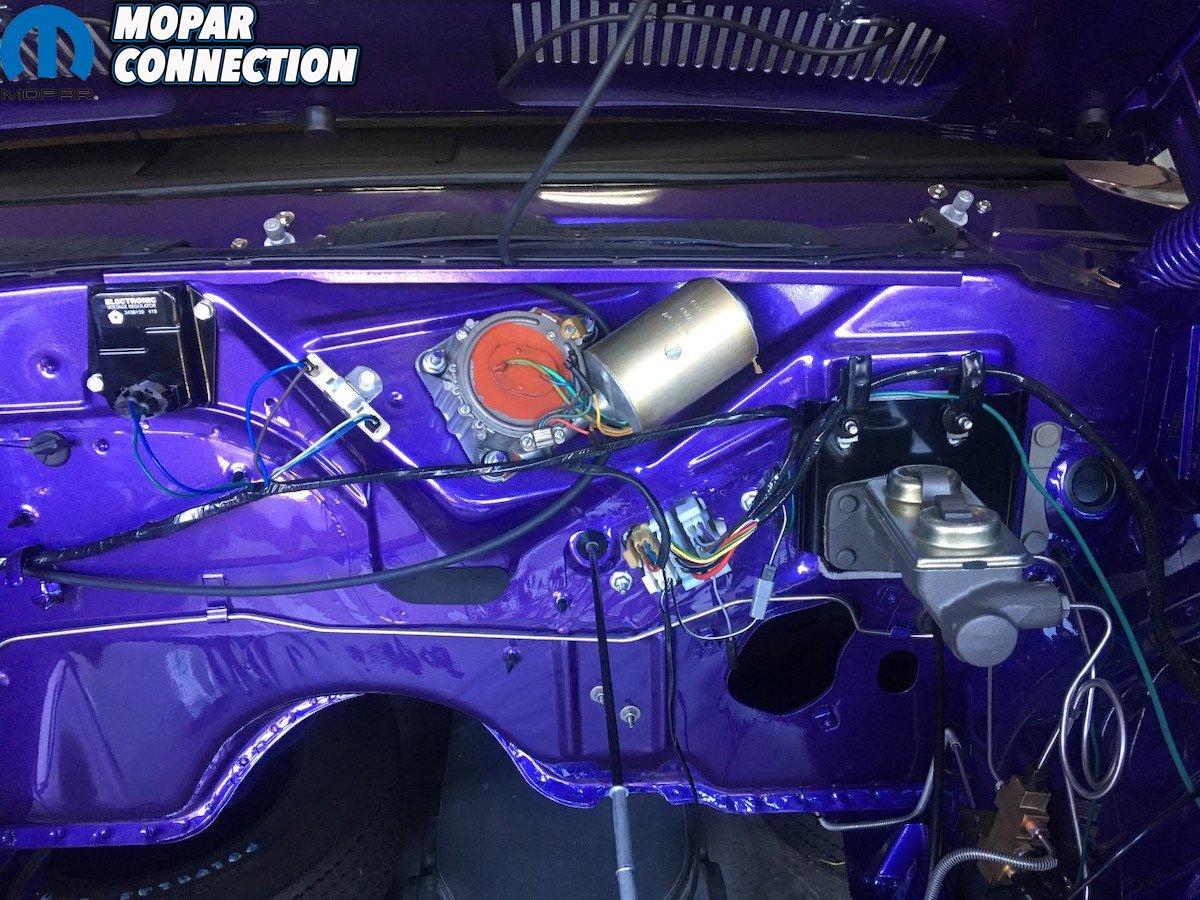
Above left: Before installing the engine, transmission, and front suspension from the bottom of the car be sure and install everything in the engine compartment. There will never be a better time to work in here than now. The hood and springs can already be attached and adjusted perfectly. Something you cannot do if you try to drop the engine in from the top. All the brake lines have been installed. The wiper motor and linkage has been installed. The fuel lines have been installed. Notice the plastic insulation pins, the nuts have all been plated and are correct. The “Shaker” cable and throttle cable are installed and as you can see everything is new or NOS. This is no time to get cheap on all these details. When that elephant or any other size mill is installed getting to these parts to replace them becomes a daunting task. Above right: Brand new wiring harness complete with a beautiful junction block is the only way to go. Not only does old wiring look bad but it is a safety hazard. Notice the detail and color of the 4-speed bracket next to the master cylinder. Too many people think this is installed prior to paint. Also notice the purple paint remaining on the wiper motor mounting studs. They are part of the firewall and when the nuts are installed, and it leaves the body color only on the ends. There is a very thin piece of metal that runs over the top of the wiper motor. We have seen this metal strip bent down and almost touching the wiper motor on other restorations. People we respect swear they came like that from the factory. We just think it would be inevitable for someone to put their hand on there to support their weight and that would easily cause it to bend. Ma Mopar rarely did anything that did not have a specific function or be necessary to make the car operational. We are still researching this fine detail. But on the Comeback ‘Cuda we ain’t bending it until we know for sure.
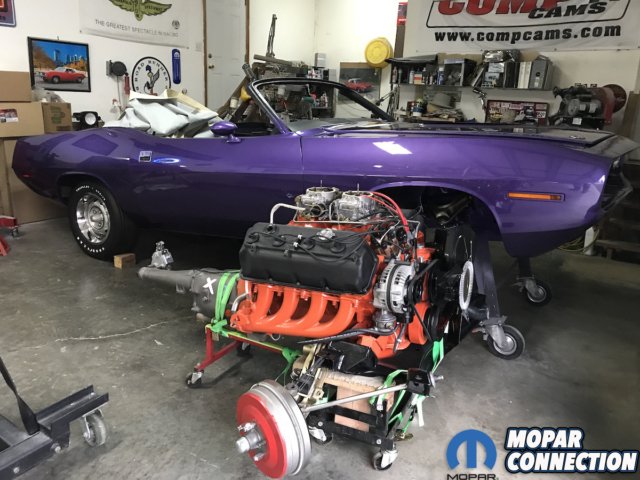
Above: With the entire rear suspension installed it provides a safe pivot point for when we lift the car up from the front far enough to roll the engine, transmission, suspension assembly under the car. The upper control arms are also already installed. We will remove the front support brackets with castors once the car is lifted by the engine hoist. It doesn’t look pretty but it is better to go overboard in securing everything to the roller stands. The last thing you need is to have this heavy assembly to tip or collapse during install. Not only could you damage the paint, but bodily harm could definitely be possible.
If you are fortunate enough to have a shop with a lift, things are much easier. But for most of us, that is not a reality. But do not be discouraged it can safely and effectively be done in a two- car garage. Remember other than shooting the paint in a borrowed booth, the Comeback ‘Cuda has been completely built in a two-car garage.
If you have been following the project you know that we built all of the components separately so that we could combine them all at once to get this car on the ground and running under its own power. By taking the time to make sure that everything is completed and in perfect working order, a whole lotta headaches can be avoided.


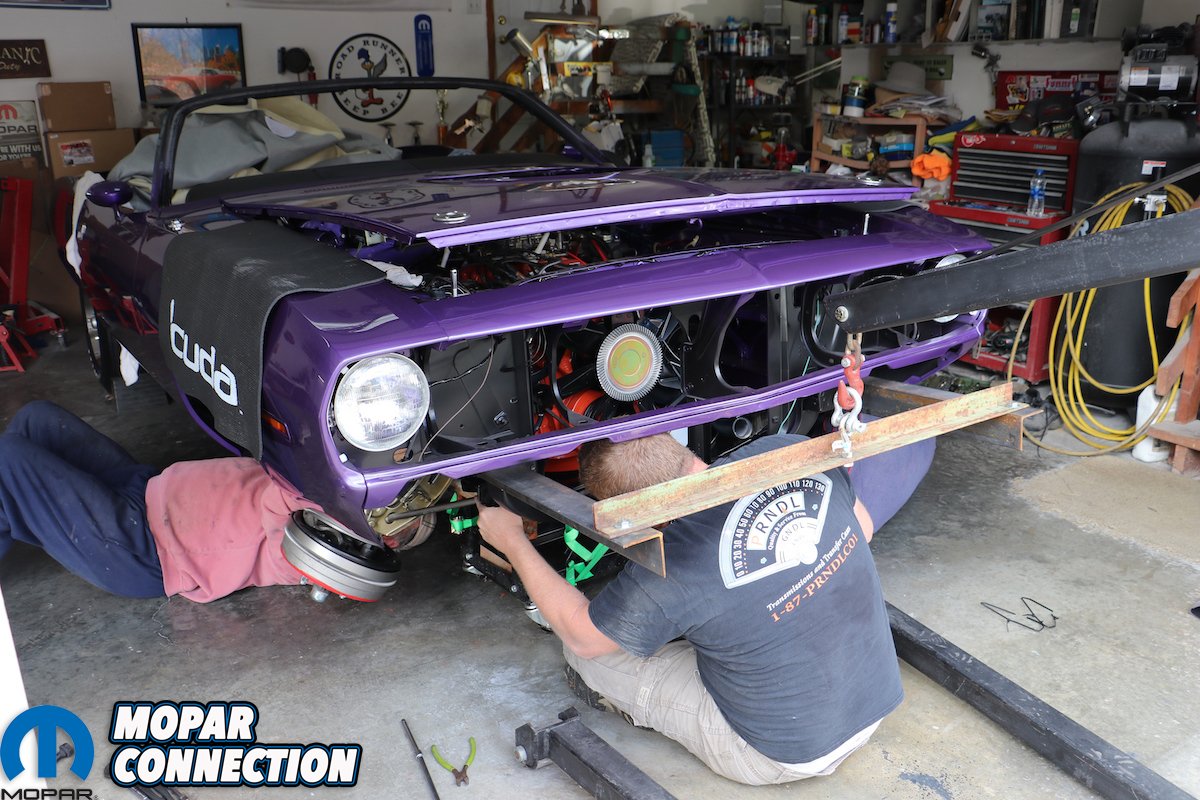
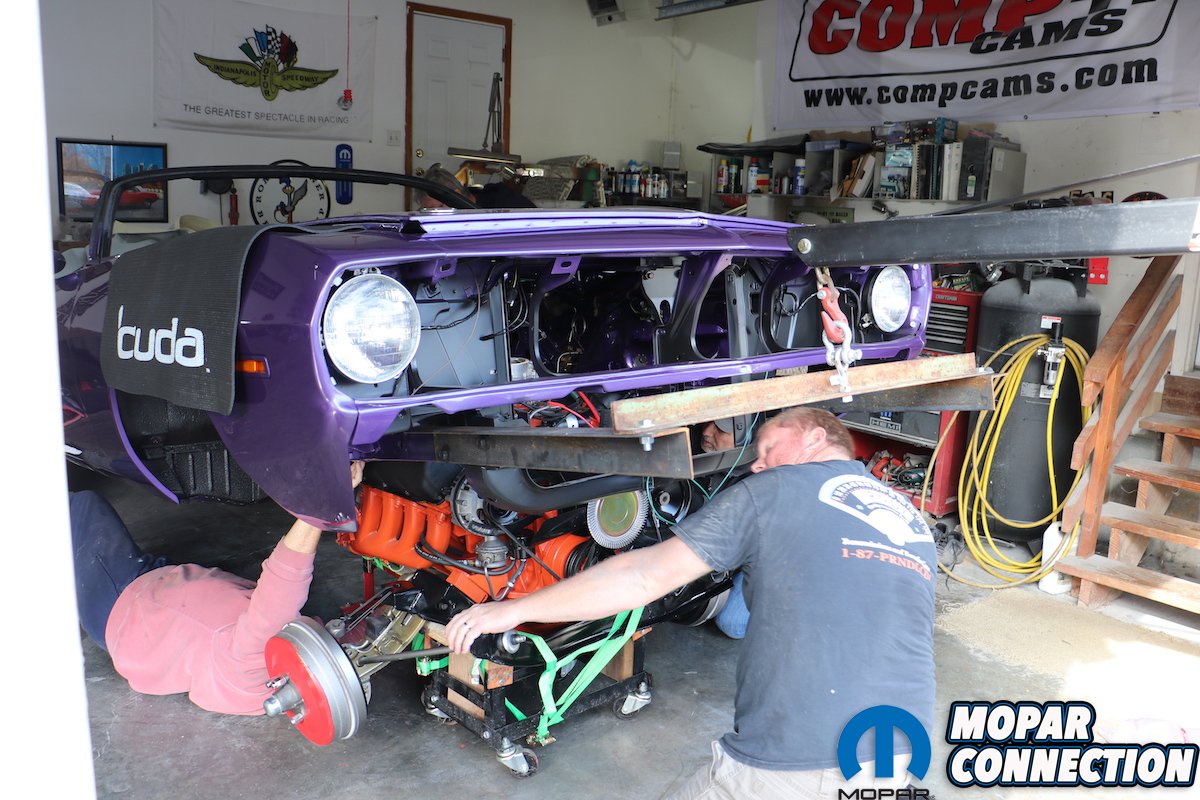
Above left: This is the last time you will be able to “stand” in the engine bay of this car. A final once over to tape areas that could have damage to the paint during install. We attach the lift bracket to the frame using the bolt holes where the front bumpers attach. Then a final run through of each man’s duties during the installation. You really cannot be too careful. At this point everything is perfect, and any damage done during installation will be difficult to fix. Above right: Once the car is lifted, we roll the complete assembly under the car. We have a man on the engine hoist. A man in front of the assembly and a man on each side of the assembly. We also have two men, one on each side up top. You need these guys to make sure everything clears during every inch the body is slowly lowered. We did not have any problem recruiting volunteers. After all who doesn’t want to be a part of a Hemi install in a ‘Cuda convertible.

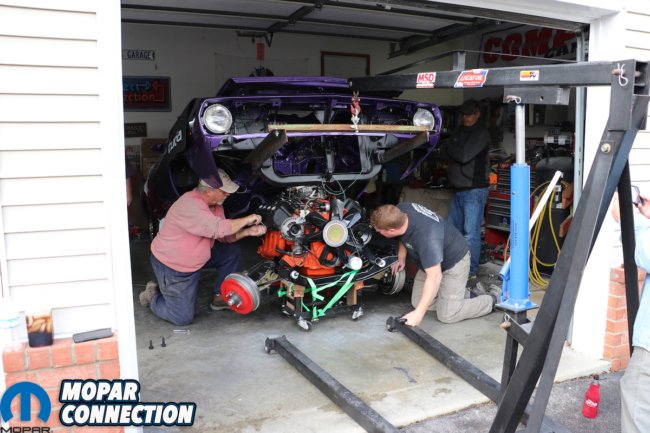
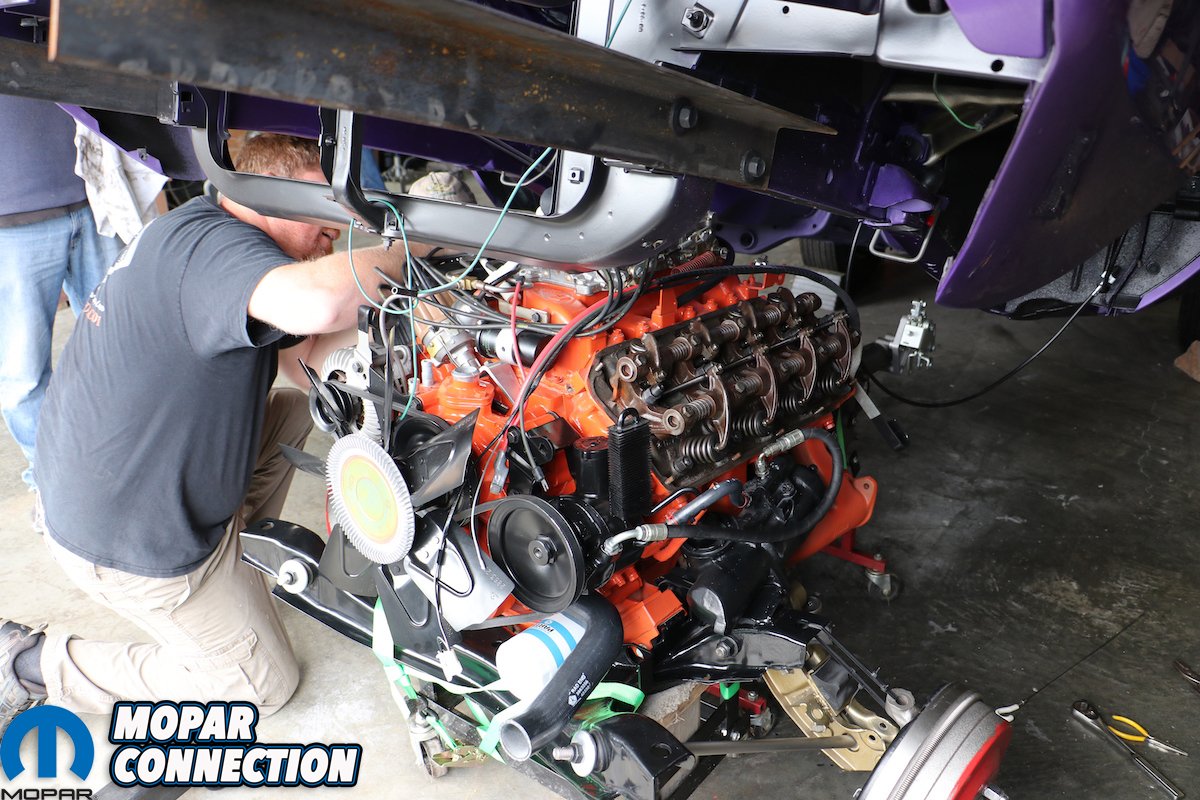
Above left: It was our goal to install the engine completely assembled. After all the factory was able to do it that way so why couldn’t we? But it did not take long to see there was not any way the valve covers were going to clear the shock towers. Remember the little glitches we talked about? Enter number one! Above right: So back up the car had to go so we could remove the spark plug wires, the spark plug tubes, and the huge valve covers that come on this beast. Everyone else took a break, and as you can see the lift operator does what everyone does during this day and age. Pop out your phone!
There are several things that are important and necessary to make the final installation a success. Everything that can be installed before putting the Hemi in from the bottom needs to be installed and tested. A rolling frame that can handle the K-member, engine and transmission must be fabricated and they must be secured. To have this assembly tip over would be a disaster.
The rolling dolly we borrowed from AAR-guru Chet Biggers and built the engine, transmission, and suspension on was too tall for the garage we had to use. So, we used two four leg engine dollies and strapped everything together so it would be safe and easy to roll. We then used steel angle iron to fabricate an extension bolted to the frame rails and long enough to clear the front sheet metal when we hooked the engine hoist to the extended frame.


Above left: Mopar Connection’s Editor-in-Chief, Kevin Shaw jumped right in to help with the disassembly. We will take this opportunity to thank him for all the help and support he has given this project. It would not have happened with him! Above right: Man did we hate to have to take these valve covers off at this time. Everything had been tested and all was sealed. But there was not any way this beast was going in with them still attached. After carefully checking that everything was positioned and would clear, we started the process again.
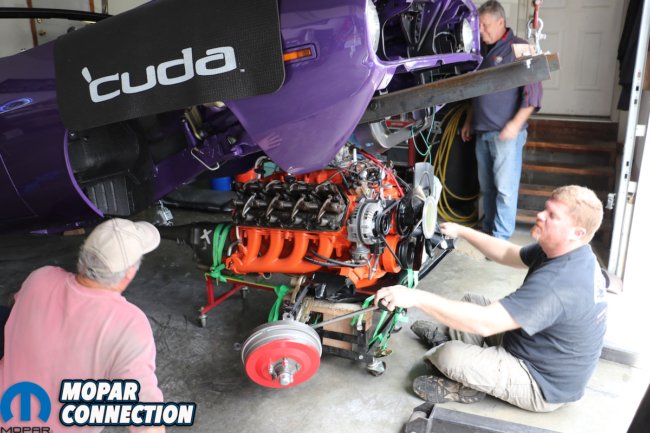

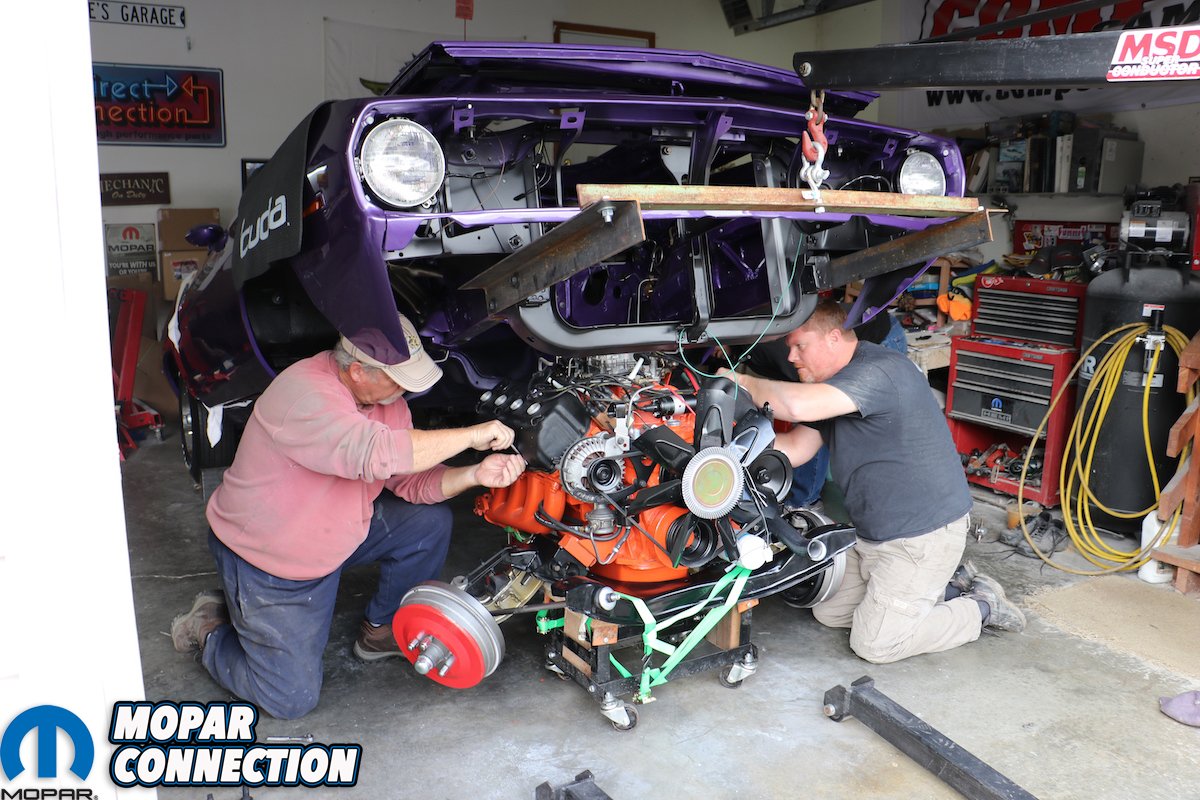
Above left: Everyone finished their refreshments, put away their phones, and returned to their assigned positions. Checking the alignment from side to side and front to back we started to slowly lower the car. It is during times like these you are thankful for a smooth engine hoist and a capable operator with quick reflexes. Above right: Even with the valve covers off it was still a tight fit. But little by little we were able to slide the Hemi past the shock towers and into position. We then put the correct K-member bolts in place, installed the transmission support complete with correct bolts and washers all from Frank Badalson. We attached the upper control arms and just like that it was all secured and in place.
Now the most important part of the install is to have Mopar buds who are used to working on a car where there can be no slip ups or damage to the paint. They must be patient and careful during every step of the install aaand take your time and calculate every move before it happens. Use rags and tape to protect any areas that might get bumped. Oh, and did we say, take your time.
The most time-saving, headache-avoiding thing you can do before installing the engine is to take it to the machine shop dyno and break in the engine, fix any leaks, and tune it so that it is running perfectly. The last thing you need to do is to try to break in the engine inside a perfectly painted car to only have a radiator hose blow spewing hot antifreeze all over the paint. It will stain and it can burn. (A previous occurrence on a black ’71 GTX. Lesson learned!) Buckle up while we take you step by step through about a 6-hour process of getting this beast shoe-horned into a pony car called “The Comeback ‘Cuda!”


Pic 12. We put heavy duty jack stands right under the front torques boxes and under the front of the frame rails where the bumper attaches. The weight of the Hemi can really put a strain on the front frame rails and before we let the car totally down, we wanted the car more than supported. We let the car down and removed the front lift brackets and lifted the hood all the way, and everyone breathed a sigh of relief. There is was, in its final place of honor! Everyone had a huge smile on their faces and high fives and toasts were more than abundant.
Pic 13. With fender covers and towels protecting the perfect in-violet paint we began to re-install the valve covers, spark plug tubes, and plugs and wiring. We use dialectic grease on the spark plug boots where they attach on the plugs. Past experiences prove that this will not be the last time these plugs go in and come back out.

Above left: They call it the “Jewelry Box.” There are many beautiful cars out there with all kinds of mods that make the engine compartment shine. But for us at Mopar Connection Magazine, there will never be anything more beautiful than a completely original, the way it looked on the show room floor back in 1970 Hemi engine compartment. Above right: There is still much more work and many more parts to install, but there is nothing more exciting than having this moment to stand back and say, “We did it.” Thank you to everyone who helped get the Comeback ‘Cuda here and we have many more “How To” articles with step by step pictures coming as we begin the final assembly of this amazing car.
Thanks to our Mopar buddy Eric Douthitt we have a time elapsed video of this entire installation process:


