


Say what you will about the power gains that long tube headers absolutely add, but a set of high-performance exhaust manifolds just look right at home hanging off the side of a big-block Mopar. Tucked up tight to the valve covers, hi-po manifolds grant generous access for maintenance, are generally less prone to leaks, and help produce a stealthy sound that can hide modest “Day Two” modifications.
Although they were way less wild than the swooping Max Wedge manifolds of the early 1960s, 1967-1974 high-performance logs expelled exhaust efficiently enough to support the 335-horsepower 383, the 375-horsepower 440, and even the 390-horsepower 440 Six-Pack during the height of the muscle car heyday.
Undoubtedly, a great many were tossed in the trash early on in favor of something more aggressively-tubular and better-suited for the strip. Such was the case for our unrestored 1970 Dodge Charger R/T. As far as we can tell, headers hit its engine bay sometime around 1980, then were replaced with factory manifolds before the car was sold to the current owner, Roy, in 1987.
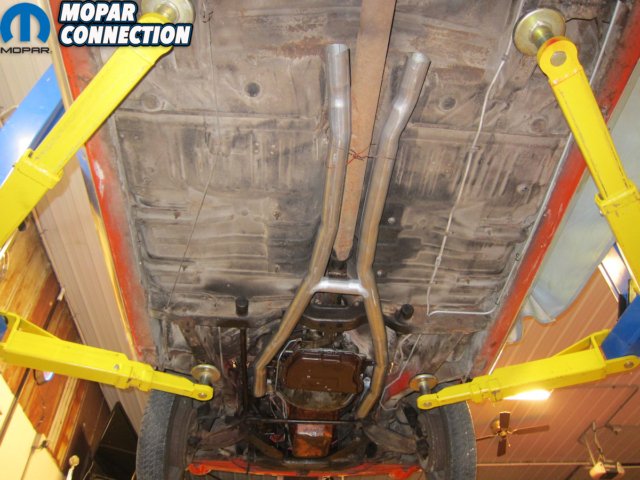
Around that same time, a set of local muffler shop pipes sans crossover were installed and remained on the car for the next thirty-plus years. Unsurprisingly, those cheapo tubes have barely been hanging on for a while, even to the point where a few feet of bailing wire kept residence in the trunk for that inevitable day when a muffler would plummet to the pavement.
Above: The previous pipes were super vintage and not in a good way.
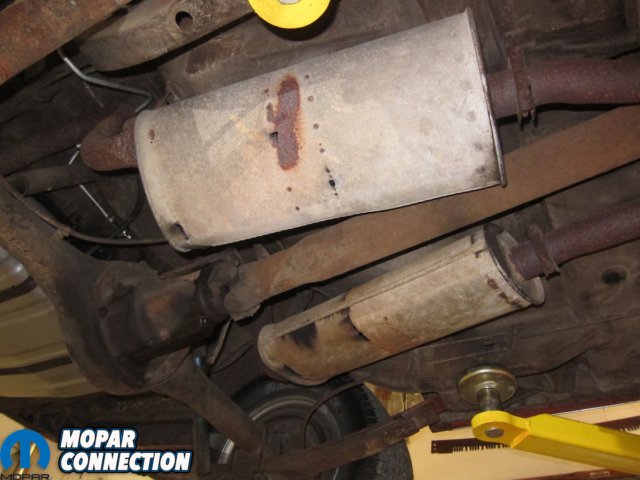

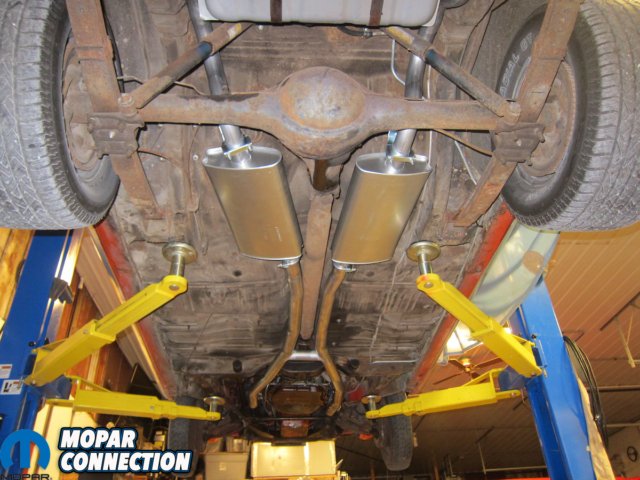
Above: A pair of crispy mufflers were the reason a stack of bailing wire stayed in the trunk for emergency hanger duty.
The only hesitation in replacing such a decrepit system was that most aftermarket setups are made for headers and don’t really replicate a factory sound. While the 440 R/T doesn’t have any trouble lighting up a set of 295/50R15 rear meats, it’s closer to Sunday cruiser than it is street/strip warrior. With a car so deceptively docile, headers and some universal X-pipe just wouldn’t fit the bill.
All it really needed was a factory fit to efficiently expel the big V8’s effluence rearward without rattle or racket. The perfect solution was just a catalog page away as YearOne and Accurate Exhaust recommended their complete exhaust kit for 1970 B-bodies with a 440 engine and turndown tailpipes (P/N AE43B). Complete with a factory-style H-pipe, high-flow mufflers, hangers, gaskets, nuts, bolts, clamps, and tailpipes, the pair have put together what might be the most comprehensive bolt-on system available.
Accurate wouldn’t have it any other way. With a history that dates back to 1975, they’ve been neck-deep in nothing but Chrysler since day one. Their specialty is stock-looking exhaust that is manufactured with modern materials and technology. Unlike the universal kits that require welders, torches, and hammers to fit, Accurate’s packaged system offers a correct appearance that can slip underneath just as easy as it would have when this car left the St. Louis assembly plant in late 1969.
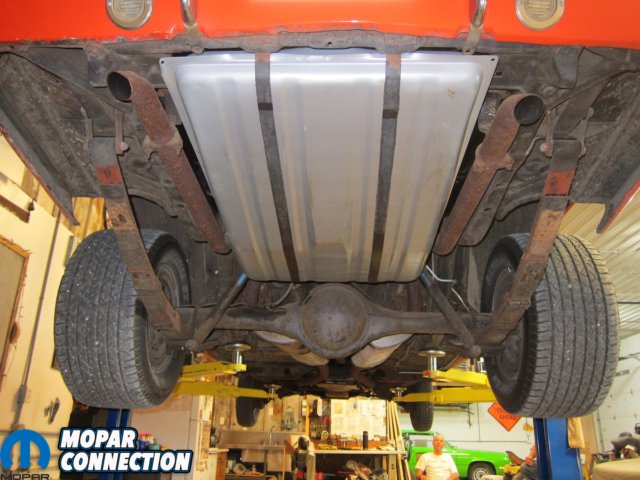
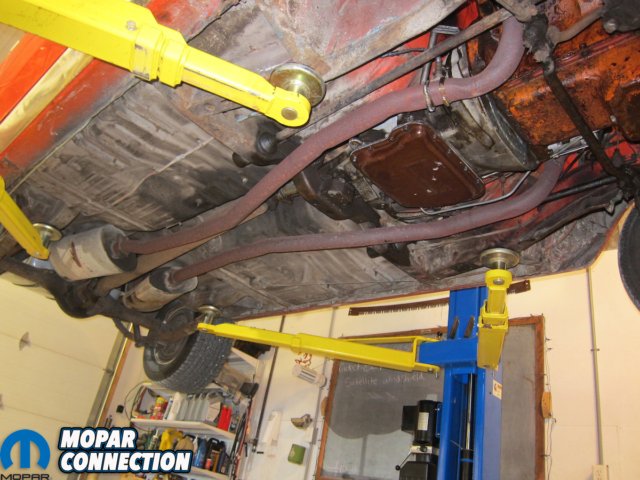
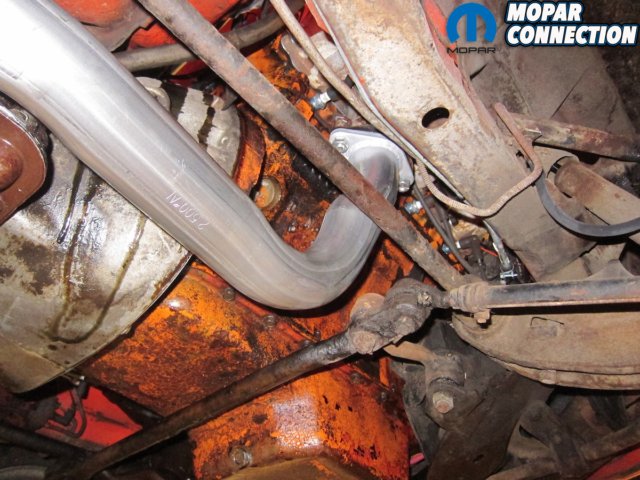
For us, the journey started with removal of the rusty stuff. Up front, a pair of bolts running through each manifold flange joint was loosened to expose the gasket in between. Each side’s pipe was temporarily suspended from its corresponding torsion bar so the rear hardware could be removed. Tailpipe hangers went next, along with their stubborn clamps.
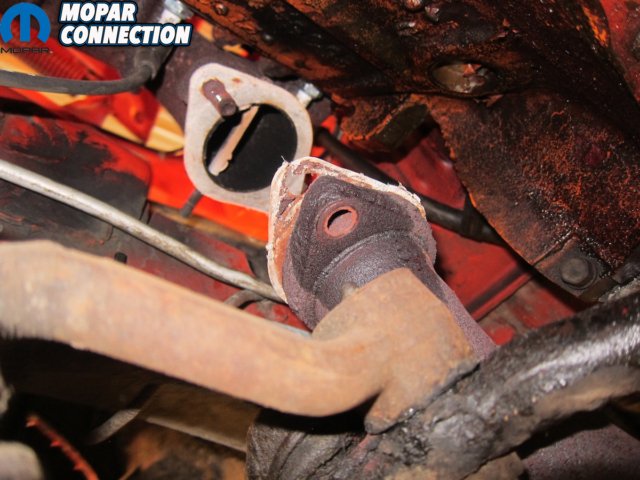

Above: Pulling the non-factory flanges and hangers off didn’t give us much heartburn. Twisted-off clamps were to be expected.


Above: The passenger’s side manifold varies from ’68-’69 (pictured right, painted gray) to ’70-’71 models in that the flange is rotated differently.
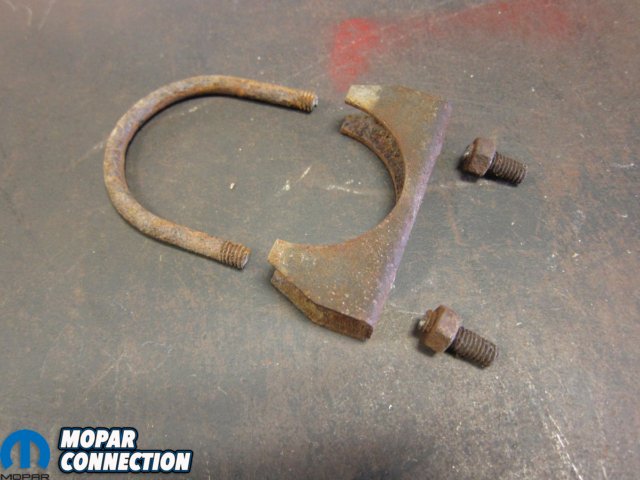
Muffler hangers were next. The one on the passenger’s side looked to be worn but original with a double-loop anti-vibration section. On the driver’s side, however, was a generic single-strap that almost certainly didn’t belong. Regardless, neither mattered much as fresh, correct pieces came as part of the comprehensive kit.
After snaking the old stuff down and out, a post-mortem revealed that we were about fifteen years past due in replacing the rotted conduit that which so inefficiently directed fumes outward. Both mufflers featured additional performance flow ports (a.k.a. holes that had rusted through) and the pipe itself was thinner than a napkin at the down-home diner.
Before tossing the new tubes on, we double-checked each manifold’s casting number since Accurate is careful to note that the correct manifolds must be used for correct fitment of their H-pipe. For the uninitiated, YearOne’s latest catalog has a nice reference chart that shows the differences between ’68-’69 and ’70-‘71 pieces. The short version is that, in 1970, the heat riser shaft on the passenger’s side rotated approximately 90 degrees. Therefore, the two flange bolts are clocked differently and the H-pipe flange must be clocked to match.
Our driver’s side (2951865) and passenger’s side (2899879) mani’s both made the grade, which was great because ‘70 manifolds are not being recast at this time. Reproductions are available for ’68-’69 big block B-bodies (P/N HP689S), hi-po 340 cars (P/N AE340), and ’66-’70 Hemis (P/N A0551), but the aftermarket has yet to help out with the ’70-’71 big-block versions that graced every 383, 440, and 440 Six Pack of that era.
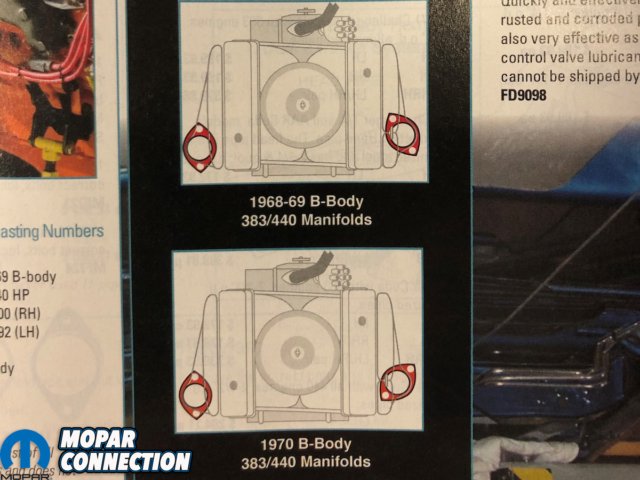

Above left: YearOne’s latest catalog paints the picture pretty clearly. Above right: A 2899879 casting number was correct for us, even though the date code (821) would have been too new for this car.


Above: Manifold flanges were cleaned by hand before new bolts were installed.
Detective work out of the way, it was time for the dirty stuff. Each manifold flange needed freed of its remaining gasket material via flap wheel, scraper, and sandpaper before new bolts, complete with anti-spin washers, could be installed. There are few things more annoying than the tick-tick-tick-tick of an exhaust leak, so this preparatory stage was well-worth the effort to ensure a solid mating surface.
YearOne’s packing list also included a set of flange gaskets with the right bolt spacing and thru-hole size since the ones from the local chain store are often too small for high-performance manifolds. As an additional measure of leak-proofing, these gaskets are made of a reusable composite metal material designed for severe temperatures. The rest of the hardware is spec’d similarly for longevity with a zinc coating to fend off corrosion.
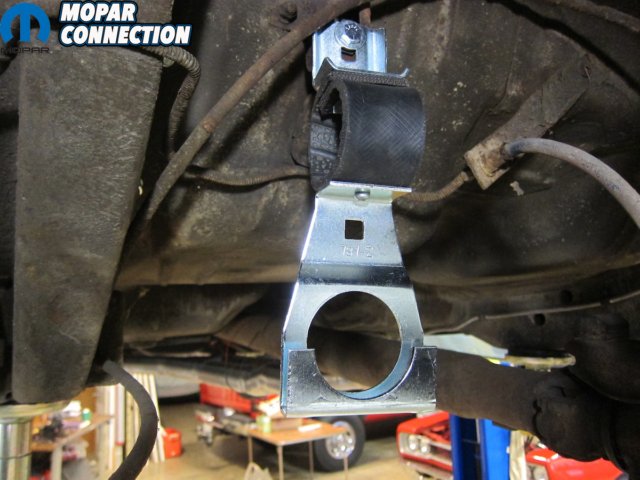
Kicking off the installation were main support and tailpipe hangers, which hung in their respective stock locations without issue. A single bolt and captured spring nut at each attachment point made for quick, one-handed wrenching and, realistically, the project was already halfway done.
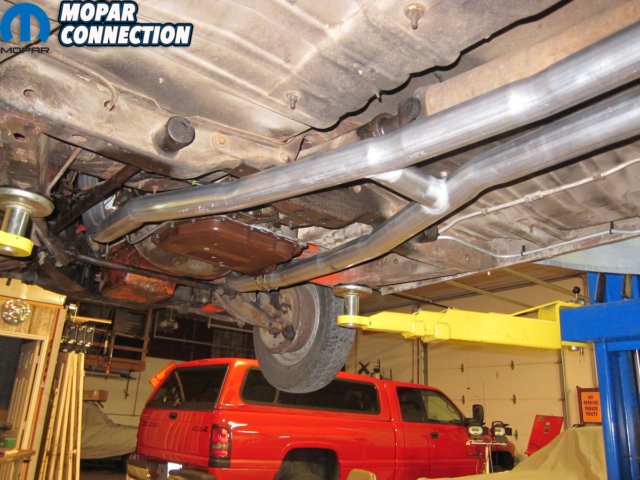
Putting up the pipes was the final step. Owner/operator Roy was a one-man H-pipe-holding machine with the help of some strategically-placed bailing wire around the driveshaft. It was no small feat, either, as the Accurate assembly felt straight-up beefy; a welded crossover and aluminized 2.5” tubing with a 14-gauge thickness made for a solid heft that reassured us of its built-to-last construction.

Above: Accurate’s gasket (metal, pictured lower) had the correct hole size and bolt pattern whereas the parts store piece (paper, pictured upper) was completely wrong.

Above: A comprehensive kit should come complete with hardware and YearOne’s packing list did not disappoint. Everything installed effortlessly.
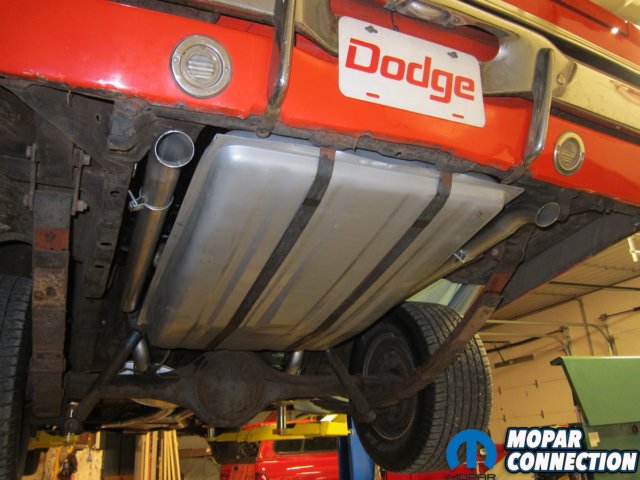
Tailpipes, preassembled with mufflers on front, went in to place without a hitch. With a factory-matched size of 2.25”, there was plenty of clearance around the shocks, frame rails, and gas tank. The mufflers themselves made up the step down in diameter with 2.5” inlets for the H-pipe and 2.25” outlets for the tailpipes.
Featuring a 20” case length and proper crushed corners, the big oval cans promised a Hemi-esque output, liberal ground clearance, and an unassuming appearance. What a relief to forego foraging through the forums, soliciting the latest opinions on sound suppression size, shape, and fitment. Accurate and YearOne saved quite the headache by supplying mufflers made for this exact application.
As the instructions recommended, final torquing of all fasteners began at the very back. Turndown stick-out and height is critical without tips, so a number of trips up and down on the lift were essential to get the pair looking just right. The goal was to get the exhaust out away from the rear valance without having the tubing itself being blatantly obvious. Matching the angle of the surrounding sheet metal provided a positioning gauge before snugging them down.
The main support hangers featured an integrated clamp just like factory, so both mufflers were tilted and adjusted appropriately before putting the torque to them. Moving forward, a set of self-explanatory clamps connected the back half to the H-pipe. Lastly, four flange bolts up front were treated to 50 ft.-lbs. per the service manual.

Above: Some of that bailing wire from the trunk helped support the H-pipe assembly while flange bolts were snugged.


Above: Mufflers were pre-installed on the tailpipes before they were fitted into place.
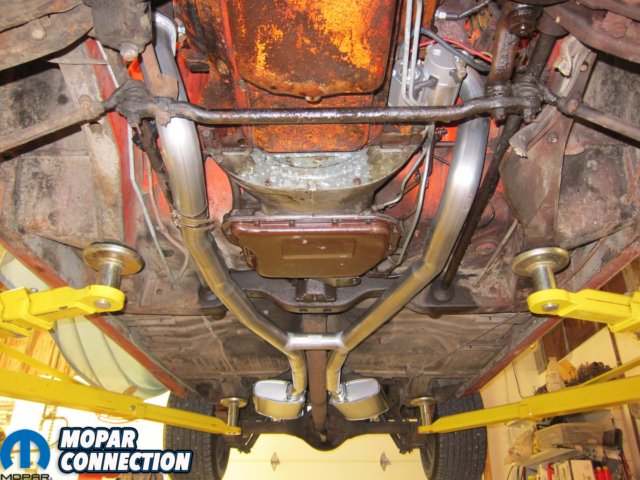
A final audit of fit and finish was nothing short of staggering. Each of Accurate’s bends was palpably purposeful as the pipes flowed smoothly down from the manifolds, beside the torsion bars, through the crossmember, over the axle, and alongside the gas tank.
Clearance in the tightest of spots, namely the torsion bar area, was plentiful with at least a finger’s worth of air space between tube and the nearest obstacle. With this exhaust fully installed, the starter could easily be serviced, transmission lines could be removed, steering linkage was clear throughout its range of motion, and the driveshaft was given room to roam freely.
Even more astounding was that all of that clearance was accomplished while keeping everything tucked up tight to the floor pan. Along the entire length of the car, nothing was lower than the rear axle. On a car with a couple extra leaf springs and taller-than-stock tires, drooping mufflers can be quite the eyesore for any unlucky followers. This was not the case with such a precision and professional fit.
After our few moments of gawking in awe, a sound check was only sensible to seal the deal. Just like anything else, the YearOne-sourced system required some level of break-in before taking it full-tilt. The manufacturing and bending processes left a bit of residual oil both inside and out, so some burn-off was necessary and expected. First startup occurred in a well-ventilated area to allow the fog to billow from underneath, but it didn’t take long.
Above: The end result was totally tubular. We weren’t even the slightest bit exhausted after the couple hours of work (puns intended).

Above: Clearances were ample in front and back.
Once the smoke cleared, a quick re-check of all hardware ensured that a heat cycle didn’t affect previously-tightened torque values. The next turn of the key would be the final sound assessment as the 440 was throttled from 800 rpm to redline at various rates to judge bark rather than bite.
At idle, the big orange B-body churned with the slightest rumble from behind, but barely a whisper up front. A smooth purr poured out beneath the back bumper, muscular yet mundane all at once. At speed, the cockpit was perfectly pleasant; without drone, regular conversation could be had while still being reminded of the beast beneath the hood.
A firm stomp on the skinny pedal trumpeted the Magnum’s mettle with a throaty roar both inside and out. With passengers pinned to their seats, the mufflers seemed to succumb to every cubic inch’s call as an orchestra of combustion reverberated throughout. Wound down to city speed, subtle changes in throttle position were able to coerce both gentle and giant at driver’s request.
For us, it was the perfect exhaust: calm when cruising yet downright disruptive under duress. Sneaking out of church on a Sunday morning won’t be a problem, but don’t expect us to lay off the go sauce when that city limit sign comes into view.

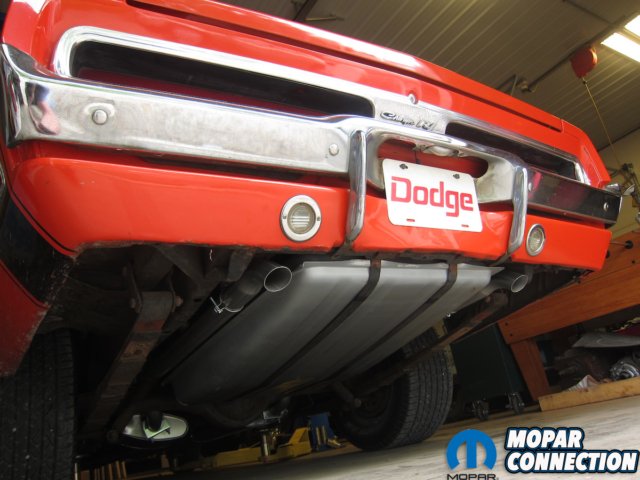
Above: Chrome tips are cool, but we’re the turndown type. There’s just something about the humble rumble that comes from beneath.


