


B-bodies have several common rust issues, and the front floor pans are near the top of the list. The driver side is usually the worst, but both front pans are highly susceptible to the ravages of rust. Once you have it, the only option is to cut it out, otherwise the cancer will spread.
This 1969 Road Runner was purchased as a mild restoration, but upon further inspection, the floors had merely been covered up in an attempt to mask the rust issues. Most of the holes could have been patched with piece-meal sections, but this method often takes more effort and the results are not as good as replacing the entire floor pan. There are a few caveats that one must consider before jumping feet first into a project of this magnitude. The key components to this task are materials, available tools, and most importantly your skills.

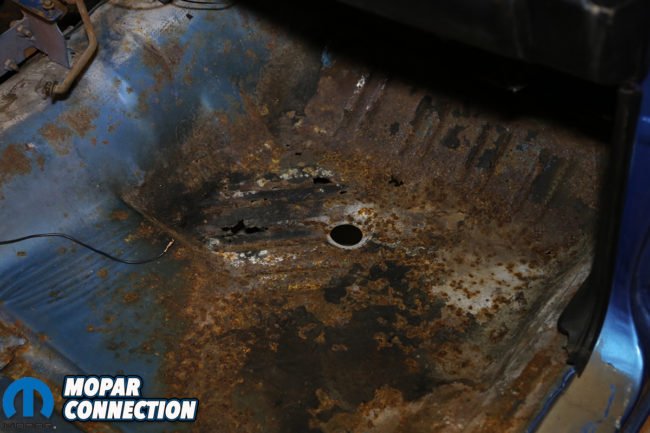
Above: Upon first glance, the floor pans are not horrible, just a few small holes. A closer look reveals much more. The surface rust has gone on much too long, this metal is paper thin. It is actually surprising that it actually supported a person in the seats.
The materials you are welding to should closely match the materials you are installing, mismatched gauges of sheet metal leads to burn through and cold welds. Welding 14-gauge steel to 20 gauge steel will likely end with lots of burn through on the 20 gauge, as is it much thinner than the 14-gauge. This means that you need to purchase a quality reproduction panel, as it should be made of similar material as the factory floor.
Another potential headache with floor pans is that they are available in many forms, from small sections to entire floors. Buying a single sheet floor is nice, but actually fitting it into the car is really tough, especially for post or 4-door B-bodies. Buy the sections you need. Measure the area that is damaged and replace only what it necessary. Make sure you check the models that the pans are made for, as sometimes there are variances that require modification in order to fit the panel.
Above: The passenger side pan was peppered with dime and quarter sized holes. The metal is so thin here; we were able to poke holes in it with a screwdriver to the edge of the transmission tunnel.
To properly install a set of floor pans you will need the following tools:
Mig Welder: You really don’t want to do this type of work with a stick welder, a MIG torch will be much easier and the results will be significantly better. Flux-core wire will work, but a solid wire with separate shielding gas is the best option for sheet metal welding. For the wire, .030” is OK, but .025” is optimum for thin gauge sheet metal.
Cut-off wheel and die-grinder: Either air or electric, you need a way to cleanly cut the rusty metal out of the car. A thin cut-off wheel works best. Air-powered die grinders are more maneuverable, but electric 90-degree grinders with a thin cut-off wheel slices through rusty steel like butter.
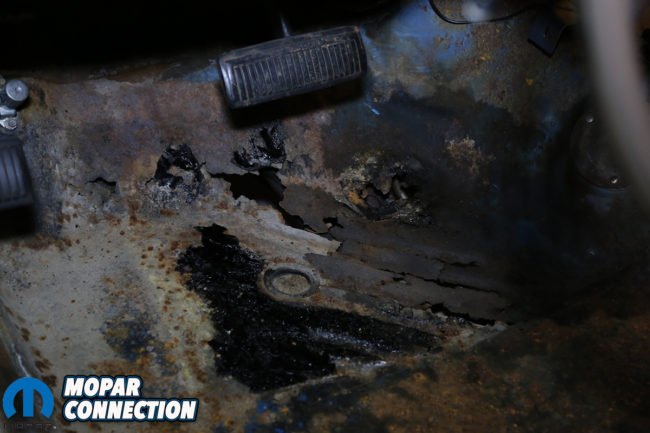
Above: The driver side pan had the worst of it. You can see the glue on the floor which held down the roofing tin that the previous builder used to cover it up. The underneath was soaked in undercoating to hide the rust.
90-degree grinder with flap wheel: This is for cleaning up the welds after the install is done. A flap-wheel removes the excess weld without the rough edges of a standard grinding wheel.
Sheet metal hole punch and 3/8” drill bit: Floor pans are spot welded in many places, including floor braces, brackets and along the rocker panel. You will need a drill bit or spot-weld cutter to remove these welds and a hole punch or drill bit to drill matching holes in the new floor pans. You can’t eliminate these spot welds, they are critical for the structural integrity of the uni-body vehicle.

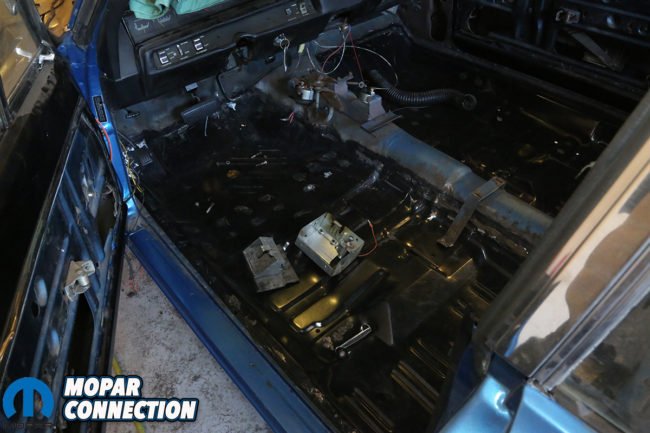
Above: Behind the front seat mounts, there were a few other bad spots. We made the decision to replace both halves of the front floor pans with new reproduction steel.
If there is one saving grace for the novice welder and floor pans it is that the floor pans are always hidden from view. If you are not an experienced welder, that is OK, the best place to learn is by welding in a floor pan. The biggest problem here is that B-body Mopars are a uni-body chassis, so the floor is structural to rest of the vehicle. You need to take care with this project and start small; don’t cut the entire floor out first.
When it comes to proper fitment, don’t just hack the car apart without careful measuring and fitting. The last part you cut is the car itself. Always fit the replacement panels to the vehicle before you cut out the old rusty stuff. If there is an area of rust the extends beyond the patch panel, now is the time to figure it out.

Above: We worked one side at a time; this keeps the rigidity of the chassis secure during the repair process. You can see the various subframe and support structures that are critical to keeping the B-body together. Note the seat belt location; this is not marked on the new panels, take lots of measurements before you cut.
You don’t want to chop the whole floor out of the car without supporting the weight and dimensional areas (door openings, etc) first. For post cars, there is less to be worried about, but convertibles and hardtops can move around more when the floor is out. The best bet is to support the vehicle at several points, taking the weight off the suspension. This spreads the weight around, and areas such as the front subframe, which hold the torsion bars, don’t move when they are not supported by the floor.
The biggest mistake most builders make when welding sheet metal is to try to weld too much too fast. Stitch welding is the process of welding short (about an inch at a time) beads all around the panel, slowly connecting each stitch together to form a solid weld bead. Spread the stitches 6-8 inches apart. You can use an air gun to blow cool air over the fresh welds to help cool them as well. Don’t forget the spot welds, these are crucial welds. Try to reproduce the welds in both location and number.
Above: The finished repairs look like factory and these new panels are EDP (electro-deposit paint) coated to resist rust.
Fresh welds are immediately susceptible to rust. Paint the edges and hidden areas that will be welded with a high-zinc weld-thru primer. This primer reacts when heated by the weld and the zinc settles onto the cooling steel, providing a protective layer against rust. The last thing you want is for the rust to come back 5 years down the road. Welding floor pans is a large task, but it is a great way to become familiar with sheet metal repairs. Take your time, be patient and you will be rewarded with excellent results.


