


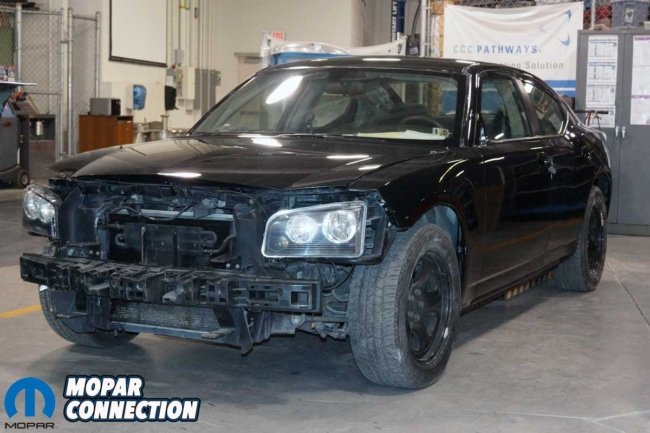
The restoration of our 2006 former police Dodge Charger has progressed well. It is in the final stages of painting and quickly moving towards the start of reassembly. The Charger was selected as a project because I wanted a late-model electronic fuel-injected Hemi to assess and evaluate. I own a few Dodge products, but all have old-school engines and transmissions, and all are carbureted. To catch up on the progress thus far, check out the previous installments about the Charger.
Retired Cruiser Returned to Action – Part I
Beginning Collision Repair on a 2006 Dodge Charger Pursuit – Part II
The Body Work on this ’06 Dodge Charger Police Pursuit Continues – Part III


Above: The Charger is finally back in color. After laying down several layers of Brilliant Black, the Penn College students finished the paintwork with multiple clear coats. With excellent prep work, the students had great results, and the paint looked fantastic.
Picking up where we finished last month, the Penn College students had overcome several challenges while welding a new quarter panel onto the Charger Pursuit. The challenges included rust and previous accident damage; both were successfully repaired. The Charger was painted in primer, and several smaller components were finished in the factory Brilliant Black paint.
The students’ proficiency grew with each task, a testament to their dedication and hard work. As the smaller components were being painted, the chassis underwent a final scuff, was meticulously taped, and then moved to one of the paint booths. Here, the students highlighted their growing mastery by expertly applying the waterborne Cromax Pro basecoat, demonstrating their ability to work precisely and without errors.


Above: Hunter Jenkins air-dried the waterborne paint (basecoat) applied to the doors. Spraying waterborne paint requires a different technique than spraying solvent-based paint.

Above: Out of the paint booth and back into the lab, the students started the wet sanding and polishing the Charger’s recently applied paint. The process resulted in a smooth, flat paint surface.
The paintwork indicated each student’s skill and mindfulness, with the pearl and flake evenly distributed in the basecoat. Each body part was given the necessary drying time and tested with the sun gun to ensure the base coat covered the primer sealer properly. The sun gun’s evaluation confirmed the students’ proficiency, as each painted body part passed without requiring a respray.
Satisfied with the basecoat, the students mixed up the solvent-based clearcoat. After ensuring the basecoat was debris-free, several layers of clearcoat were applied to the Charger’s body panels. The clear coat was then baked in the paint booth, ensuring it was appropriately cured.
The chassis was moved out of the paint booth and back into the sanding and assembly area of the lab. The clear coat had some orange peel, a common imperfection in paint jobs, which was expected but had to be addressed.

Above: Hunter applied paint to the door handles. He followed up with clear and then installed the handles and reattached their linkage to their corresponding door.
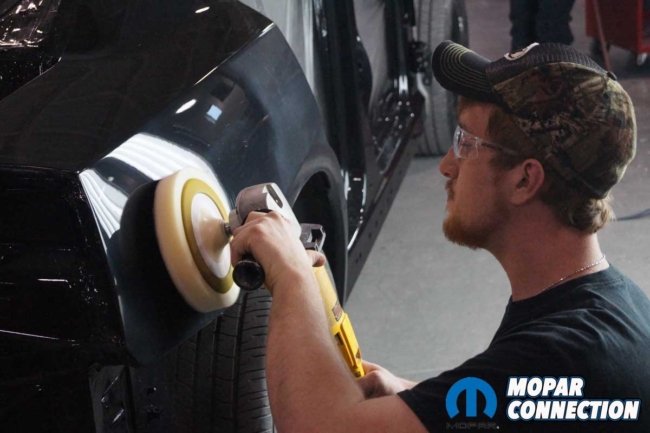

Above Left: After wet sanding the quarter panel, Zach Graybill buffed it with multiple types of buffing compound to give the black paint exceptional depth. Above Right: Nathan Deitrich performed similar sanding and buffing on the bumper cover.
The chassis panels were sanded with a DA sander to remove any orange peel and flatten the body panels to a laser-straight finish. The sanding started with 1500 grit sandpaper and progressively moved through the finer grits until the finish sanding was performed with 5000 grit sandpaper. This multi-step sanding process is crucial for achieving a smooth, even paint surface.
From the quarter panels to the roof, the students meticulously approached the sanding. They first taped off critical areas to protect the edges of the panels, the glass, and the new paint, displaying their meticulous attention to detail.
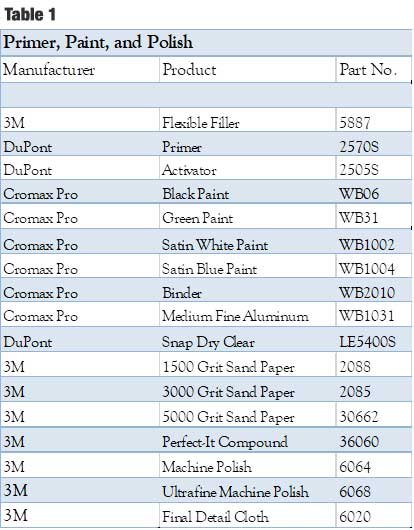
After the sanding, the students began polishing with various compounds and a high-speed polisher set between 1200 and 2000 rpm. The compounds selected were several 3M, which brought out a brilliant shine. Table 1 lists the paint and polish products used on the Charger.


Above Left: The headlamp covers looked terrible after seeing how nice the new paint was. Above Right: The students sanded, buffed, and cleared each headlamp cover lens. The process was not perfect, but it was an exceptional improvement.
During the continued polishing of the Charger’s panels, the doors were hung, aligned, and tested for operation. Each door was treated using the same sanding and polishing procedure the chassis received. The front fenders, deck lid, and bumper covers were sanded and polished before installation on the Charger’s chassis. The hood was fitted and then sanded and polished.
With the front bumper cover in place, we noticed that the headlamps looked weathered and dirty next to the freshly painted cover. So, the bumper cover was removed, and each headlamp was wet sanded, polished, and clear coated before reinstallation.


Above Left: The polishing was finished, and the final assembly was progressing. Above Right: During the reinstallation of the front bumper cover, the passenger side fender was scratched. The fender’s damage could not be buffed out, so it required a repaint.
As the front bumper cover was being reinstalled, the cover, or a tool, scratched the passenger front fender, necessitating the removal of the fender for repair. The process of sanding, prepping, priming, painting, clear coating, sanding, and polishing needed to be repeated.
The deck lid was installed, evaluated for proper fitment, and then sanded and polished. The previously polished rear bumper cover was installed, and the deck lid and bumper cover fit were adjusted. Just like the headlamps, the tail lamps looked dingy and dull next to the new paint, so the same sanding, polishing, and clear coat process was applied to them.
The installation of the tail lamps finished the assembly of all the significant parts of the car’s rear; once the rest of the Charger was assembled, the panels were ready for final polishing, ensuring a thorough and complete repair.


Above Left: The damaged fender was sanded and prepped for a repaint. Above Right: The fender came out of the paint booth looking like it had before the damage. The repaint pushed back our timeline by a little over a week.
At this point, most of the panels were installed on the Charger, except for the passenger front fender, which was being repainted. Also, a new windshield and the factory rear glass were glued into the window channels. With the glass in place, the remainder of the trim was installed.
The passenger-side fender was installed to finish the body reassembly. With both front fenders loosely installed, the front bumper cover slid into place. The body gaps were checked at the hood, fenders, and bumper cover, and adjustments were made where necessary to achieve the desired results. With the gap measurements established, the hood, fenders, and bumper cover were adequately secured, and the gaps were rechecked.
The gaps were even on each side of the hood at the fenders. Also, the gap between the bumper cover and the hood was acceptable for a production vehicle, but it was not even throughout the entire span. The spacing at the front corners of the hood was tighter than at the center of the hood. If this had been a show car, the time spent on the gaps would have been more extensive, and additional steps may have been attempted to ensure a perfectly even gap throughout the entire span. All the measurements were within specs, and nobody would notice the slight variance in the gap.


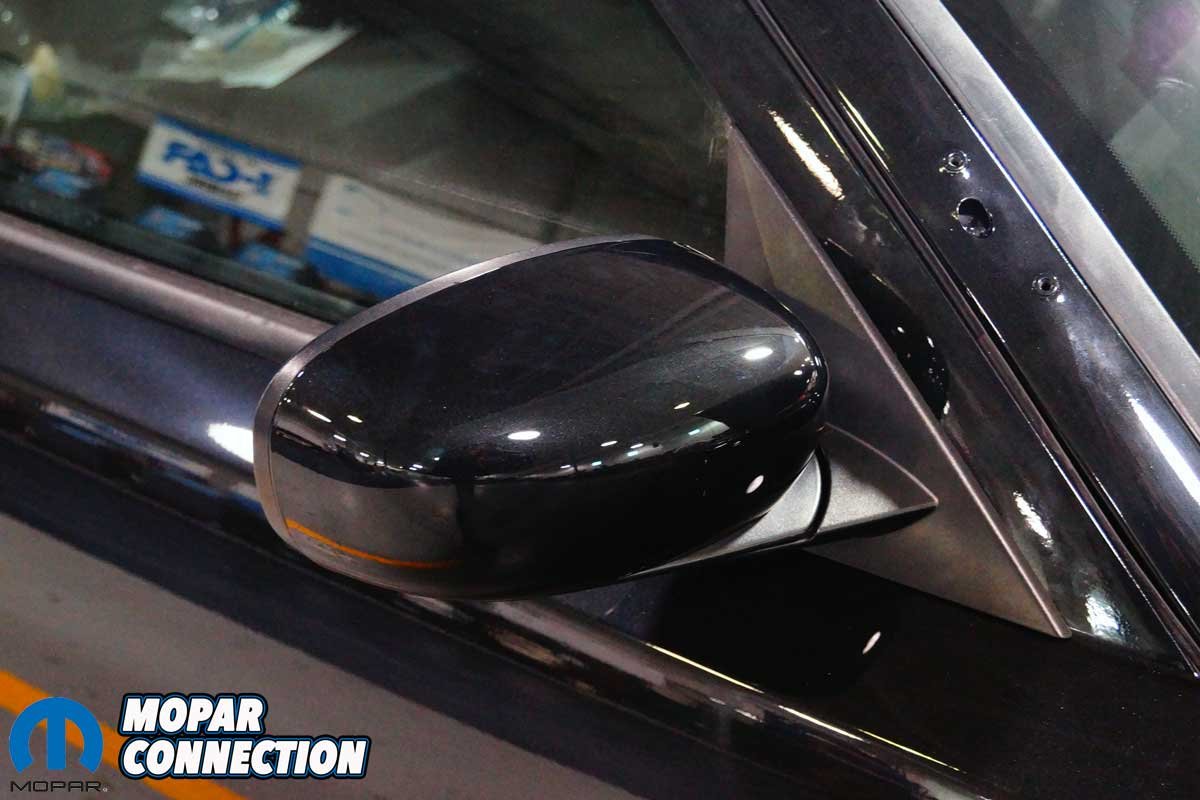
Above Left: The Charger was assembled entirely, except for the front bumper cover and the passenger side fender. The Charger’s paint looked great. Above Middle: The passenger side fender was installed, and its color matched the other body panels. The bumper cover popped into place without error on this attempt. Above Right: I found a pair of fold-away mirrors to replace the original non-foldable mirrors. Both A-pillars had holes for a spotlight. The plan was to use the spots, so the students did not fill in the holes.
I was displeased with the factory exterior mirrors and how the flashing red and blue lights were attached. A pair of foldable rear-view mirrors were sourced, cleaned, primed, and painted in a Brilliant Black hue. The freshly painted exterior door handles and new gaskets were installed on their respective doors.
The rear interior door handles did not operate when the Charger was purchased. Part of the prep work required to make the Charger into a police car was disconnecting the actuator rod in each rear door, rendering the door handles inoperative.


Above: The students reinstalled the push bar on the Charger. After a final buffing, the Charger was washed to remove any traces of the polishing compounds.
The rods were reattached, and the full function of the interior rear door handles was reestablished. With the exterior door handles installed and the actuator rods connected, the students no longer needed access to the inside of the door, so the door panels were reinstalled. However, the door water shields were not available at the time of assembly. The plan was to remove, clean, dye, and reinstall the panels with the water shields later.
During the final cleanup, a minor defect in the clear coat was noticed on the roof at the passenger side b-pillar area. The students had to tape off and reshoot the entire roof to fix the defect. The roof then had to be reworked through sanding and buffing. I had been expecting the Charger to be out of the body shop so I could continue the reassembly, but the repainting set the timetable back about a week to ten days.


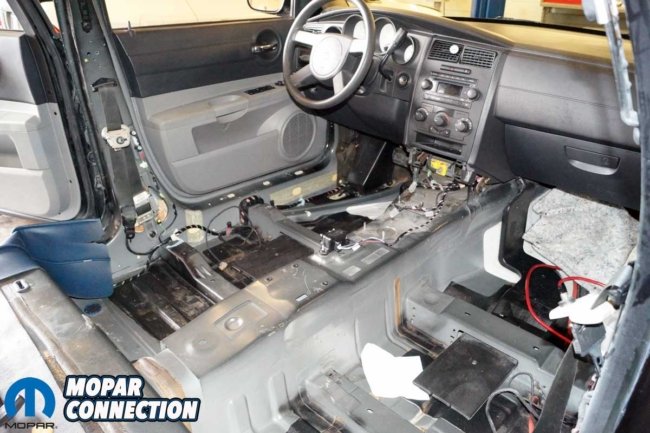
Above Left: While the Charger was in the body shop, the students used the interior as a storage area. The modified police console can be seen. That will be changed later in the restoration. The rear seat was removed and thrown away. The cloth material was stained and dirty. It was disgusting. Above Middle: The rubber carpet looked cheap and was damaged in several locations, including the driveshaft tunnel. Above Right: The three rubber carpet modules were removed and thrown away. The car was dirty, but a good vacuuming removed any traces of debris.
After the repairs, the Charger was returned to my garage, and the time had come to get busy with the reassembly. When the Charger was in the body shop, I had been busy acquiring interior pieces to make the interior look less police-like and more like a nice SXT or RT Charger. The first thing to address was the rubber flooring, which I did not like. I found all three-carpet modules from a totaled low-mileage 2007 Chrysler 300. Because I was unsure what might be lurking under each carpet module, I removed the mats by lifting them at the edges.


Above: A used, and inexpensive three-piece carpet was located. The carpet modules came from a low-mileage vehicle and were in great shape. The modules were vacuumed and then installed into the Charger. Removing the rubber carpet and installing real carpet increased the interior’s beauty. A factory-style center console will cover the opening in the front carpet module.
I found a few dozen Tootsie Rolls, a bunch of Dunkin Donuts napkins, and $0.56. After quickly vacuuming the floor, I was ready to install the black carpet modules. I started with the rear module, then the passenger and driver front modules. The carpet fit perfectly and looked great. The simple removal of the rubber mat and installing the black carpet made the interior look more refined and less police-like.
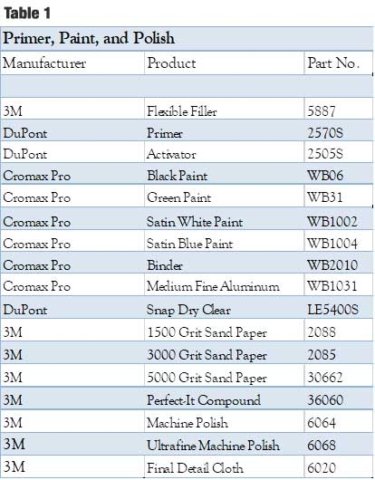
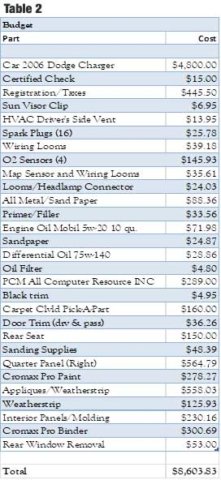
Above Left: Table 1 lists the various paints, sandpaper, and compounds used on the Charger. Above Right: Table 2 shows the amount of money spent thus far.
Although I had hoped to get further along with the project, the Charger is back in black after just a few months, and the reassembly process has started. Thus far I have spent just over $8600 (Table 2) of my self-imposed $12,000 budget. Next month, I will tackle the console, seats, seat belts, and additional interior details to reduce the Charger’s police-like appearance and make it more suitable for civilian use.


