


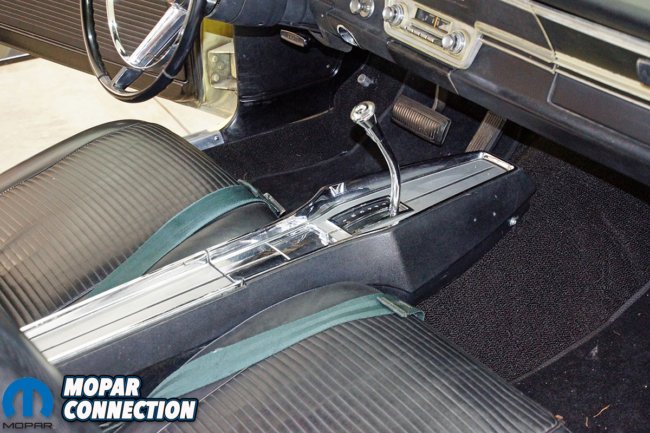
Our 1967 Dart came equipped with a center console unlike the majority that were equipped with the gear selector on the column. Time has not treated our Dart’s console well. It had become the mounting point for several unknown components and now is in less than perfect shape. Being budget minded, our task was to restore the console to a satisfactory appearance with quality reproduction parts from Classic Industries and not break the bank with the use of new-old stock (NOS) parts.
While the components are long removed, there were four holes in the plastic frame of the console housing, and there were three holes in the metal console cover in the area where someone may have mounted a tachometer. The carpet that had been glued onto the console frame was gone, and the chrome of the shifter knob button was worn through in several locations.
To start we removed the console from the interior of the Dart and was done so with a few hand tools. The shifter was moved to the neutral position on the selector. Two screws (one on each side) at the front of the plastic frame of the console were removed, and the console “glove” box lid was opened to gain access to two additional screws. With the screws removed, the console was tilted forward slightly toward the dashboard so access under the console frame could be achieved.
The nut on the wire attached to the cigarette lighter was loosened and removed, and the wire was detached from the lighter’s stud. The console selector light bulb socket was twisted and pulled from the bezel. With the cigarette lighter and the light bulb disconnected, the shifter knob jamb screw was loosened. The knob, spring, and button were unthreaded from the shifter handle. The console was lifted up, slipped over the knob-less shifter handle, and it was wiggled around the passenger seat and out of the Dart.
With the console out of the Dart, the entire assembly was taken apart. It appeared that a previous owner had worked on the console in the past. There were incorrect nylon nuts used in place of the factory fasteners, and one of the two ashtray cover slide channels was damaged, but it had been repaired with a screw that was run from the top of the console through the channel. The hole in the console would have to be fixed, and a new screw would be needed to make a better quality repair.
With the console cover removed from the frame, the automatic range selector and shifter slider were detached from the underside. The black shifter slider, which fits over the shifter handle, had cracked in several places and had been taped back together numerous times. The slider would be replaced during the rebuilding of the console. The glove box cover piano hinge was separated from the console frame, and the cover was set aside for repair.
With the console completely disassembled, the first task was to fix the console cover that had been poorly repaired previously. The factory ashtray housing screw had broken off, and in an attempt to fix the problem, a previous owner drilled and tapped the damaged bolt with no success, hence a hole had been drilled through the console cover, and a screw and nut were used for the repair. The result of the repair was functional, but the aesthetics of the console were extremely poor.
Our fix was to drill and tap a new hole on the underside of the console cover. There was just enough lip on the underside to accept the drilled hole. After the hole was tapped, we threaded a non-factory screw through the ashtray housing, around the ashtray door slider, and into the console cover. The fix was successful, and nobody will ever know this step was performed unless we inform them of the repair.
To address the three holes that had been drilled into the console cover, we used a 3M Scotch-Brite brown roloc disc on our 90° die grinder. The objective of the roloc disc was to smooth the high points around the drilled holes without removing any metal from the surface of the console cover. Once the holes were flattened, we cleaned the console cover to remove all the debris that had accumulated since 1967.
Instead of welding the holes closed and then sanding and painting the console cover, we found Detroit Muscle Technologies, LLC. offered a plastic overlay in a matte silver color to simulate the painted areas of the console cover. The overlay for our Dart (#AXX6668OL12-SILVER) was a .030-inch thick, laser cut 3M adhesive backed overlay, which fit our console cover and the glove box cover perfectly. If you prefer a woodgrain overlay Classic Industries has a few options on their site.
After the inlays were in place we installed our new slider plate and range selector covers. We purchased a new console shifter slider from Classic Industries (#MD4005) for $19.99. Our automatic range selector was in good shape and was able to be polished. If yours is cracked or in disrepair Classic Industries offers a new one for $39.99 (#MD4004). The rest of the console cover components were cleaned and reassembled.
Once the console cover and the glove box cover were finished, we repaired the four holes drilled into the console frame. Each hole was ground down about 1/8-inch below the surface of the console frame. We filled the holes with Perfect Plastic Putty (part no. BD44), and once set, we progressively sanded the console with finer grit sandpaper until we reached 4000-grit, which provided the smoothest finish we could achieve.
We had a concern that the console texture would not look correct (actually the texture was sanded off), and the repair would be easily seen. It turns out SEM Products not only makes paint supplies, but they make a texture paint, which we could use to simulate the texture of the console frame. We picked up a spray can of SEM black paint (part no. 15011), SEM texture paint (part no. 39853), and SEM clear coat (part no. 13013) for our console.
The black paint was sprayed onto the frame with the same technique used with most paints. We laid down several light coats until we had completely covered the frame. The technique to apply the texture to the console took some setup and a different application technique. The texture we desired required the spray nozzle to be between 18- to 24-inches from the surface. Additionally, spraying from above the surface and allowing gravity to pull the texture paint onto the surface provided the best results.
We laid down four very light coats of texture paint onto the console. After the last coat of paint dried, we used 800-grit sandpaper to lightly knock down the high points on the texture. We cleaned the console frame, and then we reshot a few coats of black paint onto the console. The texture pattern was satisfactory so we cleared the entire console.
We let the console sit for 48 hours before we added the finishing touches. The console originally came from the factory with carpet around the entire lower circumference. Ours was missing, so we ordered a pre-cut black carpet for the console from Classic Industries (#MA684801). The pre-cut carpet was test fitted to the console, and once we were sure the fit was correct, we marked the carpet’s position on the console and then removed the carpet.
The console frame and the carpet were sprayed with 3M adhesive, which was allowed to dry to a tacky finish before the carpet was installed. It was crucial to make sure the carpet was placed where we wanted it during the installation because the adhesive was not forgiving if an error occurred.
We worked slowly and deliberately as we pressed the carpet into place. We completed the installation of the carpet with the exception of the two tails that folded around the front of the console because we needed access to the front mounting screws before we wrapped the carpet around the console.
With the console reassembled, we maneuvered it over the shifter handle dropping it between the bucket seats. The four mounting screws were threaded into place, and the two carpet tails were wrapped around the front of the console frame. The shifter was pushed into the park position before a new shifter knob, spring and button were installed.
We purchased a new button (#MP80105) and spring (#MD4015) from Classic Industries. We installed both before threading the knob onto the shifter. The button spring were reproduction components that fit perfectly onto the factory shifter. The shifter button was tested by depressing it, and the shifter moved freely from position to position.

Fortunately for us the top plate and major components were in great shape and did not need to be replaced. If you are not as lucky, Classic Industries offers new top plates for four speed and automatic transmissions. Along with complete shifters, four speed shifter boots, ash trays and more for A, B and E-body Mopars.
With the help of Classic Industries we were able to refurbish the console without spending a large amount of money for NOS parts. The repair may not be perfect for a concours restoration, but for our Dart, it is more than presentable. If you have an automatic or four-speed console, all that is required to produce similar results are a few tools, a little mechanical aptitude, and some patience. Call Classic Industries to order up the parts needed and get to work restoring your Mopar’s console.


 Mopar Connection Magazine – The ONLY Daily Mopar Magazine © 2022. All Rights Reserved. Mopar Connection Magazine is the ONLY daily Mopar Magazine bringing you the latest Mopar news, technology, breaking news, and Mopar related events and articles. Find out the latest information about Mopar, Mopar products and services, stay up to date on Mopar enthusiast news, dealership information and the latest Mopar social media buzz! Sign up for the Mopar Connection Magazine newsletter for the latest information about new products, services and industry chatter. Mopar Connection Magazine is the best and only source you need to be a Mopar industry insider!
 by
by