


We all know one of the biggest headaches in fixing up old cars is gauges that don’t work. Some of you might shake your head and say, “Who needs gauges?” In reality if you’re planning on driving your car around town or even to local car shows, you need gauges. You can diagnose and prevent a lot of problems just by looking at a couple simple gauges. One of the more important gauges is your fuel. If we are out cruising around town the last thing we want to do is run out of fuel and have to walk or get towed somewhere just for some fuel. It’s a common problem on many classic Mopars that the fuel sending unit is the main cause of fuel gauge problems. Recently, we experienced just that in our Project Orange Crush. We knew the day would come that the factory fuel sender would give up. Who can blame it after 40+ years and countless fill ups? It was bound to happen. Luckily, Classic Industries was there to provide us with a new factory style fuel sending unit that we needed and fast.
It happened after a long drive. The fuel gauge was working fine, we stopped to get more fuel and filled the tank. We got in the car, started it up and watched the fuel gauge start to climb and took off. We know it takes a couple minutes for the gauge to completely move to full after a fill up. We continued to drive around town that evening. We didn’t really look at our fuel gauge much because we filled up and knew we didn’t do much driving. We pulled in the driveway and right before we shut the car off we noticed the fuel gauge. Not only was it showing full but it was past full. Normally, when completely full, the fuel gauge when is on the full mark, but never past. It was currently showing close to a quarter tank past full. We thought it might be glitch and will work its way out next time we drive it. After driving the car around another day we noticed the fuel gauge hadn’t budged. We knew how far we drove and the fuel gauge should have been close to about half a tank. We checked fuses and made sure it was still hooked up and everything checked out. There wasn’t much else we were going to do and headed back home. Once we pulled the Orange Crush back in the garage we started to do some research to see why it wasn’t moving.


Above: You can see the 5/16″, 3/8″ and 1/2″ fuel tank sending units Classic Industries offers for all 1963-73 A-bodies
First , lets look at how a fuel sending unit works. Fuel sending units work off of Ohms. An Ohm, according to Merriam-Webster dictionary, is “the practical meter-kilogram-second unit of electric resistance equal to the resistance of a circuit in which a potential difference of one volt produces a current of one ampere”. For a lack of better words, an Ohm is a measurement of electrical resistance. Fuel senders have a rheostat that provides a resistance to ground that will create Ohms. As the fuel arm moves from empty to the full position a contact is moved across the board on the rheostat which varies the Ohms seen by the fuel gauge. For example most classic Mopar and AMC stock fuel gauges have a 73-10 Ohm fuel sender. When the tank is empty, the arm will move to the bottom of the tank and the rheostat will create 73 Ohms of resistance. When the tank is full, the float on the arm will make the arm rise and the rheostat will create 10 Ohms of resistance. The needle in the gauge on the dash will move according to the Ohms are being created.
Our fuel gauge was pegged past the full mark which point to the rheostat not creating any Ohms. There could be multiple reasons for this scenario. Potentially the wire running from the gauge could be grounding out on the body and causing the rheostat to read 0 Ohms. The other scenario is the center terminal on the sending unit itself is grounding out on the body or something inside the sending unit is bad. The easiest way to check the sending unit is to disconnect it from the lead wire and turn the car on. If the gauge still reads full or past full, the wire between the sending unit and the gauge is grounded out and the sending unit might be OK. If it reads empty that means the wire between the gauge and sending unit should be OK and there’s in issue with the sending unit. When we disconnected the lead wire our gauge read empty, so we knew our lead wire from our gauge was fine and that something in the sending unit was bad.


Above Left: During removal process, used a jack and some boards to help lower the half full tank. Above Right: Tank has been removed and ready to be emptied.


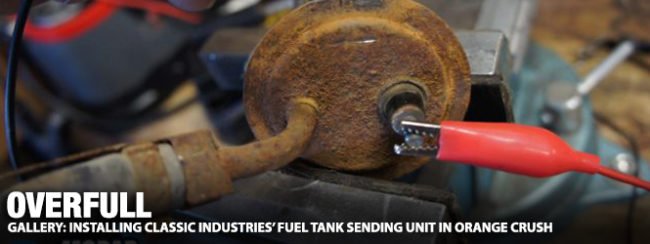
Above: You can see how we used a flat blade screwdriver to help turn the lock ring on the sending unit. You can also see how rusty the lock ring was underneath.
Not all bad sending units will only read past full like ours, sometimes the car reads empty all the time. If your gauge only reads empty there are a couple steps to take to see if the problem again lies within the lead wire or the sending unit. First, remove the lead wire from the sending unit and check to make sure it has power when the key is on. If there is no power present you might have a break in the lead wire and will have to trace the wire all the way back to the gauge. If it has power the sending unit may not be properly grounded. You can easily ground the unit by temporarily running a ground wire from the unit to a spot on the frame. This can be done by just a bare wire wrapped around the fuel outlet tube or by using a small alligator clip and clamp to pin it to part of the sending unit and the other end to the frame. Afterwards, if the unit is grounded and the gauge still reads empty, then the sending unit itself is bad.
Once we have determined that our sending unit is bad, its time to drop the tank and pull the sending unit. Depending on your setup, you might be able to fish the sending unit out of the tank without dropping it. In Project Orange Crush, we have a Reilly Motorsports Street-Lynx triangulated 4-link which eliminated the leaf springs. This set-up made it easier for us to drop the tank vs. trying to remove it while still in the car.
Prior to dropping the tank, make sure you have the lead wire disconnected from the sending unit, fuel vent disconnected and fuel line disconnected. You may also choose to remove the fuel filler neck but we had room to slide the filler neck off as the tank was being removed. Hopefully if this happens to you, your tank is close to being empty. Our tank was just over half full. If you do the math, 1 gallon of fuel weighs about 7.5 pounds, and our tank holds 16 gallons total, which equals about 120 pounds when full. Cut in half, that’s about 60-70 pounds. Regardless of whether you’re on the floor wrestling with it, or removing it from overhead, thats not light. Aside form the weight, it also creates a mess when the fuel sloshes out the fuel outlet tube or the filler neck hole.

Above: When testing you have to make sure to get good contact with the sending unit on both the ground and positive.


Above left: Here you see us holding the float in the full position the multimeter is reading just over 00.8 Ohms which is below the 10 Ohm spec. Above right: With the float in the empty position the multimeter reads only 00.9 Ohms, which is way below the 73 spec and makes sense why the gauge still reads full.
Once the tank was removed we drained the remaining fuel that we weren’t wearing or hadn’t spilled out of it. With all the fuel out of the tank, we started to work on removing the fuel sending unit. On the outside of the sending unit is a lock ring that holds the unit in the tank. These lock rings tend to become rusty over time and can be difficult to remove. We used a flat blade screw driver and hammer to tap the ring counterclockwise to loosen it. It took some strong swings with the hammer for it to break free. If the lock ring is really rusty, we recommend spraying it with a rust penetrator to help loosen and allow the ring to turn.
With the lock ring removed, you can now pull the sending unit out. You may have to slightly pry on it as there is a rubber gasket between the sending unit and the tank which, with time, tends to bond together. With the sending unit free, you will have to rotate it to get the pickup tube and float arm out without bending them. After pulling the sending unit out we used a flash light and looked around on the inside of the tank to see if it needed replacing. We haven’t noticed any major dirt in our fuel filters but wanted to double check while the tank was out. We couldn’t see any flaking or debris on the inside and decided not to replace the tank right now.
With the sending unit out we wanted to test it to ensure it was bad. You may need assistance from another person or use a vise to hold the sending unit while checking the Ohms. To test it you will need a multimeter. First, turn the multimeter to the Ω setting then put the red probe on the post where the lead wire goes, then place the black probe on the ground post or body of the sending unit. Move the float to the full position and record the Ohm reading. Then, move the float to the empty position and record that reading. When its full the Ohms should be around 10 Ohms and as we previously stated, it should read 73 Ohms empty. As suspected, ours read 0 Ohms in both positions. Somehow the stud where the lead wire goes was grounding itself to the sending unit and creating no resistance.

Above: You can see the comparison of the old and new sending units.


Above Left: The filtration Sock came right apart and ready to start clogging up our fuel system. Above Right: You can see the extra return fuel line that we capped off until we install our Edelbrock EFI.
After confirming that the sending unit was bad, we found another issue that hadn’t previously crossed our mind. At the end of the pickup tube there is a filtration sock. It’s the first line of defense of keeping any debris from being sucked into the fuel line and making its way to the carburetor. These socks deteriorate and are normally non existent with a sending unit of this age. At first glance the sock looked to be in good shape, but as soon as we touched it, it began to disintegrate. The whole sock peeled right off the pickup tube without much effort. For us, this was just another reason we needed to replace the sending unit.
Once we had decided that a new sending unit was going to be the cure, we called up Classic Industries to order a new sending unit. Our car was originally a slant 6 car which meant that it came from the factory with a sending unit that has a 5/16” pickup tube. Depending on your HP rating and fuel type that might cause some issues. Classic Industries offers 5/16”, 3/8” and 1/2” pickup tube options for their sending units. We have plans for a bigger motor and fuel injection that requires a 3/8” fuel line, so we chose to go with the 3/8” pickup. If you’re looking to run E85 or high horsepower you might want to go with the 1/2” pickup. The other great option that came on our new sending unit was a 1/4” fuel return line. With the Edelbrock’s Pro-Flo 3 EFI system and many others, they require a fuel return line back to the tank. This will allow us to hook straight into the fuel sending unit and not have to modify our tank for a return line. We ordered our new sending unit online and it arrived a few days later.
Before we installed the sending unit we decided since the tank was out, we should touch it up. We restored the tank a few years ago but the car has seen quite a few miles on the road and track since then and decided we would give it a fresh coat of paint. There were a few spots where gas leaked and ate the paint plus some rock chips. We put our old sending unit back in the tank to plug the hole and then taped off all openings and vents. We used a wire wheel on a drill to hit any spots that were flaking and where gas ate the paint away. We wiped the rest of the tank down with a cloth to remove any dirt. After letting any remaining stray fuel dry, we used gloss black engine enamel to coat the whole tank. High temp engine enamel has some resistance to fuel and other chemicals that should help prevent the paint from peeling or being ate at a later date.


Above Left: The tank was taped up first to prevent any debris entering the tank. Above Center: The tank is being prepared for paint by being wire wheeled and sanded. Above Right: We wait for the tank and straps to dry.


Above: The fuel tank is back in the car and everything hooked up.
Once the paint was on and the tank dried it was ready to reassemble and put back into the car. The new sending unit came with a new rubber gasket and lock ring. Before you start to install the sending unit make sure you install the new rubber gasket first. You can install the sending unit with the gasket as one piece and it’ll lock into place but your fuel tank will leak and you will have to do this process all over. Our gasket was in a plastic bag taped on the inside of the box, so be sure to thoroughly check your package.
We choose to slide the gasket over the float and filtration sock and then worked its way up the sending unit until it reach the backside of the sending unit. With the rubber gasket installed we started to insert the sending unit back into the tank. We found it easier to insert the float first and then the filtration sock. The rest should go smoothly as there is a tab on the backside of the sending unit and will only allow the unit to be installed one way. If it isn’t sitting flat against the tank, continue to rotate the sending unit until the tab falls into the notch it sits flush.
After the sending unit is sitting flush against the tank with the rubber gasket in between, it was time to install the lock ring. There are three spots on the lock ring that will line up with the three tabs on the tank. The lock ring will sit flat against the sending unit and you should be able to start hand turning the lock ring clockwise to get it started. The lock ring should be under each one of the tabs on the fuel tank. Once the ring lines up the tabs, go ahead and take your screwdriver and tap the lock ring clockwise until it locks into place.


With the sending unit installed, its time to get the tank back in the car. We started by installing the gas tank straps into their retaining hole and left them hanging until the tank was in place. The next step was sliding the filler neck into the tank and then working the tank into place. Once it was in place we hooked our J-bolts in and installed the straps. Once the straps are nice and tight, you’re ready to hook up the fuel line, lead wire, and fuel tank vent. As we previously mentioned, the new sending unit also had the 1/4” fuel return line to hook up but we weren’t ready for it yet and decided to plug it for now.
After we got everything installed and hooked up, we put fuel back in the tank. Then, it was time to see if we made the right call. We turned the key to the on position and the gas gauge slowly started moving and stopped about half way. We knew this was correct because because we put about 8 gallons back in the tank. We went ahead and started the car and let it run for a couple of minutes and then shut it off. We crawled back under the car to make sure none of our connections or sending unit was leaking any fuel. Everything was dry and we were road ready!
Looking back, we could have saved ourselves a lot of headache if we would have installed one of Classic Industries fuel tank sending units when we restored the tank a few years ago. It’s said that you learn from your mistakes, so please learn from ours. Who knows, maybe some of the issues we have had encountered the last couple years were due to the filtration sock clogging up filters or the small 5/16’ pickup not flowing enough fuel. We may never know but at least now we have confidence that our fuel system will perform like it should and we will not be stranded on the side of the road because we didn’t know how much fuel was left. This was an inexpensive fix and took us less than a day total to complete. If your car’s fuel gauge isn’t working or is working but has been in the car since it was new, do yourself a favor and call Classic Industries to order one today.


 Mopar Connection Magazine – The ONLY Daily Mopar Magazine © 2022. All Rights Reserved. Mopar Connection Magazine is the ONLY daily Mopar Magazine bringing you the latest Mopar news, technology, breaking news, and Mopar related events and articles. Find out the latest information about Mopar, Mopar products and services, stay up to date on Mopar enthusiast news, dealership information and the latest Mopar social media buzz! Sign up for the Mopar Connection Magazine newsletter for the latest information about new products, services and industry chatter. Mopar Connection Magazine is the best and only source you need to be a Mopar industry insider!
 by
by