


For today’s modern daily-driven passenger cars, the electric fuel pump is expected to last the lifespan of the car itself. So why is it that our ne’er-do-well ’69 Dodge Charger project car has burned up two of them in the space of little over a year? As is with most things, it was the fault of the installer (yours truly) who had failed to makes certain preparatory steps prior to setting out on the road. Albeit bumpy, the path to the installation a Sniper EFI Conversion Fuel Tank and High Flow Pump from Holley, came about after receiving quite the education via the hard way.
In June of 2016, we installed the FAST EZ-EFI 2.0 system to our Charger’s 535ci. stroker RB440. The package comes with the option of an in-tank or external “in-line” fuel pump; we had chosen the latter. The supplied Bosch pump was mounted on the inside of the Charger’s subframe connector (the fuel line ran up the inside of the subframe from the pickup, to the pump, into the fuel filter and through the pressure switch). For whatever reason, we battled with abysmally low fuel pressure (the FAST system requires between 33-and-43psi, we had at certain times, a little over 14psi).
Despite the performance-level duty cycle of the supplied fuel pump, we were starving the engine of necessary fuel. The pump fatefully gave up the ghost, spurring us to rethink our setup. There were no kinks or tight bends in our 3/8-inch fuel lines. The filter was clear. Even all wiring was well-grounded, soldered and wrapped at the connections. So what had we done wrong? With a fresh replacement pump, we went about wrapping the pump itself and all of the line running from there back to the fuel pickup in DEI (Design Engineering, Inc.) Velcro-lined heat wrap believing our fuel line’s proximity to the 3-inch exhaust to be our culprit.
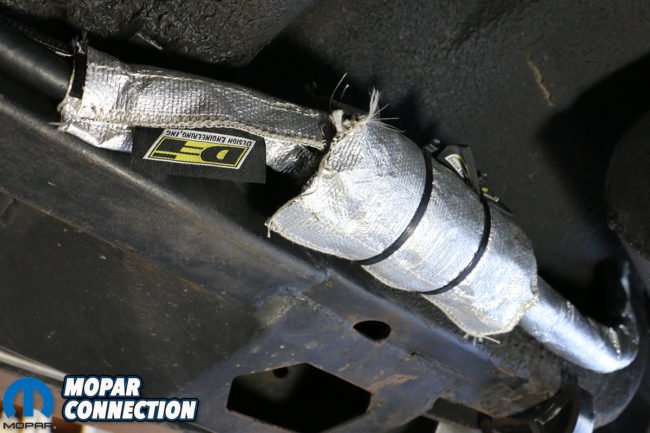

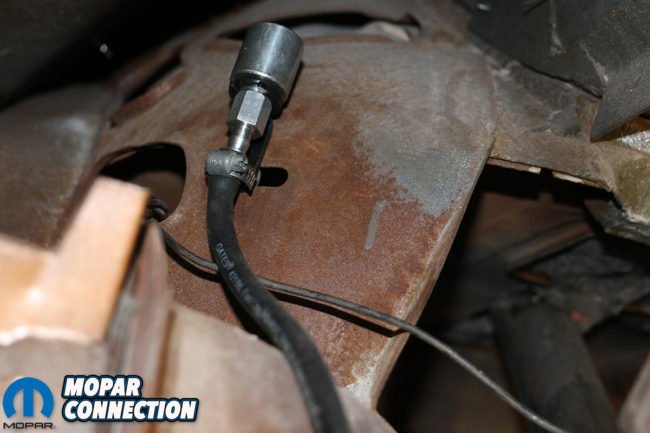
Above left: Eating up two fuel pumps in a single year meant we had done something wrong when we first set up our FAST EZ-EFI 2.0 system. After burning up our first fuel pump, we wrapped our replacement pump and most of the fuel line in DEI heat wrap. Above right: After the second pump gave up, we discovered that we had been strangling our fuel pumps by running too small of a fuel pickup (5/16-inch). An aftermarket 1/2-inch pickup (with a return line tube) from Vans Auto finally gave us the fuel supply our stroker 535ci wedge needed.

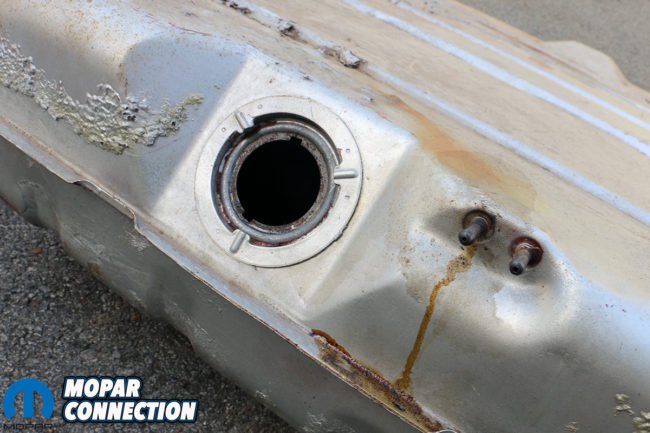
Above left: The black material you see on the top of this ’69 Charger fuel tank is extra HushMat vibration/sound deadening material we had from a previous technical article. The red-and-blue AN fitting was the large return line inlet we made during our EFI installation. Above right: The tank shown here is from a ’70 Super Bee tank came with two breather line ports from the factory.
And for months, we were somewhat satisfied with the fix; pressure was still on the low side (high-20s) but improved. Yet, whenever we hammered the throttle, our AFR (air-to-fuel ratio) would lean out horribly, almost to the point of piston-injuring pre-detonation. So again, we were left wondering, what had we done wrong? The answer came in the form of a question from Duane Schneider of Vans Auto; “What size pickup is in the tank?” Although not an original R/T, the Charger had come with a 383, leading me to assume it was a 3/8-inch pickup. I was wrong.
“Only the 440 and Hemis came with the larger fuel pickup. Everything else had the smaller 5/16-inch pickup,” Mopar Connection Tech Editor Mike Wilkins explained further. “The big ‘tell’ was the return line. The bigger engines had a return line when the others didn’t.” And true to his word, our Charger did not have a return line. In fact, we had repurposed the stainless fuel line already in the car to serve as the EFI system’s return line, while plumbing new 3/8-inch hose all the way up to the throttle body. Thankfully, Vans Auto makes replacement fuel pickups – including a custom 1/2-inch – which we bought immediately.
The fuel tank was dropped, the new pickup/sending unit was installed, 1/2-inch EFI-rated hose was plumbed from the pickup to the fuel pump (with a larger fitting) with 3/8-inch line running the length of the car forward. With a twist of the ignition, our fuel pressure read a steady 42psi. BAM! Our problem solved, or so we thought. Over the course of several months, the steadiness of our fuel flow had declined ever since we drove into the sweltering mid-June heat of Bowling Green, Kentucky, for the final stop of the 2016 Hot Rod Power Tour.

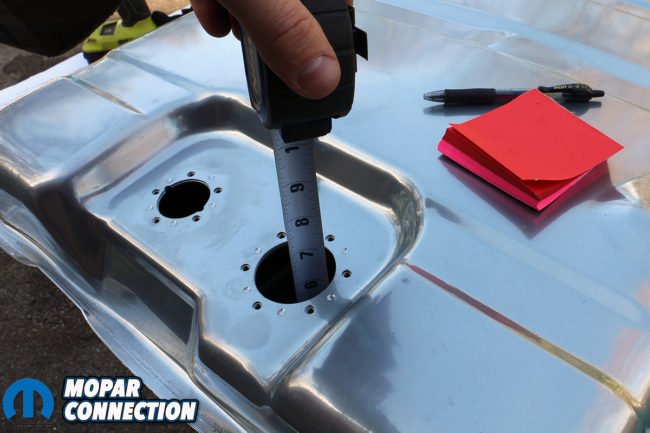

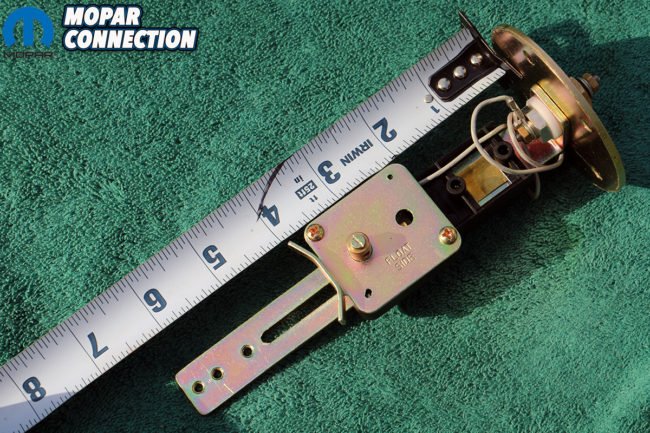
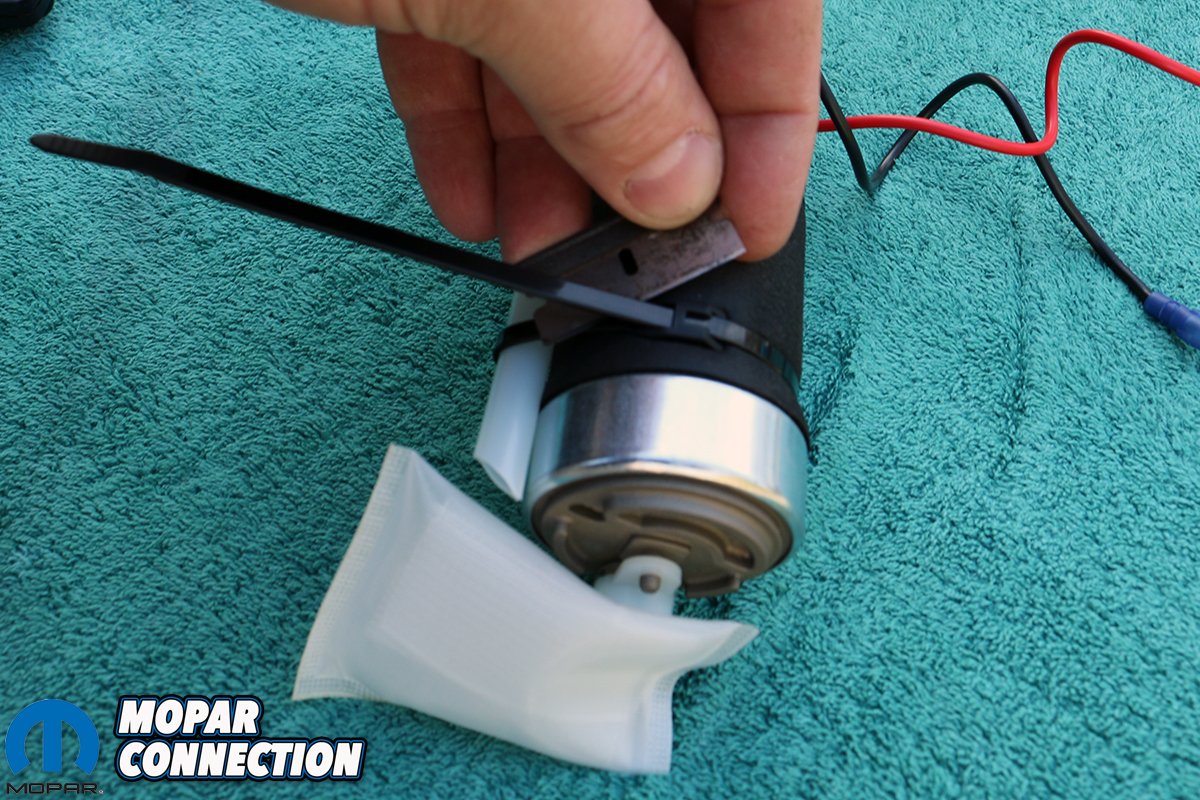
Above left: Given that the Sniper EFI Conversion Tank Kit came with the lower-rated 255 lbh pump, we opted for Holley’s “big daddy” 400 lph Walbro fuel pump. Both the kit and separate pump all come complete with the hangar assembly, sending and return tubes, tie downs and wiring. The rest of the tank kit included the fuel level sender, rheostat, float arm, gaskets and hardware. Above center: The first step in installing your fuel pump is taking a depth measurement. Above right: Then, with the pump assembled, take a total length measurement (subtracting 1/8th of an inch for the mounting plate) and subtract that from the total depth of the tank. That distance is how long your sending tube should be.
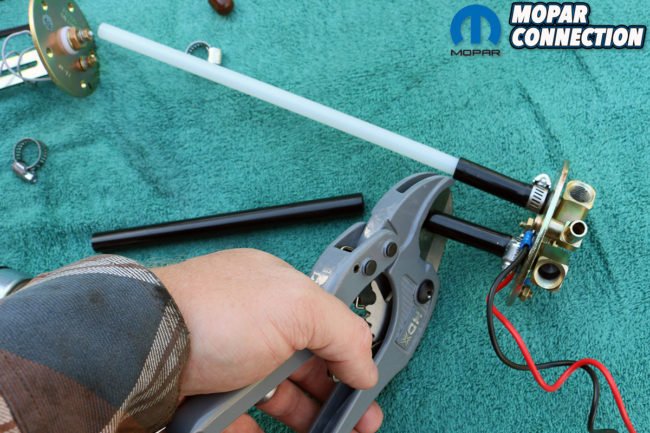

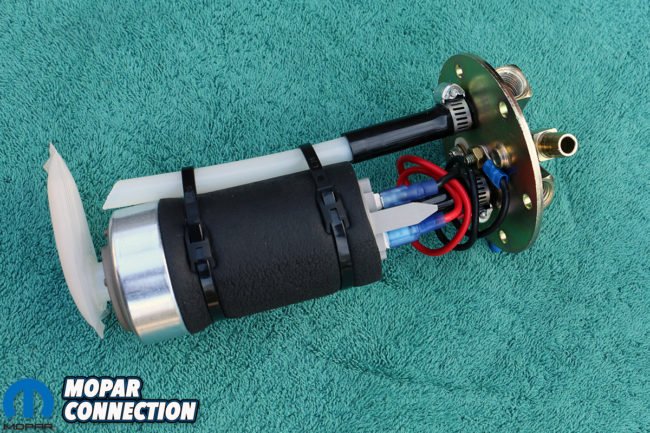
Above left: Using a good pair of tube cutters, trim your sending tube to the devised length (achieved by subtracting the total pump length (at the base of the nipple) from the total depth of the tank). Above center: Next, trim the opaque return tube 1-inc shorter than the total depth of the tank, careful to cut the end at a 45-degree angle. Finally, zip-tie the return tube to the installed fuel pump. Above right: Two items: the plastic tubes are stiff, so a heat gun may be necessary to soften the sending tube enough to install the fuel pump. Next, be mindful to turn your hose clamps inward so they don’t interfere with the space needed on the mounting plate to mount it down flush with the tank.
The 110-plus-temperatures outside only meant that the heat beneath the car was all-but boiling the fuel as it passed through the pump, injuring the turbine and burning up the armature. The phenomenon is called “thermal shock” and it can quickly destroy the effectiveness of your fuel pump by “causing uncontrolled clearance adaptation, which can result in sticking/scuffing of the fuel valves, fuel pump plungers, and suction valves,” according to famed fluid dynamic engineer Håkon B. Thoresen.
Fuel starvation had killed our first fuel pump, and now extreme heat had done our replacement in. It was time to rethink our setup yet again. Apart from the inconvenience of access, in-tank fuel pumps have a decisive advantage over externally-mounted in-line pumps as far as cooling goes. Temperatures inside of a fuel cell can range upwards to 20-to-30 degrees cooler than those outside, allowing the pump to run smoothly and reliably. Moreover, the relocation inside of the tank also significantly reduces noise, as the electric whir of the high volume pump is muffled inside.
Our solution came quite easily. Recently, Holley released its Sniper EFI Fuel Tank System Kit. Holley took particular care in making its EFI conversion fuel tanks as correct-fitting as possible while offering some marked improvements over a factory-stock tank: first, each tank is supplied by Tanks, Inc. and includes a large 4.3 liter internal fuel tray that surrounds the pump preventing fuel starvation, the baffles reduce both fore/aft and side-to-side sloshing, giving the sender a more precise fuel reading; and each tank is made from galvanized steel and then powder coated for corrosion resistance and protection, but also adds better regulated in-tank temperatures as well.


Above left: Here we have 1. the tank taken from our ’69 Dodge Charger, 2. a tank taken from a ’70 Dodge Super Bee, 3. the Sniper EFI Conversion tank. All of the tanks from Holley are manufactured by Tanks, Inc., are made from stainless steel and powder coated. Above right: Each tank is internally baffled to prevent fuel starvation of the pump or sloshing, unlike factory tanks which do not. These attributes alone should be enough to convince most performance enthusiasts to make the change.
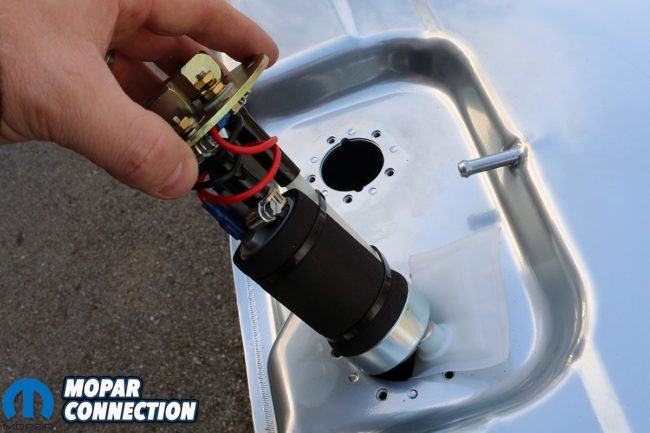

Above: As we discovered first hand, installing the larger diameter fuel pump will be tricky – it’s not impossible, and you can do it without having to trim, grind or cut. We promise you.
The kit too is impressively comprehensive, including a 255 lph (liters per hour) fuel pump with a complete hanger assembly, two oven-brazed ¼-inch NPT supply and return line port fittings capable of supporting up to 550 EFI (@ 60 PSI at 13.5 volts/10.4 AMP draw); and an adjustable fuel level sender calibrated to the correct Ohm range to work with factory gauges; a Y-fitting for the vent tubes; a roll-over check valve (breather); OE-correct tank straps; O-ring gaskets and stainless hardware.
Seeing that our 535 stroker made 700 lbs. ft. of torque and over 640-horsepower, we opted for Holley’s optional 400 lph electric fuel pump. Capable of up to 100psi, the larger Walbro pump also featured the large oven-brazed ¼-inch NPT supply and return line ports, in-tank wiring harness, heavy 10 gauge no-warp mounting plate, and barbed vent fittings. This, and the powder coated, baffled fuel tank, would ensure that our Brazen Charger would remain fed a fresh supply of fuel reliably, whether cruising or hammering on the throttle.
Installing the fuel pump and sender gauge was an easy-to-follow process that requires some measuring and cutting. First, we took the depth of the tank using a measuring tape. With this depth in mind, we measured the total length of the fuel pump (with the fuel sock firmly installed), subtracted the difference, and trimmed the black supply tube accordingly. With the pump installed, the total depth should match your first measurement (it’s suggested to warm the supply tube with a heat gun to allow the pump to slide on easier).
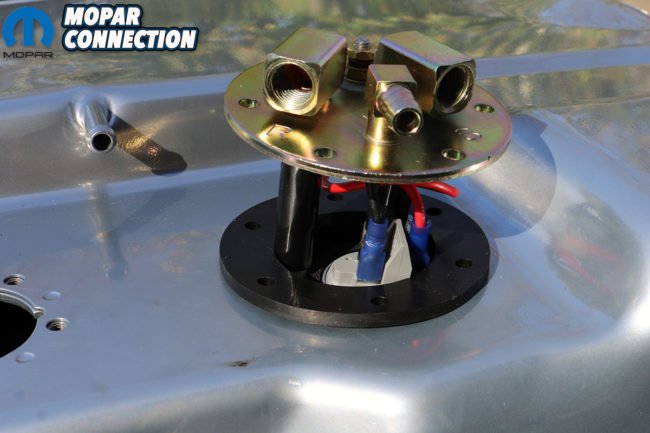
Above left: Both the wiring and hose clamps needed to be moved/rotated around a couple of times to provide enough clearance for the mounting plate to be tightened down flat and flush. Also notice that there are two vents, one for the pump itself and the other for the tank. These will need to be plumbed into the supplied Y-fitting and to the ball valve at or above the filler cap. Above right: Looking inside, the fuel pump is completely surrounded by baffling to keep the pump from ever starving for fuel. Likewise, Holley strongly recommends never going below a 1/4 tank so that the pump has enough gas to soak in to keep cool.

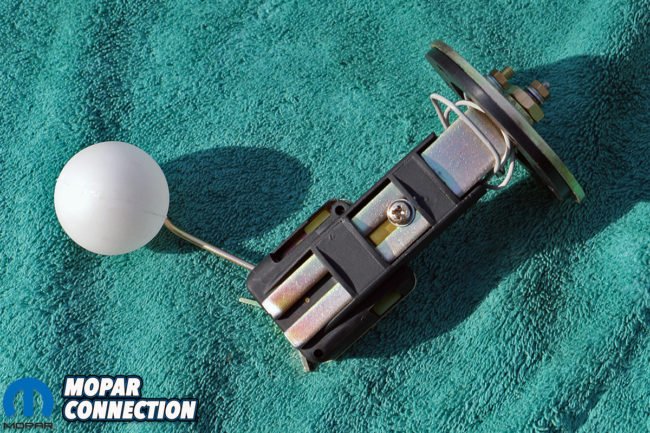
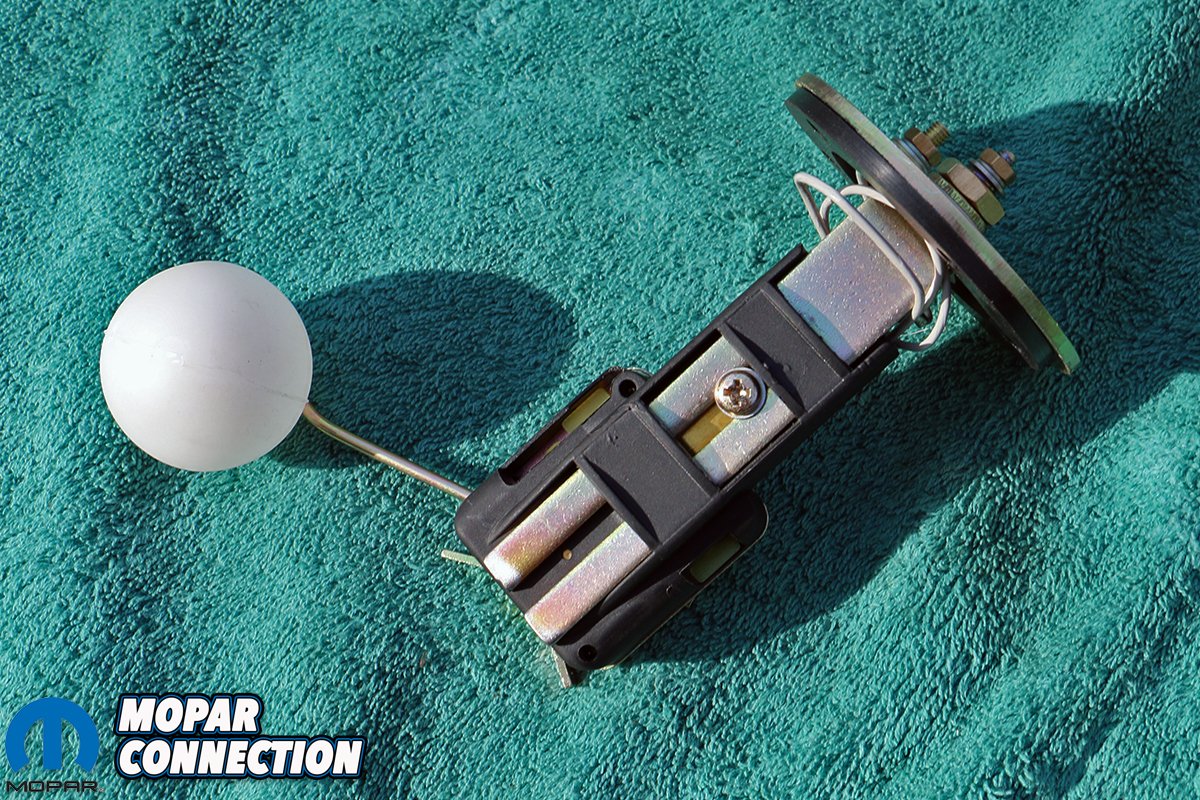
Above left: The fuel level sending unit came with an extension bracket that we didn’t need. In fact, the base bracket was too long too. We began by measuring the total length of the sending unit’s bracket, and aligned the float arm’s pivot to at exactly half the depth of our tank. Above center: Next, with the float arm installed, we measured its length when set at maximum height (save for 1/8th of an inch for the mounting bracket), and marked the excess length on the float arm. Above right: With both the rheostat bracket and the float arm trimmed and smoothed on a bench grinder wheel, our fuel sending unit was ready to install.
Next, we trimmed the opaque return line 1-inch short from the bottom of the total depth at a 45-degree angle. Holley instructs that the two supplied zip-ties should wrap the return tube to the pump. We also discovered that the wires and terminals on the underside of the flange need to be rotated inward as much as possible to clear the mating surface. Because we went with the larger 400 lph pump, fitting the assembled pump into the 2 1/8-inch opening is tough but it is doable. (Remember not to forget the thick rubber gasket.)
Since our total tank depth was so shallow, we didn’t need the supplied extension for the fuel level sender. We removed the two screws and nuts from the lower bracket and removed the extension. We also loosened the screws on the plastic rheostat housing and removed the housing itself. This allowed us to measure and mark our mounting bracket and cut off any excess material. After cleaning up our cut on the bench grinder, we reinstalled the rheostat at exactly half the total depth of our tank (using the rheostat’s pivot point as our center mark).
Per Holley’s instructions, we measured the float arm’s length with the float approximately 1/8-inch below the bottom of the mounting plate and trimmed off the excess material (allowing the float arm to move freely without the excess interfering). Installing the gasket next, the fuel level sender and float arm were wriggled into the tank and indexed so that the arm extended out into the tank, careful that it wouldn’t bump into the in-tank baffling.


Above left: Holley has all of their fuel level sending units calibrated to the right Ohms so that they’ll read properly with your factory gauges. The internal fuel pump emits a muffled whir from inside the tank compared the noisy whine of an in-line, externally-mounted pump. Above right: With our factory tank removed and our Charger in the air, we were ready to install our new Sniper fuel tank. Tanks, Inc. provides these to Holley, and are guaranteed to match all factory OE sizing and dimensions. This might look custom to many of you, but it fits in the factory location without a hiccup.
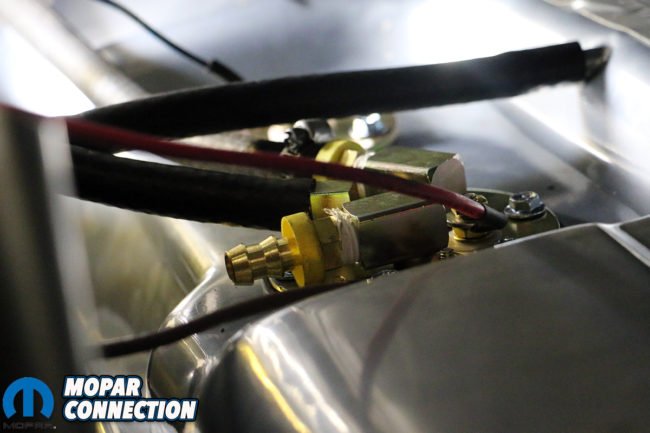
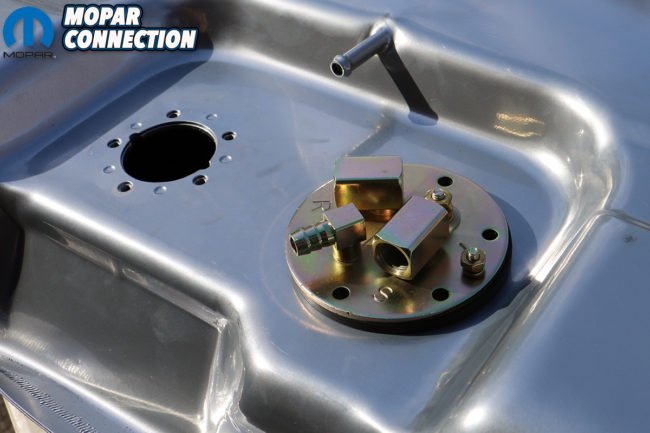
Above left: Before tightening down the J-hooks holding the straps, we snapped this picture to show the vent tubes from the tank and the pump joining at the Y-fitting, as well as the barbed hose fittings tightened into the two ¼-inch NPT supply and return line ports. Because the vent lines are not under any pressure, hose clamps weren’t necessary. Above right: Routing and plumbing the roll-over check valve proved slightly trickier, as we ran to run it up through the filler neck grommet, atop the wheel well and to the inside of the C-pillar just to be equal to the filler cap on the quarter panel.
Thankfully, all that was needed to pair the FAST EZ-EFI 2.0 system to the Sniper EFI Fuel Tank System Kit was a few feet of 12 gauge wire to extend our loom from the previous pump location all the way to the tank. All of our previous wiring (fuel sender ground and signal to the dashboard) was left as-is. The tank kit does not come with a replacement filler neck, so we simply reused the same one we had. From the factory, the filler neck had a vent tube that began at the top (connected via a double-clamped 2-inch length of fuel line) and exiting back down through the trunk floor.
Due to the high volume of fuel being moved through the fuel tank, a larger, billet roll-over ball valve-style breather was supplied with the tank kit. This breather needs to be mounted at or above the filler cap, so it was mounted up and inside the Charger’s massive C-pillar, feeding some extra 5/16-inch rubber hose we had, running from the breather to the Y-fitting that connected to the tank and the fuel pump mounting plate with two shorter lengths of tube.
Finally, we double-checked our hose clamps, routed our wiring and hoses so that they were out of the way and reconnected the battery terminal. With a twist of the ignition, the muffled whir of the fuel pump could be heard as it primed the fuel line and the injectors before firing up to a happy 40psi of fuel pressure. Yes, it does read slightly lower at idle than our previous setup, but we rack that up to the smaller gauge line, and out on the street, we saw a far more consistent psi than any time before, whether cruising, romping on the gas or charging on the open freeway.

Above: Although a little shinier than how Dodge’s galvanized stainless steel tanks came from the factory, the thick powder coating provides both a durable, protective seal on our tank as well as help to insulate it slightly, in those rare instances of extreme weather. The straps, albeit black, are a perfect fit and included in the package. From the outside, it’s almost impossible to tell that we’ve made any sort of change – but the heavy baffling and intelligent design of this system will ensure a long life and steady supply of fuel whether idling, cruising the streets, or mashing the throttle.


Having the fuel vent into the trunk is a BAD idea. It should be external of the car. The stock vent on every car I have ever owned is vented to the outside.